Ubuntu – Install Ansible

It should be easy, and it is – but no single-command installation:

administrator@lx-ubuntu:$ sudo apt-get install ansible
Reading package lists... Done
Building dependency tree
Reading state information... Done
E: Unable to locate package ansible

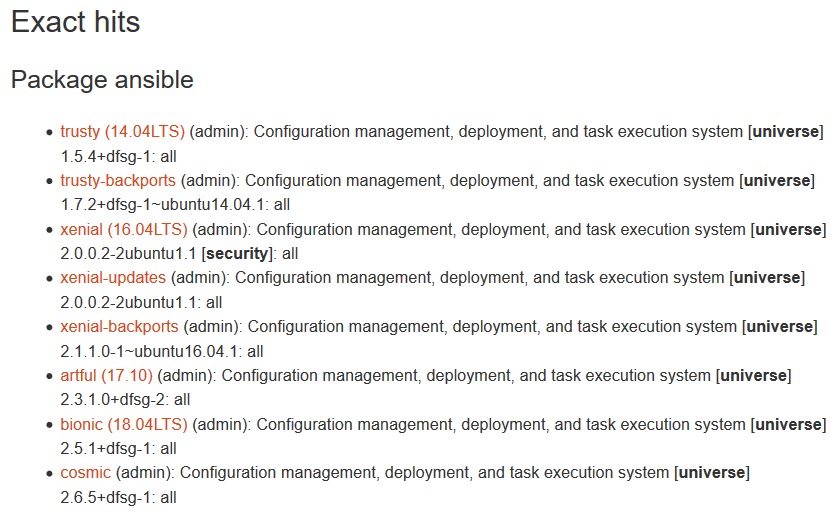
Look at the Ubuntu Packet-Search for Ansible:

  • it’s in the „universe“-repository

Add the „universe“-repository:

administrator@lx-ubuntu:$ sudo add-apt-repository universe
'universe' distribution component enabled for all sources.
Hit:1 http://archive.ubuntu.com/ubuntu bionic InRelease
Get:2 http://archive.ubuntu.com/ubuntu bionic-security InRelease [83.2 kB]
Get:3 http://archive.ubuntu.com/ubuntu bionic-updates InRelease [88.7 kB]
Get:4 http://archive.ubuntu.com/ubuntu bionic/universe amd64 Packages [8,570 kB]
Get:5 http://archive.ubuntu.com/ubuntu bionic/universe Translation-en [4,941 kB]
Get:6 http://archive.ubuntu.com/ubuntu bionic-security/universe amd64 Packages [84.5 kB]
Get:7 http://archive.ubuntu.com/ubuntu bionic-security/universe Translation-en [46.4 kB]
Get:8 http://archive.ubuntu.com/ubuntu bionic-updates/universe amd64 Packages [556 kB]
Get:9 http://archive.ubuntu.com/ubuntu bionic-updates/universe Translation-en [143 kB]
Fetched 14.5 MB in 18s (824 kB/s)
Reading package lists... Done

Now it works:

administrator@lx-ubuntu:$ sudo apt-get install ansible
Reading package lists... Done
Building dependency tree
Reading state information... Done
The following additional packages will be installed:
  ieee-data libpython-stdlib libpython2.7-minimal libpython2.7-stdlib python python-asn1crypto python-certifi
  python-cffi-backend python-chardet python-crypto python-cryptography python-enum34 python-httplib2 python-idna
  python-ipaddress python-jinja2 python-jmespath python-kerberos python-libcloud python-lockfile python-markupsafe
  python-minimal python-netaddr python-openssl python-paramiko python-pkg-resources python-pyasn1 python-requests
  python-selinux python-simplejson python-six python-urllib3 python-xmltodict python-yaml python2.7 python2.7-minimal
Suggested packages:
  cowsay sshpass python-doc python-tk python-crypto-doc python-cryptography-doc python-cryptography-vectors
  python-enum34-doc python-jinja2-doc python-lockfile-doc ipython python-netaddr-docs python-openssl-doc
  python-openssl-dbg python-gssapi python-setuptools python-socks python-ntlm python2.7-doc binutils binfmt-support
Recommended packages:
  python-winrm
The following NEW packages will be installed:
  ansible ieee-data libpython-stdlib libpython2.7-minimal libpython2.7-stdlib python python-asn1crypto python-certifi
  python-cffi-backend python-chardet python-crypto python-cryptography python-enum34 python-httplib2 python-idna
  python-ipaddress python-jinja2 python-jmespath python-kerberos python-libcloud python-lockfile python-markupsafe
  python-minimal python-netaddr python-openssl python-paramiko python-pkg-resources python-pyasn1 python-requests
  python-selinux python-simplejson python-six python-urllib3 python-xmltodict python-yaml python2.7 python2.7-minimal
0 upgraded, 37 newly installed, 0 to remove and 3 not upgraded.
Need to get 12.1 MB of archives.
After this operation, 79.4 MB of additional disk space will be used.
Do you want to continue? [Y/n] y
Get:1 http://archive.ubuntu.com/ubuntu bionic/main amd64 libpython2.7-minimal amd64 2.7.15~rc1-1 [334 kB]
Get:2 http://archive.ubuntu.com/ubuntu bionic/main amd64 python2.7-minimal amd64 2.7.15~rc1-1 [1,292 kB]
Get:3 http://archive.ubuntu.com/ubuntu bionic/main amd64 python-minimal amd64 2.7.15~rc1-1 [28.1 kB]
Get:4 http://archive.ubuntu.com/ubuntu bionic/main amd64 libpython2.7-stdlib amd64 2.7.15~rc1-1 [1,910 kB]
Get:5 http://archive.ubuntu.com/ubuntu bionic/main amd64 python2.7 amd64 2.7.15~rc1-1 [238 kB]
Get:6 http://archive.ubuntu.com/ubuntu bionic/main amd64 libpython-stdlib amd64 2.7.15~rc1-1 [7,620 B]
Get:7 http://archive.ubuntu.com/ubuntu bionic/main amd64 python amd64 2.7.15~rc1-1 [140 kB]
Get:8 http://archive.ubuntu.com/ubuntu bionic/main amd64 python-asn1crypto all 0.24.0-1 [72.7 kB]
Get:9 http://archive.ubuntu.com/ubuntu bionic/main amd64 python-cffi-backend amd64 1.11.5-1 [63.4 kB]
Get:10 http://archive.ubuntu.com/ubuntu bionic/main amd64 python-enum34 all 1.1.6-2 [34.8 kB]
Get:11 http://archive.ubuntu.com/ubuntu bionic/main amd64 python-idna all 2.6-1 [32.4 kB]
Get:12 http://archive.ubuntu.com/ubuntu bionic/main amd64 python-ipaddress all 1.0.17-1 [18.2 kB]
Get:13 http://archive.ubuntu.com/ubuntu bionic/main amd64 python-six all 1.11.0-2 [11.3 kB]
Get:14 http://archive.ubuntu.com/ubuntu bionic-security/main amd64 python-cryptography amd64 2.1.4-1ubuntu1.2 [221 kB]
Get:15 http://archive.ubuntu.com/ubuntu bionic/main amd64 python-markupsafe amd64 1.0-1build1 [13.0 kB]
Get:16 http://archive.ubuntu.com/ubuntu bionic/main amd64 python-jinja2 all 2.10-1 [94.6 kB]
Get:17 http://archive.ubuntu.com/ubuntu bionic/main amd64 python-pyasn1 all 0.4.2-3 [46.7 kB]
Get:18 http://archive.ubuntu.com/ubuntu bionic/main amd64 python-paramiko all 2.0.0-1ubuntu1 [110 kB]
Get:19 http://archive.ubuntu.com/ubuntu bionic/main amd64 python-pkg-resources all 39.0.1-2 [128 kB]
Get:20 http://archive.ubuntu.com/ubuntu bionic/main amd64 python-yaml amd64 3.12-1build2 [115 kB]
Get:21 http://archive.ubuntu.com/ubuntu bionic/main amd64 python-crypto amd64 2.6.1-8ubuntu2 [244 kB]
Get:22 http://archive.ubuntu.com/ubuntu bionic/main amd64 python-httplib2 all 0.9.2+dfsg-1 [34.6 kB]
Get:23 http://archive.ubuntu.com/ubuntu bionic/main amd64 ieee-data all 20180204.1 [1,539 kB]
Get:24 http://archive.ubuntu.com/ubuntu bionic/main amd64 python-netaddr all 0.7.19-1 [213 kB]
Get:25 http://archive.ubuntu.com/ubuntu bionic/universe amd64 ansible all 2.5.1+dfsg-1 [3,197 kB]
Get:26 http://archive.ubuntu.com/ubuntu bionic/main amd64 python-certifi all 2018.1.18-2 [144 kB]
Get:27 http://archive.ubuntu.com/ubuntu bionic/main amd64 python-chardet all 3.0.4-1 [80.3 kB]
Get:28 http://archive.ubuntu.com/ubuntu bionic/main amd64 python-jmespath all 0.9.3-1ubuntu1 [21.2 kB]
Get:29 http://archive.ubuntu.com/ubuntu bionic/universe amd64 python-kerberos amd64 1.1.14-1 [22.5 kB]
Get:30 http://archive.ubuntu.com/ubuntu bionic/main amd64 python-urllib3 all 1.22-1 [85.1 kB]
Get:31 http://archive.ubuntu.com/ubuntu bionic/main amd64 python-requests all 2.18.4-2 [58.3 kB]
Get:32 http://archive.ubuntu.com/ubuntu bionic/main amd64 python-lockfile all 1:0.12.2-2 [14.6 kB]
Get:33 http://archive.ubuntu.com/ubuntu bionic/main amd64 python-simplejson amd64 3.13.2-1 [61.2 kB]
Get:34 http://archive.ubuntu.com/ubuntu bionic/universe amd64 python-libcloud all 2.2.1-1 [1,235 kB]
Get:35 http://archive.ubuntu.com/ubuntu bionic/main amd64 python-openssl all 17.5.0-1ubuntu1 [41.3 kB]
Get:36 http://archive.ubuntu.com/ubuntu bionic/universe amd64 python-selinux amd64 2.7-2build2 [138 kB]
Get:37 http://archive.ubuntu.com/ubuntu bionic/universe amd64 python-xmltodict all 0.11.0-1 [10.3 kB]
Fetched 12.1 MB in 18s (672 kB/s)
Extracting templates from packages: 100%
Selecting previously unselected package libpython2.7-minimal:amd64.
(Reading database ... 102195 files and directories currently installed.)
Preparing to unpack .../0-libpython2.7-minimal_2.7.15~rc1-1_amd64.deb ...
Unpacking libpython2.7-minimal:amd64 (2.7.15~rc1-1) ...
Selecting previously unselected package python2.7-minimal.
Preparing to unpack .../1-python2.7-minimal_2.7.15~rc1-1_amd64.deb ...
Unpacking python2.7-minimal (2.7.15~rc1-1) ...
Selecting previously unselected package python-minimal.
Preparing to unpack .../2-python-minimal_2.7.15~rc1-1_amd64.deb ...
Unpacking python-minimal (2.7.15~rc1-1) ...
Selecting previously unselected package libpython2.7-stdlib:amd64.
Preparing to unpack .../3-libpython2.7-stdlib_2.7.15~rc1-1_amd64.deb ...
Unpacking libpython2.7-stdlib:amd64 (2.7.15~rc1-1) ...
Selecting previously unselected package python2.7.
Preparing to unpack .../4-python2.7_2.7.15~rc1-1_amd64.deb ...
Unpacking python2.7 (2.7.15~rc1-1) ...
Selecting previously unselected package libpython-stdlib:amd64.
Preparing to unpack .../5-libpython-stdlib_2.7.15~rc1-1_amd64.deb ...
Unpacking libpython-stdlib:amd64 (2.7.15~rc1-1) ...
Setting up libpython2.7-minimal:amd64 (2.7.15~rc1-1) ...
Setting up python2.7-minimal (2.7.15~rc1-1) ...
Linking and byte-compiling packages for runtime python2.7...
Setting up python-minimal (2.7.15~rc1-1) ...
Selecting previously unselected package python.
(Reading database ... 102942 files and directories currently installed.)
Preparing to unpack .../00-python_2.7.15~rc1-1_amd64.deb ...
Unpacking python (2.7.15~rc1-1) ...
Selecting previously unselected package python-asn1crypto.
Preparing to unpack .../01-python-asn1crypto_0.24.0-1_all.deb ...
Unpacking python-asn1crypto (0.24.0-1) ...
Selecting previously unselected package python-cffi-backend.
Preparing to unpack .../02-python-cffi-backend_1.11.5-1_amd64.deb ...
Unpacking python-cffi-backend (1.11.5-1) ...
Selecting previously unselected package python-enum34.
Preparing to unpack .../03-python-enum34_1.1.6-2_all.deb ...
Unpacking python-enum34 (1.1.6-2) ...
Selecting previously unselected package python-idna.
Preparing to unpack .../04-python-idna_2.6-1_all.deb ...
Unpacking python-idna (2.6-1) ...
Selecting previously unselected package python-ipaddress.
Preparing to unpack .../05-python-ipaddress_1.0.17-1_all.deb ...
Unpacking python-ipaddress (1.0.17-1) ...
Selecting previously unselected package python-six.
Preparing to unpack .../06-python-six_1.11.0-2_all.deb ...
Unpacking python-six (1.11.0-2) ...
Selecting previously unselected package python-cryptography.
Preparing to unpack .../07-python-cryptography_2.1.4-1ubuntu1.2_amd64.deb ...
Unpacking python-cryptography (2.1.4-1ubuntu1.2) ...
Selecting previously unselected package python-markupsafe.
Preparing to unpack .../08-python-markupsafe_1.0-1build1_amd64.deb ...
Unpacking python-markupsafe (1.0-1build1) ...
Selecting previously unselected package python-jinja2.
Preparing to unpack .../09-python-jinja2_2.10-1_all.deb ...
Unpacking python-jinja2 (2.10-1) ...
Selecting previously unselected package python-pyasn1.
Preparing to unpack .../10-python-pyasn1_0.4.2-3_all.deb ...
Unpacking python-pyasn1 (0.4.2-3) ...
Selecting previously unselected package python-paramiko.
Preparing to unpack .../11-python-paramiko_2.0.0-1ubuntu1_all.deb ...
Unpacking python-paramiko (2.0.0-1ubuntu1) ...
Selecting previously unselected package python-pkg-resources.
Preparing to unpack .../12-python-pkg-resources_39.0.1-2_all.deb ...
Unpacking python-pkg-resources (39.0.1-2) ...
Selecting previously unselected package python-yaml.
Preparing to unpack .../13-python-yaml_3.12-1build2_amd64.deb ...
Unpacking python-yaml (3.12-1build2) ...
Selecting previously unselected package python-crypto.
Preparing to unpack .../14-python-crypto_2.6.1-8ubuntu2_amd64.deb ...
Unpacking python-crypto (2.6.1-8ubuntu2) ...
Selecting previously unselected package python-httplib2.
Preparing to unpack .../15-python-httplib2_0.9.2+dfsg-1_all.deb ...
Unpacking python-httplib2 (0.9.2+dfsg-1) ...
Selecting previously unselected package ieee-data.
Preparing to unpack .../16-ieee-data_20180204.1_all.deb ...
Unpacking ieee-data (20180204.1) ...
Selecting previously unselected package python-netaddr.
Preparing to unpack .../17-python-netaddr_0.7.19-1_all.deb ...
Unpacking python-netaddr (0.7.19-1) ...
Selecting previously unselected package ansible.
Preparing to unpack .../18-ansible_2.5.1+dfsg-1_all.deb ...
Unpacking ansible (2.5.1+dfsg-1) ...
Selecting previously unselected package python-certifi.
Preparing to unpack .../19-python-certifi_2018.1.18-2_all.deb ...
Unpacking python-certifi (2018.1.18-2) ...
Selecting previously unselected package python-chardet.
Preparing to unpack .../20-python-chardet_3.0.4-1_all.deb ...
Unpacking python-chardet (3.0.4-1) ...
Selecting previously unselected package python-jmespath.
Preparing to unpack .../21-python-jmespath_0.9.3-1ubuntu1_all.deb ...
Unpacking python-jmespath (0.9.3-1ubuntu1) ...
Selecting previously unselected package python-kerberos.
Preparing to unpack .../22-python-kerberos_1.1.14-1_amd64.deb ...
Unpacking python-kerberos (1.1.14-1) ...
Selecting previously unselected package python-urllib3.
Preparing to unpack .../23-python-urllib3_1.22-1_all.deb ...
Unpacking python-urllib3 (1.22-1) ...
Selecting previously unselected package python-requests.
Preparing to unpack .../24-python-requests_2.18.4-2_all.deb ...
Unpacking python-requests (2.18.4-2) ...
Selecting previously unselected package python-lockfile.
Preparing to unpack .../25-python-lockfile_1%3a0.12.2-2_all.deb ...
Unpacking python-lockfile (1:0.12.2-2) ...
Selecting previously unselected package python-simplejson.
Preparing to unpack .../26-python-simplejson_3.13.2-1_amd64.deb ...
Unpacking python-simplejson (3.13.2-1) ...
Selecting previously unselected package python-libcloud.
Preparing to unpack .../27-python-libcloud_2.2.1-1_all.deb ...
Unpacking python-libcloud (2.2.1-1) ...
Selecting previously unselected package python-openssl.
Preparing to unpack .../28-python-openssl_17.5.0-1ubuntu1_all.deb ...
Unpacking python-openssl (17.5.0-1ubuntu1) ...
Selecting previously unselected package python-selinux.
Preparing to unpack .../29-python-selinux_2.7-2build2_amd64.deb ...
Unpacking python-selinux (2.7-2build2) ...
Selecting previously unselected package python-xmltodict.
Preparing to unpack .../30-python-xmltodict_0.11.0-1_all.deb ...
Unpacking python-xmltodict (0.11.0-1) ...
Setting up ieee-data (20180204.1) ...
Processing triggers for mime-support (3.60ubuntu1) ...
Processing triggers for man-db (2.8.3-2) ...
Setting up libpython2.7-stdlib:amd64 (2.7.15~rc1-1) ...
Setting up python2.7 (2.7.15~rc1-1) ...
Setting up libpython-stdlib:amd64 (2.7.15~rc1-1) ...
Setting up python (2.7.15~rc1-1) ...
Setting up python-idna (2.6-1) ...
Setting up python-simplejson (3.13.2-1) ...
Setting up python-yaml (3.12-1build2) ...
Setting up python-asn1crypto (0.24.0-1) ...
Setting up python-crypto (2.6.1-8ubuntu2) ...
Setting up python-pyasn1 (0.4.2-3) ...
Setting up python-netaddr (0.7.19-1) ...
Setting up python-xmltodict (0.11.0-1) ...
Setting up python-jmespath (0.9.3-1ubuntu1) ...
Setting up python-certifi (2018.1.18-2) ...
Setting up python-kerberos (1.1.14-1) ...
Setting up python-pkg-resources (39.0.1-2) ...
Setting up python-markupsafe (1.0-1build1) ...
Setting up python-httplib2 (0.9.2+dfsg-1) ...
Setting up python-cffi-backend (1.11.5-1) ...
Setting up python-six (1.11.0-2) ...
Setting up python-selinux (2.7-2build2) ...
Setting up python-enum34 (1.1.6-2) ...
Setting up python-lockfile (1:0.12.2-2) ...
Setting up python-ipaddress (1.0.17-1) ...
Setting up python-urllib3 (1.22-1) ...
Setting up python-chardet (3.0.4-1) ...
Setting up python-jinja2 (2.10-1) ...
Setting up python-cryptography (2.1.4-1ubuntu1.2) ...
Setting up python-requests (2.18.4-2) ...
Setting up python-openssl (17.5.0-1ubuntu1) ...
Setting up python-paramiko (2.0.0-1ubuntu1) ...
Setting up ansible (2.5.1+dfsg-1) ...
Setting up python-libcloud (2.2.1-1) ...

Which version?

  • as „packages.ubuntu.com“ said: 2.5.1
administrator@lx-ubuntu:$ ansible --version
ansible 2.5.1
  config file = /etc/ansible/ansible.cfg
  configured module search path = [u'/home/administrator/.ansible/plugins/modules', u'/usr/share/ansible/plugins/modules']
  ansible python module location = /usr/lib/python2.7/dist-packages/ansible
  executable location = /usr/bin/ansible
  python version = 2.7.15rc1 (default, Apr 15 2018, 21:51:34) [GCC 7.3.0]
Linux – NetPlan Interface Configuration

Just added a second NIC to a Linux-VM…

  • new config-style – new luck 🙂
administrator@lx-ubuntu:/etc/netplan$ cat /etc/network/interfaces
# ifupdown has been replaced by netplan(5) on this system. See
# /etc/netplan for current configuration.
# To re-enable ifupdown on this system, you can run:
#    sudo apt install ifupdown

Ok, it seems to be easy to get back to good-old network-config-style.

But after reading https://netplan.io/examples this seems to be very handy.

The initial „netplan-file“ references only the initial NIC:

administrator@lx-ubuntu:~$ cd /etc/netplan/
administrator@lx-ubuntu:/etc/netplan$ cat 50-cloud-init.yaml
# This file is generated from information provided by
# the datasource.  Changes to it will not persist across an instance.
# To disable cloud-init's network configuration capabilities, write a file
# /etc/cloud/cloud.cfg.d/99-disable-network-config.cfg with the following:
# network: {config: disabled}
network:
    ethernets:
        enp0s3:
            addresses: []
            dhcp4: true
    version: 2

What’s the ID of the new NIC?

  • it’s „enp0s8“
administrator@lx-ubuntu:/etc/netplan$ ifconfig
enp0s3: flags=4163<UP,BROADCAST,RUNNING,MULTICAST>  mtu 1500
        inet 192.168.56.104  netmask 255.255.255.0  broadcast 192.168.56.255
        inet6 fe80::a00:27ff:fe37:dbef  prefixlen 64  scopeid 0x20<link>
        ether 08:00:27:37:db:ef  txqueuelen 1000  (Ethernet)
        RX packets 989  bytes 119568 (119.5 KB)
        RX errors 0  dropped 0  overruns 0  frame 0
        TX packets 704  bytes 105969 (105.9 KB)
        TX errors 0  dropped 0 overruns 0  carrier 0  collisions 0

enp0s8: flags=4163<UP,BROADCAST,RUNNING,MULTICAST>  mtu 1500
        inet 10.0.3.15  netmask 255.255.255.0  broadcast 10.0.3.255
        inet6 fe80::a00:27ff:fe8d:ab00  prefixlen 64  scopeid 0x20<link>
        ether 08:00:27:8d:ab:00  txqueuelen 1000  (Ethernet)
        RX packets 2  bytes 1180 (1.1 KB)
        RX errors 0  dropped 0  overruns 0  frame 0
        TX packets 5  bytes 944 (944.0 B)
        TX errors 0  dropped 0 overruns 0  carrier 0  collisions 0

lo: flags=73<UP,LOOPBACK,RUNNING>  mtu 65536
        inet 127.0.0.1  netmask 255.0.0.0
        inet6 ::1  prefixlen 128  scopeid 0x10<host>
        loop  txqueuelen 1000  (Local Loopback)
        RX packets 2032  bytes 123200 (123.2 KB)
        RX errors 0  dropped 0  overruns 0  frame 0
        TX packets 2032  bytes 123200 (123.2 KB)
        TX errors 0  dropped 0 overruns 0  carrier 0  collisions 0

Create a backup

administrator@lx-ubuntu:/etc/netplan$ sudo cp 50-cloud-init.yaml 50-cloud-init.yaml.bak

Modify the Netplan-File:

administrator@lx-ubuntu:/etc/netplan$ sudo vi 50-cloud-init.yaml

administrator@lx-ubuntu:/etc/netplan$ cat 50-cloud-init.yaml
# This file is generated from information provided by
# the datasource.  Changes to it will not persist across an instance.
# To disable cloud-init's network configuration capabilities, write a file
# /etc/cloud/cloud.cfg.d/99-disable-network-config.cfg with the following:
# network: {config: disabled}
network:
    ethernets:
        enp0s3:
            addresses: []
            dhcp4: true
        enp0s8:
            addresses: []
            dhcp4: true
    version: 2

Activate the new Config:

administrator@lx-ubuntu:/etc/netplan$ sudo netplan apply

Verify the result

administrator@lx-ubuntu:/etc/netplan$ ifconfig
enp0s3: flags=4163<UP,BROADCAST,RUNNING,MULTICAST>  mtu 1500
        inet 192.168.56.104  netmask 255.255.255.0  broadcast 192.168.56.255
        inet6 fe80::a00:27ff:fe37:dbef  prefixlen 64  scopeid 0x20<link>
        ether 08:00:27:37:db:ef  txqueuelen 1000  (Ethernet)
        RX packets 989  bytes 119568 (119.5 KB)
        RX errors 0  dropped 0  overruns 0  frame 0
        TX packets 704  bytes 105969 (105.9 KB)
        TX errors 0  dropped 0 overruns 0  carrier 0  collisions 0

enp0s8: flags=4163<UP,BROADCAST,RUNNING,MULTICAST>  mtu 1500
        inet 10.0.3.15  netmask 255.255.255.0  broadcast 10.0.3.255
        inet6 fe80::a00:27ff:fe8d:ab00  prefixlen 64  scopeid 0x20<link>
        ether 08:00:27:8d:ab:00  txqueuelen 1000  (Ethernet)
        RX packets 2  bytes 1180 (1.1 KB)
        RX errors 0  dropped 0  overruns 0  frame 0
        TX packets 5  bytes 944 (944.0 B)
        TX errors 0  dropped 0 overruns 0  carrier 0  collisions 0

lo: flags=73<UP,LOOPBACK,RUNNING>  mtu 65536
        inet 127.0.0.1  netmask 255.0.0.0
        inet6 ::1  prefixlen 128  scopeid 0x10<host>
        loop  txqueuelen 1000  (Local Loopback)
        RX packets 2032  bytes 123200 (123.2 KB)
        RX errors 0  dropped 0  overruns 0  frame 0
        TX packets 2032  bytes 123200 (123.2 KB)
        TX errors 0  dropped 0 overruns 0  carrier 0  collisions 0

Cisco IOS Service-Containers: Run an x86-VM inside a Router (Part 5: Install the Service-VM)

The CSR1000V-Router has already been prepared (Create a CSR1000V-Instance with nested Virtualiation support) and in (Part 4: Package the Service-VM into an OVA) we copied the OVA-Image of our „ubuntu-server“-VM to this Router.

Add the internal Network-Interface between Router and Service-VM

SERVICECONTAINER#conf t
Enter configuration commands, one per line.  End with CNTL/Z.
SERVICECONTAINER(config)#int virtualportgroup 0
*Feb  3 19:05:17.206: %LINEPROTO-5-UPDOWN: Line protocol on Interface VirtualPortGroup0, changed state to up
SERVICECONTAINER(config-if)#ip addr 192.168.0.1 255.255.255.0
SERVICECONTAINER(config-if)#exit

SERVICECONTAINER(config)#virtual-service
SERVICECONTAINER(config-virt-serv-global)#signing level unsigned
% Support for unsigned packages has been user-enabled. Unsigned packages are not endorsed by Cisco Systems, Inc. User assumes all responsibility
SERVICECONTAINER(config-virt-serv-global)#ex

SERVICECONTAINER(config)#ip dhcp pool SERVICE
SERVICECONTAINER(dhcp-config)# network 192.168.0.0 255.255.255.0
SERVICECONTAINER(dhcp-config)# exit

SERVICECONTAINER(config)#virtual-service UBUNTU
SERVICECONTAINER(config-virt-serv)#vnic gateway virtualPortGroup 0
SERVICECONTAINER(config-virt-serv-vnic)#guest ip address 192.168.0.2
SERVICECONTAINER(config-virt-serv-vnic)#end
SERVICECONTAINER#
*Feb  3 19:06:27.474: %SYS-5-CONFIG_I: Configured from console by console

Install the Service-VM

SERVICECONTAINER#debug virtual-service all
virtual service all debugging is on
SERVICECONTAINER#term mon
% Console already monitors
SERVICECONTAINER#term width 0
SERVICECONTAINER#virtual-service install name UBUNTU package bootflash:ubuntu1604.ova
Installing package 'bootflash:/ubuntu1604.ova' for virtual-service 'UBUNTU'. Once the install has finished, the VM may be activated. Use 'show virtual-service list' for progress.

*Feb  3 19:07:43.518: VIRTUAL-SERVICE [UBUNTU]: Sending install req for [UBUNTU], path=bootflash:/ubuntu1604.ova, uri= uid=0
*Feb  3 19:07:43.529: VIRTUAL-INSTANCE: Message sent for INSTALL TDL request: Virtual-instance name: UBUNTU, UID: 0
*Feb  3 19:07:43.529: VIRTUAL-SERVICE: Started response timer for tid DD000001 - 30 minutes
*Feb  3 19:05:14.205: %IOSXE-4-PLATFORM: R0/0: kernel: dev->name [intsvc0]: dev_entry not populated

SERVICECONTAINER#show virtual-service list
System busy installing virtual-service 'UBUNTU'. The request may take several minutes...
Virtual Service List:


Name                    Status             Package Name
------------------------------------------------------------------------------
UBUNTU                  Installing         ubuntu1604.ova


*Feb  3 19:08:00.645: %VMAN-5-PACKAGE_SIGNING_LEVEL_ON_INSTALL: R0/0: vman: Package 'ubuntu1604.ova' for service container 'UBUNTU' is 'unsigned', signing level cached on original install is 'unsigned'
*Feb  3 19:08:09.216: VIRTUAL-SERVICE: Install response handler: VM[UBUNTU]: Owner IOSd trans_id 3707764737
*Feb  3 19:08:09.216: VIRTUAL-SERVICE [UBUNTU]: vm[UBUNTU] set owner [IOSd]
*Feb  3 19:08:09.225: VIRTUAL-SERVICE [UBUNTU]: application_name: 'ubuntu' application_vendor: '' application_version: '1.1'
*Feb  3 19:08:09.226: VIRTUAL-SERVICE [UBUNTU]: Default profile info: license_name: '', license_ver: ''
*Feb  3 19:08:09.226: VIRTUAL-SERVICE: Install pkg response for tid DD000001: rc=0, descr=Install Success
*Feb  3 19:08:09.226: VIRTUAL-SERVICE [UBUNTU]: License type: none, no license needed
*Feb  3 19:08:09.226: %VIRT_SERVICE-5-INSTALL_STATE: Successfully installed virtual service UBUNTU
*Feb  3 19:08:09.243: VIRTUAL-SERVICE: Received local transport activation request
*Feb  3 19:08:09.244: VIRTUAL-SERVICE: Enabling vman local transport

SERVICECONTAINER#show virtual-service list
Virtual Service List:

Name                    Status             Package Name
------------------------------------------------------------------------------
UBUNTU                  Installed          ubuntu1604.ova

*Feb  3 19:08:32.758: %ONEP_BASE-6-SS_ENABLED: ONEP: Service set Base was enabled by Default
*Feb  3 19:08:33.259: VIRTUAL-SERVICE: Local transport 'activation' request processed

Activate the installed Service-VM

SERVICECONTAINER#conf t
Enter configuration commands, one per line.  End with CNTL/Z.
SERVICECONTAINER(config)#virtual-service UBUNTU
SERVICECONTAINER(config-virt-serv)#activate
SERVICECONTAINER(config-virt-serv)#end

% Activating virtual-service 'UBUNTU', this might take a few minutes. Use 'show virtual-service list' for progress.

*Feb  3 19:09:57.772: VIRTUAL-SERVICE [UBUNTU]: Activate CLI: appl->owner [IOSd]
*Feb  3 19:09:57.775: VIRTUAL-INSTANCE: Message sent for ACTIVATE TDL request: Virtual service name: UBUNTU, UID: 0
*Feb  3 19:09:57.775: VIRTUAL-SERVICE [UBUNTU]: Started virtual service (0) activate response timer - 30 minutes
*Feb  3 19:10:06.052: %SYS-5-CONFIG_I: Configured from console by console
*Feb  3 19:10:06.383: VIRTUAL-SERVICE [UBUNTU]: Activate response handler: got owner [IOSd]
*Feb  3 19:10:06.383: VIRTUAL-SERVICE: clnt_type 0: Interface counter is '1'
*Feb  3 19:10:06.383: VIRTUAL-SERVICE: Information for virtual port grp '0' is received
*Feb  3 19:10:06.384: VIRTUAL-SERVICE [UBUNTU]: Deliver intf response, vm =UBUNTU, counter=1
*Feb  3 19:10:06.384: VIRTUAL-SERVICE [UBUNTU]: Received interface id=0, type=1, state=1
*Feb  3 19:10:06.384: VIRTUAL-SERVICE [UBUNTU]: Received virtual port group interface 0 with service MAC 001e.e5b1.cfba, state: up
*Feb  3 19:10:06.385: VIRTUAL-INSTANCE: Message sent for IF MTU TDL message: appliance 'UBUNTU'
*Feb  3 19:10:06.385: VIRTUAL-SERVICE [UBUNTU]: Activate response handler: rsp_rc 0
*Feb  3 19:10:06.385: VIRTUAL-SERVICE [UBUNTU]: Deliver response: appliance_state 3 rsp_rc 0 if_notify name UBUNTU clnt_type 0 act_state 0
*Feb  3 19:10:06.385: %VIRT_SERVICE-5-ACTIVATION_STATE: Successfully activated virtual service UBUNTUconf t
*Feb  3 19:10:06.385: VIRTUAL-SERVICE [UBUNTU]: Stopped virtual service (1) response timer
*Feb  3 19:10:06.385: VIRTUAL-SERVICE: Delivered Virt-manager response message to virtual service 'UBUNTU' - Response: 'OK'
*Feb  3 19:10:06.385: VIRTUAL-SERVICE [UBUNTU]: set owner to 'IOSd' in appliance

SERVICECONTAINER#show virtual-service list
Virtual Service List:

Name                    Status             Package Name
------------------------------------------------------------------------------
UBUNTU                  Activated          ubuntu1604.ova

SERVICECONTAINER#show ip dhcp bind
Bindings from all pools not associated with VRF:
IP address      Client-ID/              Lease expiration        Type       State      Interface
                Hardware address/
                User name
192.168.0.2     001e.e5b1.cfba          Feb 04 2018 07:20 PM    Automatic  Active     VirtualPortGroup0

Access the VM using the (virtual) Serial-Console

SERVICECONTAINER#virtual-service connect name UBUNTU console
Connected to appliance. Exit using ^c^c^c

Ubuntu 16.04.3 LTS ubuntu-server ttyS0

ubuntu-server login: user
Password:
Last login: Sat Feb  3 20:23:27 CET 2018 on ttyS0
Welcome to Ubuntu 16.04.3 LTS (GNU/Linux 4.4.0-87-generic x86_64)

 * Documentation:  https://help.ubuntu.com
 * Management:     https://landscape.canonical.com
 * Support:        https://ubuntu.com/advantage

9 packages can be updated.
7 updates are security updates.


user@ubuntu-server:~$ who
user     ttyS0        2018-02-03 23:12

Logout: 3x [CTRL]+

user@ubuntu-server:~$ ^C

Access the VM using SSH via the internal Network

SERVICECONTAINER#ssh -l user 192.168.0.2
Password:
Welcome to Ubuntu 16.04.3 LTS (GNU/Linux 4.4.0-87-generic x86_64)

 * Documentation:  https://help.ubuntu.com
 * Management:     https://landscape.canonical.com
 * Support:        https://ubuntu.com/advantage

9 packages can be updated.
7 updates are security updates.

Last login: Sat Feb  3 23:12:21 2018
user@ubuntu-server:~$ who
user     pts/0        2018-02-03 23:13 (192.168.0.1)

Check the local python/NAPALM-Setup to get facts about the containing router

user@ubuntu-server:~$ python
Python 2.7.12 (default, Dec  4 2017, 14:50:18)
[GCC 5.4.0 20160609] on linux2
Type "help", "copyright", "credits" or "license" for more information.

>>> import napalm

>>> iosdriver = napalm.get_network_driver('ios')
dpass', optional_args={'port': 22, 'dest_file_system': 'bootflash:'})sword='rmon

>>> router.open()

>>> print router.get_facts()
{u'os_version': u'Virtual XE Software (X86_64_LINUX_IOSD-UNIVERSALK9-M), Version 16.7.1, RELEASE SOFTWARE (fc6)', u'uptime': 12840, u'interface_list': [u'GigabitEthernet1', u'GigabitEthernet2', u'GigabitEthernet3', u'VirtualPortGroup0'], u'vendor': u'Cisco', u'serial_number': u'9SNHUBYAML', u'model': u'CSR1000V', u'hostname': u'SERVICECONTAINER', u'fqdn': u'SERVICECONTAINER.lab.local'}

Cisco IOS Service-Containers: Run an x86-VM inside a Router (Part 4: Package the Service-VM into an OVA)

I’ll start at the KVM-Virtualization Host („Ubuntu Desktop“) again.

Folder Structure
I’ll create a folder „isr-service-container“ for common stuff (package.yaml, create_ova.sh) and a for each VM a dedicated sub-folder, today: „ubuntu-server16.04“

user@KVM-1:~$ mkdir isr-service-container
user@KVM-1:~$ cd isr-service-container
user@KVM-1:~/isr-service-container$ mkdir ubuntu-server16.04

Download the Cisco-provided „templates.tar“ from GitHub (GitHub: Templates.tar).
It contains:

  • package.yaml
  • create_ova.sh

Prepare a compressed virtual harddisk of the „Ubuntu-Server“-VM
Locate the original virtual harddisk:

user@KVM-1:~$ sudo ls /var/lib/libvirt/images/ -l
total 3238172
-rw------- 1 root root 21478375424 Feb  2 23:14 ubuntu-server16.04.qcow2

Convert the original „.qcow2“-File into a compressed „copy“:

user@KVM-1:~/isr-service-container$ sudo qemu-img convert -p -c -o compat=0.10 -O qcow2 /var/lib/libvirt/images/ubuntu-server16.04.qcow2 ./ubuntu-server16.04/ubuntu-server16.04.qcow2
    (100.00/100%)

user@KVM-1:~/isr-service-container$ cd ubuntu-server16.04/
user@KVM-1:~/isr-service-container/ubuntu-server16.04$ ls -lh
total 1,2G
-rw-r--r-- 1 root root 1,2G Feb  2 23:26 ubuntu-server16.04.qcow2

Change the Owner of this new file:

user@KVM-1:~/isr-service-container/ubuntu-server16.04$ sudo chown user:user ubuntu-server16.04.qcow2 
user@KVM-1:~/isr-service-container/ubuntu-server16.04$ ls -lh
total 1,2G
-rw-r--r-- 1 user user 1,2G Feb  2 23:26 ubuntu-server16.04.qcow2
user@KVM-1:~/isr-service-container/ubuntu-server16.04$ copy ../package.yaml ./package.yaml

I’ll change:

  • Description: „KVM Ubuntu 16.04 LTS“
  • resources/vcpu: 1
  • disk/file: ubuntu-server16.04.qcow2

The vCPU# got decreased since the CSR1000v only supports Service-VMs with one vCPU.

user@KVM-1:~/isr-service-container/ubuntu-server16.04$ joe ./package.yaml
manifest-version: 1.0

info:
  name: ubuntu
  description: "KVM Ubuntu 16.04 LTS"
  version: 1.1

app:
  # Indicate app type (vm, paas, lxc etc.,)
  apptype: vm

  resources:
   cpu: 10
   memory: 854016
   vcpu: 1

   disk:
    - target-dev: hdc
      file: ubuntu-server16.04.qcow2

   interfaces:
    - target-dev: net1

   serial:
    - console
    - aux

  # Specify runtime and startup
  startup:
    runtime: kvm
    boot-dev: hd

Another File „version.ver“ has to be created:

  • the „version“ must match the „manifest-version“ of the yaml-file.
user@KVM-1:~/isr-service-container/ubuntu-server16.04$ echo 1.0 > version.ver

Check the content of the VM-folder

user@KVM-1:~/isr-service-container/ubuntu-server16.04$ ls -l
total 1206788
-rw-rw-r-- 1 user user        437 Feb  3 20:13 package.yaml
-rw-r--r-- 1 user user 1239148032 Feb  2 23:26 ubuntu-server16.04.qcow2
-rw-rw-r-- 1 user user          4 Feb  2 23:33 version.ver

Create the OVA-File

user@KVM-1:~/isr-service-container/ubuntu-server16.04$ cd ..

user@KVM-1:~/isr-service-container$ ./create_ova.sh -mts 200000 -mfs 100000 ubuntu-server16.04
create_ova.sh v1.0(Linux) - Create a virtual-service OVA package

User inputs:
  Compress=(files > '100000M' if total 
            file size > '200000M')
  Directory=ubuntu-server16.04

Package name :  ubuntu
 Generating SHA1 on files...
Running SHA1 over all files in '/home/user/isr-service-container/ubuntu-server16.04' and
    creating manifest file ' ubuntu.mf', please wait...

Done creating ' ubuntu.mf' file
 ...Done Generating SHA1 on files
Creating ' ubuntu.ova' please wait...
package.yaml
ubuntu.mf
ubuntu-server16.04.qcow2
version.ver

'/home/user/isr-service-container/ubuntu-server16.04/ ubuntu.ova' created

Manifest Contents:
SHA1(package.yaml)= fb47cf5b764a7bb062561a4f67d830003f8e4d5a  
SHA1(ubuntu-server16.04.qcow2)= 732c8ac9dc81ab6b2695fe6c045bec4493d77168  
SHA1(version.ver)= 61652cd1568dcf2614df833eba241755eee34e89  

Copy the OVA-File to the Router:

user@KVM-1:~/isr-service-container$ scp ./ubuntu-server16.04/ubuntu.ova <ios-user>@<csr1000v-management-router-ip>:bootflash:ubuntu1604.ova
Password: <ios-password>
ubuntu.ova                                                                                         100% 1182MB   1.2MB/s   17:05    
Connection to 192.168.2.189 closed by remote host.

Check the ISR-Router:

SERVICECONTAINER#dir *.ova

Directory of bootflash:/
   22  -rw-  1239152640   Feb 3 2018 19:00:42 +00:00  ubuntu1604.ova
7897796608 bytes total (4507389952 bytes free)

Cisco IOS Service-Containers: Run an x86-VM inside a Router (Part 3: Create the Service-VM)

Create the „Ubuntu Server“-VM using KVM on top of the „Ubuntu Desktop“-VM
Run the „Virtual Machine Manager“

Virtual Machine Manager

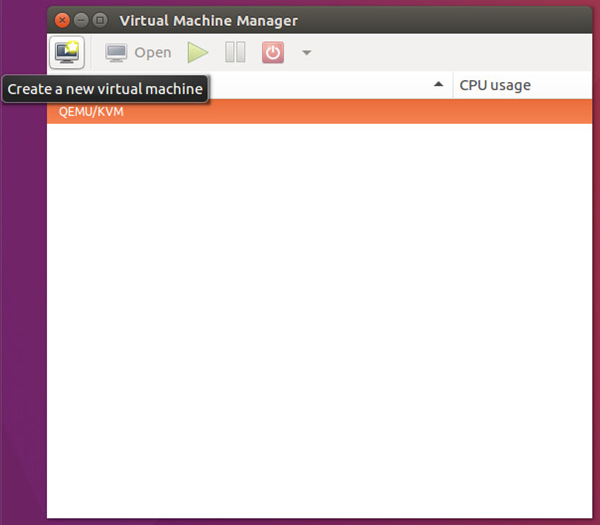
Create a new virtual Machine:
Virtual Machine Manager – create a new VM

(1) Create a new virtual Machine

vmm – 1 – Create a new virtual machine

(2) Select the Installation ISO
* and deselect „auto OS Detection“

vmm – 2 – Use ISO Image

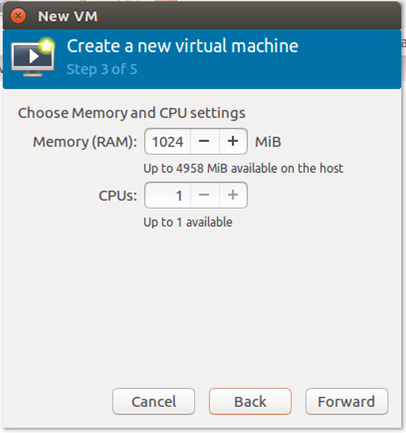
(3) Choose Memory and CPU Settings

vmm – 3 – Choose Memory and CPU settings

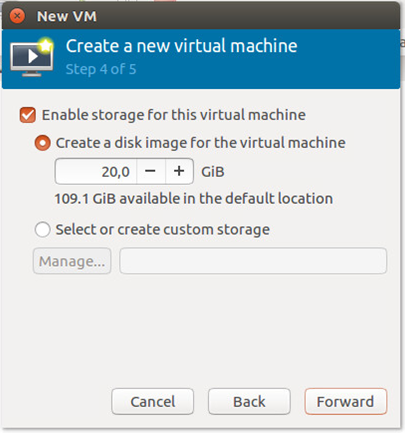
(4) Create a virtual Hard-Disk for the VM

vmm – 4 – Enable storage for this VM

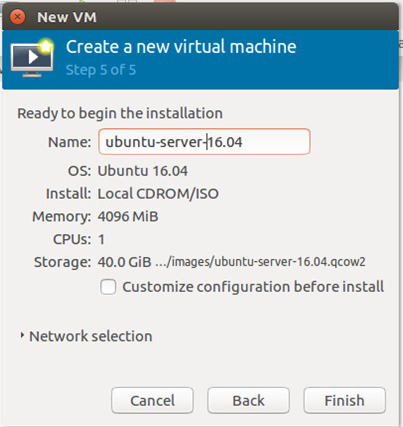
(5) Give a name to the VM

vmm – 5 – Ready to begin the installation

Boot the KVM-VM („Ubuntu Server“)

0 – install Ubuntu Server

Basic Setup:

  • Language: Englisch
  • my territory: other/Europe/Germany
  • locale: en_US.UTF_8
  • Keyboard: German
  • hostname: ubuntu-server
  • user / password
  • no home-directory encryption
  • timezone Europe/Berlin
  • use entire virtual disk (no need for „LVM…“ i think)
  • no HTTP-Proxy
  • no automatic updates
  • [x] SSH-Server
  • install GRUB

After the first login, as always:
sudo apt-get update && sudo apt-get upgrade –y
sudo reboot

Enable the Virtual-„Console“-Port of the Ubuntu-Server-VM

  • enable a virtual „CON“ serial-port at the linux vm

sudo joe /lib/systemd/system/ttyS0.service

Example-Script for the 16.04 System-CTL Service:

[Unit]
Description=Serial Console Service

[Service]
ExecStart=/sbin/getty -L 9600 ttyS0 vt102
Restart=always

[Install]
WantedBy=multi-user.target

Reload systemctl, enable the TTY-service and then start it:

sudo systemctl daemon-reload
sudo systemctl enable ttyS0
sudo systemctl start ttyS0

Verify the service state:
user@ubuntu-server:~$ sudo systemctl status ttyS0
● ttyS0.service - Serial Console Service
Loaded: loaded (/lib/systemd/system/ttyS0.service; enabled; vendor preset: en
Active: active (running) since Sat 2018-02-03 20:21:20 CET; 1h 19min ago
Main PID: 831 (login)
Tasks: 0
Memory: 672.0K
CPU: 196ms
CGroup: /system.slice/ttyS0.service
‣ 831 /bin/login --

Add your „Network Application“ to the VM:
I want to use my Service-Container for network-management (Centralized access to device-configuration and other state-information using NAPALM and Linux: SNMP with Python ):
sudo apt-get install -y joe
sudo apt-get install –y libsnmp-dev snmp-mibs-downloader
sudo apt-get install –y gcc python-dev python-pip libssl-dev libffi-dev python-cffi
pip install easysnmp
pip install napalm

That’s all
Shutdown the VM

Cisco IOS Service-Containers: Run an x86-VM inside a Router (Part 2: Create a CSR1000v-Instance with nested Virtualization support)

In real life an hardware-ISR/ASR-Router might be the correct choice.

Create a CSR1000v-Instance with nested Virtualization support
But since the CSR1000v-Router supports Service-Containers, too – this is the chance to prove the setup in a lab environment:

  • IOS-XE 3.17 is the first supported release, i’ll go with IOS-XE 16.7.1
  • Option to enable unsigned containers
  • any 3rd party KVM
  • Libvirt based format / YAML manifest file
  • Requires 4GB+ dedicated RAM
  • ASR1000, ISR4000, CSR1000

5 Minutes to deploy the virtual CSR1000v-Router using COT
I’ll use COT (Common OVF Tool (COT) – Automated Lab-Router Deployment) to deploy my CSR1000v-Router:

user@ubuntu-server:~$ cot inject-config csr1000v-universalk9.16.07.01.ova -c ios-napalm.startup.cfg -o csr1000v-universalk9.16.07.01.napalm.ova
Add disk file to existing (but empty) cdrom drive? [y]
NOTICE  : Overwriting existing disk Item in OVF

cot --verbose deploy csr1000v-universalk9.16.07.01.napalm.ova esxi &amp;amp;amp;lt;VCENTER-HOST/IP&amp;amp;amp;gt;/&amp;amp;amp;lt;DATACENTER&amp;amp;amp;gt;/host/&amp;amp;amp;lt;ESXi-HOST/IP&amp;amp;amp;gt; -u &amp;amp;amp;lt;USER&amp;amp;amp;gt; -p &amp;amp;amp;lt;PASS&amp;amp;amp;gt; -n RTR-SERVICE-CONTAINER -d &amp;amp;amp;lt;DATASTORE&amp;amp;amp;gt; -S "telnet://:41001,server" -N GigabitEthernet1="Management" GigabitEthernet2=T24 GigabitEthernet3=T34 -c 2CPU-8GB

Boot the Router
Check the Virtualization-Environment: fail 🙁

  • Machine types disabled : KVM
SERVICECONTAINER# show virtual-service
Virtual Service Global State and Virtualization Limits:

Infrastructure version : 1.7
Total virtual services installed : 0
Total virtual services activated : 0

Machine types supported   : LXC
Machine types disabled    : KVM

Maximum VCPUs per virtual service : 1
Resource virtualization limits:
Name                         Quota     Committed     Available
--------------------------------------------------------------
system CPU (%)                  75             0            75
memory (MB)                   3072             0          3072
bootflash (MB)               20000             0          5554

i forgot to enable nested-virtualization for the CSR1000v-Router-VM.

Action Plan

    • Power-down the VM („Shut Down Guest“) again
    • edit Hardware (Web-Client)
csr1000v-router-enable-nested-virtualization
  • boot the router again

Check again: works 🙂

  • Machine types supported : KVM, LXC
SERVICECONTAINER#show virtual-service
Virtual Service Global State and Virtualization Limits:

Infrastructure version : 1.7
Total virtual services installed : 0
Total virtual services activated : 0

Machine types supported   : KVM, LXC
Machine types disabled    : none

Maximum VCPUs per virtual service : 1
Resource virtualization limits:
Name                         Quota     Committed     Available
--------------------------------------------------------------
system CPU (%)                  75             0            75
memory (MB)                   3072             0          3072
bootflash (MB)               20000             0          5553

That’s it, the CSR1000V is ready.

Notice: vCPU-Limitation in CSR1000v

  • Maximum VCPUs per virtual service : 1

Remember this, when creating the YAML-File for the OVA. (Part 4: Package the Service-VM into an OVA)

Cisco IOS Service-Containers: Run an x86-VM inside a Router (Part 1: KVM Development Environment)

Network Hosted Kernel Virtual Machine (KVM)

Many Cisco Routers allow you to host your own virtual machine directly inside a router.
DevNet: Cisco IOS KVM Service-Containers

  • CSR 1000v
  • ISR 4000
  • ASR 1000

I went through the documentation, especially Service-Containers-Tutorial.pdf and Ubuntu – Building a Service Container.pdf where very helpful.

But i didn’t want to go the „Ubuntu-Desktop-14.04-LTS“-way which was described.

„My“ Service-Container-VM should be:

  • Ubuntu 16.04 LTS
  • Ubuntu Server
    • save some compute/cpu/dram/harddisk-ressources by not installing an Ubuntu-Desktop-Environment inside the Router. Just network services, please!

The whole deployment process can be accomplished in five steps:

  1. build a KVM virtualization-Environment
  2. prepare an ISR-Router (lab: Create a CSR1000v-Instance for nested Virtualization)
  3. create the Service-VM (Ubuntu-Server)
  4. package it inside an OVA
  5. install this OVA at the router

Build the KVM Virtualization Environment

Here I’ll use Ubuntu LTS, but the „Desktop“-Release to get the „Virtual Machine Manager“-GUI.
ubuntu-16.04.3-desktop-amd64.iso

Common vSphere Process „New VM“

  • Linux Ubuntu 64 Bit, 4GB DRAM, 120GB Disk
  • mount Ubuntu-Desktop-ISO as DVD

Enable nested virtualization (Hardware-Virtualization for Guest-OS)
Don’t forget: this „KVM Virtualization Environment“ will run on top of an VSphere-ESXi-Host.

  • nested virtualization: [Linux-Server-VM] on top of [KVM Virtualization] on top of [ESXi Hypervisor]
Hardware virtualization: [x] Expose hardware assisted virtualization to guest-OS

Ubuntu-Desktop VM with KVM-Virtualization
Installation: Defaults are fine

  • never use the „root“-acccout
  • use a common user-account instead, i’ll use the username „user“ in the text

Additional Setup
user@KVM-1:~$ sudo apt-get update && sudo apt-get upgrade -y
user@KVM-1:~$ sudo apt-get install -y open-vm-tools open-vm-tools-desktop

Add KVM („libvirt“)
user@KVM-1:~$ sudo apt-get install -y qemu-kvm libvirt-bin bridge-utils virt-manager qemu-system
Finalize it
user@KVM-1:~$ sudo reboot

Check the KVM Environment
Should look like this:

user@KVM-1:~/isr-service-container$ virsh -c qemu:///system list

 Id    Name                           State
----------------------------------------------------

Fine-tuning: „Disable Screensaver“

  • avoid ever and ever re-login to the remote-Desktop
  • acceptable in an isolated lab environment

all settings => brightness & lock

  • „never“ turn screen off when inactive
  • lock „off“
  • [ ] require password when waking from suspend

Preparation: Mount NFS-Share with „ubuntu-server“-ISO
I store my ISO-Images on an central NFS-Datastore.

  • the ISO-image has to be available inside the VM
sudo apt-get install -y nfs-common
mkdir /home/user/<NAS-SHARE>
sudo mount.nfs <NAS-IP>:<NAS-SHARE> /home/user/<NAS-SHARE>

Linux: vSphere CLI Installation

Sometimes I need a lightweight straight-forward toolset to provision, modify or delete vSphere-Objects.

Installation was a nightmare in former times, but vSphere CLI Release 6.5 works with Ubuntu server 16.04.3 LTS „out of the box“.

And – it’s compatible with ESXi 6.0 hosts. (don’t waste time trying to install vSphere CLI Release 6.0 on a current Linux Server)

Consider the docs:
vSphere CLI Documentation
VMware [Code] vSphere-CLI 6.5

Download the 64-bit Archive
Use the vmware-search or Google…
„Download VMware vSphere Command Line Interface 6.5“ might be a promising query.

I downloaded VMware-vSphere-CLI-6.5.0-4566394.x86_64.tar.gz using my Windows Machine.

Transfer the Archive to the Linux-VM using SCP
Since SCP is available at the Linux-VM and this protocol is fast and secure i don’t see the requirement to think about alternative protocols.

  • I’d suggest to use „PSCP“ from the PuTTY-Suite.
c:\temp>pscp -2 VMware-vSphere-CLI-6.5.0-4566394.x86_64.tar.gz USER_NAME@LINUX_VM_IP:VMware-vSphere-CLI-6.5.0-4566394.x86_64.tar.gz
USER_NAME@LINUX-VM-IP's password: USER_PASS
VMware-vSphere-CLI-6.5.0- | 52264 kB | 3266.5 kB/s | ETA: 00:00:00 | 100%

Disable unneded SSH-Localization
The VMware-Installer seems to not expect non-US-Computers, so avoid automatic special characters from Germany in the SSH-shell.

user@snmp-server:~$ sudo cp /etc/ssh/ssh_config /etc/ssh/ssh_config.bak

Just comment the „SendEnv LANG LC_*“-line:

user@snmp-server:~$ sudo joe /etc/ssh/ssh_config

like this:

user@snmp-server:~$ diff /etc/ssh/ssh_config.bak /etc/ssh/ssh_config
53c53
<     SendEnv LANG LC_*
---
> #    SendEnv LANG LC_*

Install Prerequisites
Taken from Installing Prerequisite Software for Linux Systems with Internet Access „Ubuntu 16.04 64-bit“-Section:

sudo apt-get install lib32z1 lib32ncurses5 build-essential uuid uuid-dev libssl-dev perl-doc libxml-libxml-perl libcrypt-ssleay-perl libsoap-lite-perl libmodule-build-perl

Install vSphere CLI

user@snmp-server:~$ tar xzf VMware-vSphere-CLI-6.5.0-4566394.x86_64.tar.gz

user@snmp-server:~$ sudo vmware-vsphere-cli-distrib/vmware-install.pl
Creating a new vSphere CLI installer database using the tar4 format.

Installing vSphere CLI 6.5.0 build-4566394 for Linux.

You must read and accept the vSphere CLI End User License Agreement to
continue.
Press enter to display it.

VMware® vSphere Software Development Kit License Agreement

Do you accept? (yes/no) yes

Thank you.
WARNING: The http_proxy environment variable is not set. If your system is
using a proxy for Internet access, you must set the http_proxy environment
variable .

If your system has direct Internet access, you can ignore this warning .

WARNING: The ftp_proxy environment variable is not set.  If your system is
using a proxy for Internet access, you must set the ftp_proxy environment
variable .

If your system has direct Internet access, you can ignore this warning .

Please wait while configuring CPAN ...

Below mentioned modules with their version needed to be installed,
these modules are available in your system but vCLI need specific
version to run properly

Module: ExtUtils::MakeMaker, Version: 6.96
Module: Module::Build, Version: 0.4205
Module: Net::FTP, Version: 2.77
Module: LWP::Protocol::https, Version: 6.04
Do you want to continue? (yes/no) yes

Be patient, do something else in the meantime…


        Please wait while configuring perl modules using CPAN ...

CPAN is downloading and installing pre-requisite Perl module "Devel::StackTrace" .
CPAN is downloading and installing pre-requisite Perl module "Class::Data::Inheritable" .
CPAN is downloading and installing pre-requisite Perl module "Convert::ASN1" .
CPAN is downloading and installing pre-requisite Perl module "Crypt::OpenSSL::RSA" .
CPAN is downloading and installing pre-requisite Perl module "Crypt::X509" .
CPAN is downloading and installing pre-requisite Perl module "Exception::Class" .
CPAN is downloading and installing pre-requisite Perl module "UUID::Random" .
CPAN is downloading and installing pre-requisite Perl module "Archive::Zip" .
CPAN is downloading and installing pre-requisite Perl module "Path::Class" .
CPAN is downloading and installing pre-requisite Perl module "Class::MethodMaker" .
CPAN is downloading and installing pre-requisite Perl module "UUID" .
CPAN is downloading and installing pre-requisite Perl module "Data::Dump" .
CPAN is downloading and installing pre-requisite Perl module "Socket6 " .
CPAN is downloading and installing pre-requisite Perl module "IO::Socket::INET6" .
CPAN is downloading and installing pre-requisite Perl module "Net::INET6Glue" .

In which directory do you want to install the executable files? [/usr/bin]

Please wait while copying vSphere CLI files...

The installation of vSphere CLI 6.5.0 build-4566394 for Linux completed
successfully. You can decide to remove this software from your system at any
time by invoking the following command:
"/usr/bin/vmware-uninstall-vSphere-CLI.pl".

This installer has successfully installed both vSphere CLI and the vSphere SDK for Perl.

Enjoy,
--the VMware team

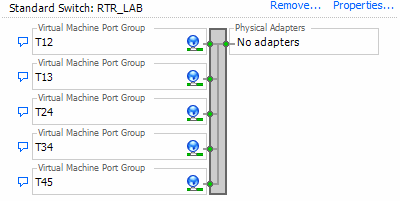
Give it a try: Add a vSwitch with 5 Portgroups

user@snmp-server:~$ vicfg-vswitch --help

Synopsis: /usr/bin/vicfg-vswitch OPTIONS [<vswitch>]


Command-specific options:
   --add
    -a
          Add a new virtual switch
   --add-dvp-uplink
    -P
          Add an uplink adapter (pnic) to a DVPort (valid for vSphere 4.0 and later)
   --add-pg
    -A
          Add a portgroup to a virtual switch
...

Define credentials to login into the vSphere-Environment

user@snmp-server:~$ export VI_SERVER=%SERVER_IP_OR_HOSTNAME%
user@snmp-server:~$ export VI_USERNAME=%VSPHERE_USER_NAME%
user@snmp-server:~$ export VI_PASSWORD=%VSPHERE_USER_PASS%

Create the Switch and the portgroups

user@snmp-server:~$ vicfg-vswitch --add "RTR_LAB" -h %ESXi-HOST-IP%

user@snmp-server:~$ vicfg-vswitch -A "T12" "RTR_LAB" -h %ESXi-HOST-IP%
user@snmp-server:~$ vicfg-vswitch -A "T13" "RTR_LAB" -h %ESXi-HOST-IP%
user@snmp-server:~$ vicfg-vswitch -A "T24" "RTR_LAB" -h %ESXi-HOST-IP%
user@snmp-server:~$ vicfg-vswitch -A "T34" "RTR_LAB" -h %ESXi-HOST-IP%
user@snmp-server:~$ vicfg-vswitch -A "T45" "RTR_LAB" -h %ESXi-HOST-IP%

Isn’t it beautiful? 😉
vSwitch RTR_LAB with 5 portgroups

And i think, even with downloading and installing vSphere-CLI it was faster than GUI-clicking to create this vSwitch 😉

Linux: SNMP with Python

Background: I plan to design and implement a controller-based QoS-Solution with distributed control-plane using SNMP and RMON.

How to send SNMP-Requests in Python?

Why Python? It’s an arbitrary decision, every programming language might be sufficient. For the moment, I prefer Python for new projects.

I decided to try Easy-SNMP, since good performance and a nice python-programming-interface seem to be killer-features for me.

EasySNMP homepage
EasySNMP documentation

A development environment

  1. clone an ubuntu-server VM

https://allones.de/2017/11/17/linux-quick-and-…ab-vm-deployment/

  1. install net-snmp

sudo apt-get install libsnmp-dev snmp-mibs-downloader

  1. install gcc, python

sudo apt-get install gcc python-dev python-pip

  1. install EasySNMP

pip install easysnmp

Enable SNMP on a Router
Never ever enable SNMP-Access for everybody, don’t even think about it.
Use an ACL permitting only the SNMP-Manager.

ip access-list standard ACL_SNMP
    permit host 192.168.2.89

snmp-server community READ ro ACL_SNMP

! just as an example System-Variable
snmp-server location allones.de

Access the Router via SNMP
The router’s LAN-IP is 192.168.2.72.

I like the „Session“-Interface:

user@snmp-server:~$ python
Type "help", "copyright", "credits" or "license" for more information.
>>>
>>> from easysnmp import Session
>>>
>>> session = Session(hostname='192.168.2.72', community='READ', version=2)

Be aware to poll the Object-Instance, not the Object-Tree-Position.
Wrong

>>> location = session.get('sysLocation')
>>> print location
<SNMPVariable value='NOSUCHINSTANCE' (oid='sysLocation', oid_index='', snmp_type='NOSUCHINSTANCE')>

Correct: Specify an Instance-ID

>>>
>>> location = session.get('sysLocation.0')
>>> print location
<SNMPVariable value='allones.de' (oid='sysLocation', oid_index='0', snmp_type='OCTETSTR')>

Works!

How to access the return-value?
How to verify the Datatype?

I’ve been using the Cisco-developed TCL-Interface for years, the „snmp_getone“-command there, where you had to parse the return-value (a string similar to the „location“-Variable above) applying regular expressions… Weird.

Just remembering the blog post, which motivated me to learn TCL… Ten years old, how time flies!
Read: „SNMP with TCL“ by Ivan Pepelnjak

Might this be easy with EasySNMP?

>>> print location.value
allones.de

>>> print location.oid
sysLocation
>>> print location.oid_index
0

>>> print location.snmp_type
OCTETSTR

Isn’t EasySNMP beautiful!? 🙂

Linux: Quick and Clean Lab-VM Deployment

I often need for quick tests a clean Linux Server, a VM nowadays.

I decided to save DRAM in my virtualization host and to:

  • not use a GUI
  • SSH with standard text-editor are quite fine for me.

Ubuntu 16.04 seems to be a good choice to start with.

  1. Apply Updates,

sudo apt-get update && sudo apt-get upgrade -y

  1. install a text-editor //I like joe since it remembers me of turbo-pascal/wordstar 😉

sudo apt-get install joe

  1. change the hostname of the server-vm
sudo joe /etc/hostname
sudo joe /etc/hosts
  1. add a reliable (static) IP-Address
sudo joe /etc/network/interfaces
# The loopback network interface
auto lo
iface lo inet loopback

# The primary network interface
auto ens160
iface ens160 inet static
address 192.168.2.89
netmask 255.255.255.0
gateway 192.168.2.1
dns-nameservers 192.168.2.1
dns-search lab.local
  1. reboot the VM

There are other possibilities, but just ifdown/ifup won’t stop the dhcpd-client – the easiest way [but uncoolest, who cares?] is to reboot the VM, takes half a second…

sudo reboot


Todo: Create an UCSD-Workflow for this

Todo: Fix the buggy „always 1“ section-numbering