Python Scapy: CDP-Monitor

Watch and decode Cisco Discovery Protocol Packetes.

  1. CDP Monitor-Script
  2. Inspired by the Scapy ARP-Monitor i created an CDP-Monitor displaying hostname and an optional Management-IP-Address.

    #! /usr/bin/env python
    from scapy.all import *
    load_contrib("cdp")
    
    def cdp_monitor_callback(pkt):
      ip = "0.0.0.0"
      if (CDPMsgDeviceID in pkt):
        device=pkt["CDPMsgDeviceID"].val.decode()
        hostname=device.split(".")[0]
        if (CDPAddrRecordIPv4 in pkt):
          ip=pkt["CDPAddrRecordIPv4"].addr
        return "Device: {0} IP: {1}".format(hostname,ip)
    
    interface="VirtualBox Host-Only Ethernet Adapter"
    capturefilter="ether dst 01:00:0c:cc:cc:cc"
    
    # run it for max. 99 Packets
    p=sniff(prn=cdp_monitor_callback, iface=interface, count=99, filter=capturefilter, store=0)
    
  3. Real-Life Example
    • Run this script:
    • C:\RH>python
      Python 3.7.0 (v3.7.0:1bf9cc5093, Jun 27 2018, 04:59:51) [MSC v.1914 64 bit (AMD64)] on win32
      Type "help", "copyright", "credits" or "license" for more information.
      >>> #! /usr/bin/env python
      ... from scapy.all import *
      >>> load_contrib("cdp")
      >>>
      >>> def cdp_monitor_callback(pkt):
      ...   ip = "0.0.0.0"
      ...   if (CDPMsgDeviceID in pkt):
      ...     device=pkt["CDPMsgDeviceID"].val.decode()
      ...     hostname=device.split(".")[0]
      ...     if (CDPAddrRecordIPv4 in pkt):
      ...       ip=pkt["CDPAddrRecordIPv4"].addr
      ...     return "Device: {0} IP: {1}".format(hostname,ip)
      ...
      >>> interface="VirtualBox Host-Only Ethernet Adapter"
      >>> capturefilter="ether dst 01:00:0c:cc:cc:cc"
      >>>
      >>> # run it for max. 99 Packets
      ... p=sniff(prn=cdp_monitor_callback, iface=interface, count=99, filter=capturefilter, store=0)
      
    • Open another CMD-Window to spin up a new CSR1000V-Router:
    • C:\RH\work\entwicklung\csr1000v-provision-in-virtualbox>CSR1000v-Virtual-Box.cmd
      Enter CSR1000v Hostname:CSR-CDPTEST-A
      Virtual machine 'CSR-CDPTEST-A' is created and registered.
      UUID: eaa931bd-9db4-4a78-b263-754d4bb300a0
      Settings file: 'c:\RH\LAB\VM\CSR-CDPTEST-A\CSR-CDPTEST-A.vbox'
      Creating ISO image at c:\RH\LAB\VM\CSR-CDPTEST-A\config.iso, 1 Files, Size: 8,00 KB
      100%
      0%...10%...20%...30%...40%...50%...60%...70%...80%...90%...100%
      Medium created. UUID: 3019216e-2e61-435a-95f2-3d26312c3ed9
      Waiting for VM "CSR-CDPTEST-A" to power on...
      VM "CSR-CDPTEST-A" has been successfully started.
      
    • Go back to the „python“-Screen and wait:
    • >>> # run it for max. 99 Packets
      ... p=sniff(prn=cdp_monitor_callback, iface=interface, count=99, filter=capturefilter, store=0)
      Device: CSR-CDPTEST-A IP: 0.0.0.0
      Device: CSR-CDPTEST-A IP: 0.0.0.0
      Device: CSR-CDPTEST-A IP: 0.0.0.0
      Device: CSR-CDPTEST-A IP: 0.0.0.0
      Device: CSR-CDPTEST-A IP: 0.0.0.0
      Device: CSR-CDPTEST-A IP: 10.0.2.15
      Device: CSR-CDPTEST-A IP: 10.0.2.15
      Device: CSR-CDPTEST-A IP: 10.0.2.15
      

      It works, the IOS-XE CSR1000V-Router is installed and it got it’s baseline-config applied:

      • Hostname
      • Interface set to „ip address dhcp“
      • CDP enabled

      takes some time, but these first CDP-Packets captured were not sent in 60s interval, so don’t be scared 😉
Python Scapy: Capturing „Cisco Discovery Protocol (CDP)“

It’s hard to believe, how easy it is to capture (and to craft) LAN-Data using Python Scapy.

I need to capture CDP-Packets and to extract information like the hostname of the sender and it’s IP-Address.

As an modification of the „ARP-Monitor“-example taken from the manual Using scapy in your tools.

  1. Scapy Installation
  2. nothing special: pip install

    C:\RH>pip install scapy
    Collecting scapy
      Downloading https://files.pythonhosted.org/packages/68/01/b9943984447e7ea6f8948e90c1729b78161c2bb3eef908430638ec3f7296/scapy-2.4.0.tar.gz (3.1MB)
        100% |████████████████████████████████| 3.1MB 420kB/s
      In the tar file C:\Users\RONALD~1.HEI\AppData\Local\Temp\pip-unpack-4jm9kde1\scapy-2.4.0.tar.gz the member scapy-2.4.0/README is invalid: unable to resolve link inside archive
    Installing collected packages: scapy
      Running setup.py install for scapy ... done
    Successfully installed scapy-2.4.0
    
  3. Python: Install Scapy
  4. C:\RH>python
    Python 3.7.0 (v3.7.0:1bf9cc5093, Jun 27 2018, 04:59:51) [MSC v.1914 64 bit (AMD64)] on win32
    Type "help", "copyright", "credits" or "license" for more information.
    
    >>> from scapy.all import *
    
  5. Example: List all Interfaces of my Laptop
  6. >>> ifaces
    INDEX  IFACE                                     IP            MAC
    20     VirtualBox Host-Only Ethernet Adapter     192.168.56.1  0A:00:27:00:00:14
    22     Intel(R) Dual Band Wireless-AC 8265       172.20.10.2   IntelCor:BD:10:37
    4      Intel(R) Ethernet Connection (4) I219-LM  47.11.17.10   BayNetwo:00:DE:11
    
    >>> for i in ifaces.data.keys():
    ...     iface = ifaces.data[i]
    ...     name = str(iface.name)
    ...     wname = iface.data['netid']
    ...     mac = str(iface.mac)
    ...     ip  = str(iface.ip)
    ...     print("DESCR:{0}, NAME:{1}, MAC:{2}, IP:{3}".format(wname,name,mac,ip))
    ...
    DESCR:Wi-Fi, NAME:Intel(R) Dual Band Wireless-AC 8265, MAC:74:70:FD:BD:10:37, IP:172.20.10.2
    DESCR:VirtualBox Host-Only Network, NAME:VirtualBox Host-Only Ethernet Adapter, MAC:0A:00:27:00:00:14, IP:192.168.56.1
    DESCR:ETH_DELL, NAME:Intel(R) Ethernet Connection (4) I219-LM, MAC:00:00:81:00:DE:11, IP:47.11.17.10
    
  7. Capture 10 Packets on a specific interface
  8. The "NAME" is needed as interface-handle
    >>> interface="VirtualBox Host-Only Ethernet Adapter"
    
    >>> p=sniff(iface=interface, count=10)
    >>> p.display()
    0000 Ether / IP / UDP 192.168.56.1:17500 > 255.255.255.255:17500 / Raw
    0001 Ether / IP / UDP 192.168.56.1:17500 > 255.255.255.255:17500 / Raw
    0002 Ether / IP / UDP 192.168.56.1:17500 > 192.168.56.255:17500 / Raw
    0003 Ether / IP / UDP 192.168.56.1:17500 > 255.255.255.255:17500 / Raw
    0004 Ether / IP / UDP 192.168.56.1:17500 > 255.255.255.255:17500 / Raw
    0005 Ether / IP / UDP 192.168.56.100:bootps > 255.255.255.255:bootpc / BOOTP / DHCP
    0006 Ether / IP / UDP 192.168.56.102:50472 > 255.255.255.255:10067 / Raw
    0007 Ether / IP / UDP 192.168.56.103:49580 > 255.255.255.255:10067 / Raw
    0008 Ether / IP / UDP 192.168.56.1:17500 > 255.255.255.255:17500 / Raw
    0009 Ether / IP / UDP 192.168.56.1:17500 > 255.255.255.255:17500 / Raw
    
  9. Capture CDP-Packets
  10. Capture CDP
    
    >>> p=sniff(iface=interface, count=2, filter="ether dst 01:00:0c:cc:cc:cc")
    >>> p
    <Sniffed: TCP:0 UDP:0 ICMP:0 Other:2>
    >>> p.display()
    0000 802.3 08:00:27:c9:d5:7e > 01:00:0c:cc:cc:cc / LLC / SNAP / Raw
    0001 802.3 08:00:27:c9:d5:7e > 01:00:0c:cc:cc:cc / LLC / SNAP / Raw
    
  11. Decode CDP (with inactive dissector)
  12. >>> p[0].display()
    ###[ 802.3 ]###
      dst       = 01:00:0c:cc:cc:cc
      src       = 08:00:27:c9:d5:7e
      len       = 386
    ###[ LLC ]###
         dsap      = 0xaa
         ssap      = 0xaa
         ctrl      = 3
    ###[ SNAP ]###
            OUI       = 0xc
            code      = 0x2000
    ###[ Raw ]###
               load      = '\x02\xb4\x91\x18\x00\x01\x00\x13CSR-A.lab.local\x00\x05\x01\x05Cisco IOS Software [Fuji], Virtual XE Software (X86_64_LINUX_IOSD-UNIVERSALK9-M), Version 16.9.1, RELEASE SOFTWARE (fc2)\nTechnical Support: http://www.cisco.com/techsupport\nCopyright (c) 1986-2018 by Cisco Systems, Inc.\nCompiled Tue 17-Jul-18 16:57 by mcpre\x00\x06\x00\x12cisco CSR1000V\x00\x02\x00\x11\x00\x00\x00\x01\x01\x01\xcc\x00\x04\xc0\xa88e\x00\x03\x00\x14GigabitEthernet2\x00\x04\x00\x08\x00\x00\x00!\x00\x07\x00\t\n\x00\x02\x00\x18\x00\x0b\x00\x05\x01\x00\x16\x00\x11\x00\x00\x00\x01\x01\x01\xcc\x00\x04\xc0\xa88e'
    
  13. Activate the CDP-Parser
  14. >>> list_contrib()
    avs                 : AVS WLAN Monitor Header                  status=loads
    bgp                 : BGP v0.1                                 status=loads
    carp                : CARP                                     status=loads
    cdp                 : Cisco Discovery Protocol                 status=loads
    chdlc               : Cisco HDLC and SLARP                     status=loads
    coap                : Constrained Application Protocol (CoAP)  status=loads
    diameter            : Diameter                                 status=loads
    dtp                 : DTP                                      status=loads
    eigrp               : EIGRP                                    status=loads
    etherip             : EtherIP                                  status=loads
    gsm_um              : PPI                                      status=loads
    gtp                 : GTP                                      status=loads
    gtp_v2              : GTPv2                                    status=loads
    homeplugav          : HomePlugAV Layer                         status=loads
    http2               : HTTP/2 (RFC 7540, RFC 7541)              status=loads
    icmp_extensions     : ICMP Extensions                          status=loads
    igmp                : IGMP/IGMPv2                              status=loads
    igmpv3              : IGMPv3                                   status=loads
    ikev2               : IKEv2                                    status=loads
    isis                : ISIS                                     status=loads
    ldp                 : Label Distribution Protocol (LDP)        status=loads
    lldp                : LLDP                                     status=loads
    macsec              : -                                        status=?
    modbus              : ModBus Protocol                          status=loads
    mpls                : MPLS                                     status=loads
    mqtt                : -                                        status=?
    nsh                 : NSH Protocol                             status=loads
    openflow            : Openflow v1.0                            status=loads
    openflow3           : Openflow v1.3                            status=loads
    ospf                : OSPF                                     status=loads
    pnio                : ProfinetIO base layer                    status=loads
    pnio_rtc            : ProfinetIO Real-Time Cyclic (RTC)        status=loads
    ppi                 : PPI                                      status=loads
    ppi_cace            : PPI CACE                                 status=loads
    ppi_geotag          : PPI GEOLOCATION                          status=loads
    ripng               : RIPng                                    status=loads
    rsvp                : RSVP                                     status=loads
    sebek               : Sebek                                    status=loads
    send                : Secure Neighbor Discovery (SEND) (ICMPv6) status=loads
    skinny              : Skinny Call Control Protocol (SCCP)      status=loads
    spbm                : SBPM                                     status=loads
    tacacs              : TACACS+ Protocol                         status=loads
    tzsp                : TZSP                                     status=loads
    ubberlogger         : Ubberlogger dissectors                   status=loads
    vqp                 : VLAN Query Protocol                      status=loads
    vtp                 : VLAN Trunking Protocol (VTP)             status=loads
    wpa_eapol           : WPA EAPOL dissector                      status=loads
    
    >>> load_contrib("cdp")
    
  15. Capture again and display CDP-Information as cleartext
  16. >>> load_contrib("cdp")
    
    >>> p=sniff(iface=interface, count=1, filter=capturefilter)
    >>>
    >>>
    >>> p[0].show()
    ###[ 802.3 ]###
      dst       = 01:00:0c:cc:cc:cc
      src       = 08:00:27:c9:d5:7e
      len       = 386
    ###[ LLC ]###
         dsap      = 0xaa
         ssap      = 0xaa
         ctrl      = 3
    ###[ SNAP ]###
            OUI       = 0xc
            code      = 0x2000
    ###[ Cisco Discovery Protocol version 2 ]###
               vers      = 2
               ttl       = 180
               cksum     = 0x9118
               \msg       \
                |###[ Device ID ]###
                |  type      = Device ID
                |  len       = 19
                |  val       = 'CSR-A.lab.local'
                |###[ Software Version ]###
                |  type      = Software Version
                |  len       = 261
                |  val       = 'Cisco IOS Software [Fuji], Virtual XE Software (X86_64_LINUX_IOSD-UNIVERSALK9-M), Version 16.9.1, RELEASE SOFTWARE (fc2)\nTechnical Support: http://www.cisco.com/techsupport\nCopyright (c) 1986-2018 by Cisco Systems, Inc.\nCompiled Tue 17-Jul-18 16:57 by mcpre'
                |###[ Platform ]###
                |  type      = Platform
                |  len       = 18
                |  val       = 'cisco CSR1000V'
                |###[ Addresses ]###
                |  type      = Addresses
                |  len       = 17
                |  naddr     = 1
                |  \addr      \
                |   |###[ CDP Address IPv4 ]###
                |   |  ptype     = NLPID
                |   |  plen      = 1
                |   |  proto     = '\xcc'
                |   |  addrlen   = 4
                |   |  addr      = 192.168.56.101
                |###[ Port ID ]###
                |  type      = Port ID
                |  len       = 20
                |  iface     = 'GigabitEthernet2'
                |###[ Capabilities ]###
                |  type      = Capabilities
                |  len       = 8
                |  cap       = Router+IGMPCapable
                |###[ IP Prefix ]###
                |  type      = IP Prefix
                |  len       = 9
                |  defaultgw = 10.0.2.0
                |###[ CDP Generic Message ]###
                |  type      = 0x1800
                |  len       = 2816
                |  val       = '\x05\x01\x00\x16\x00\x11\x00\x00\x00\x01\x01\x01\xcc\x00\x04\xc0\xa88e'
    
  17. Decode CDP-Hostname
  18. >>> device=p[0]["CDPMsgDeviceID"].val.decode()
    >>> device
    'CSR-A.lab.local'
    >>> hostname=device.split(".")[0]
    >>> hostname
    'CSR-A'
    
  19. Decode CDP-Management-IP-Address
  20. >>> ip=p[0]["CDPAddrRecordIPv4"]
    >>> ip.addr
    '192.168.56.101'
    

Amazon AWS – Use IAM-role to authenticate python-script on EC2-Instance to S3-API

Today i wanted to stop using hard-coded S3-Credentials in my scripts running on EC2-Instances.

Create an IAM-Role

  1. Services
  2. IAM
  3. Roles
  4. [Create Role]
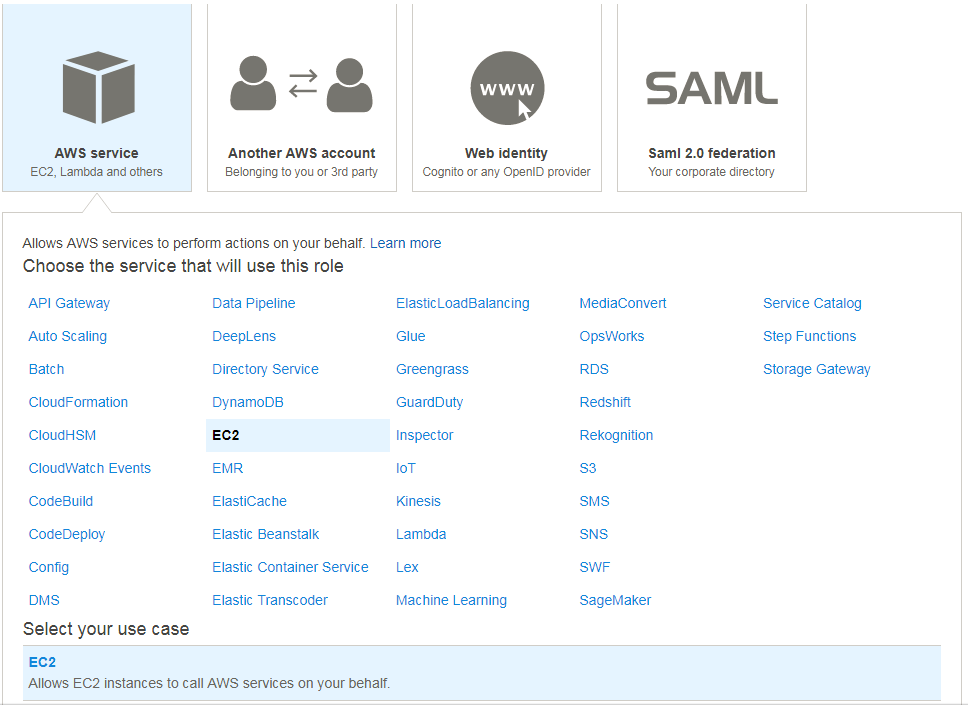
  • Select type of trusted entity
    • AWS-Service
    • EC2
    • [Next: Permissions]
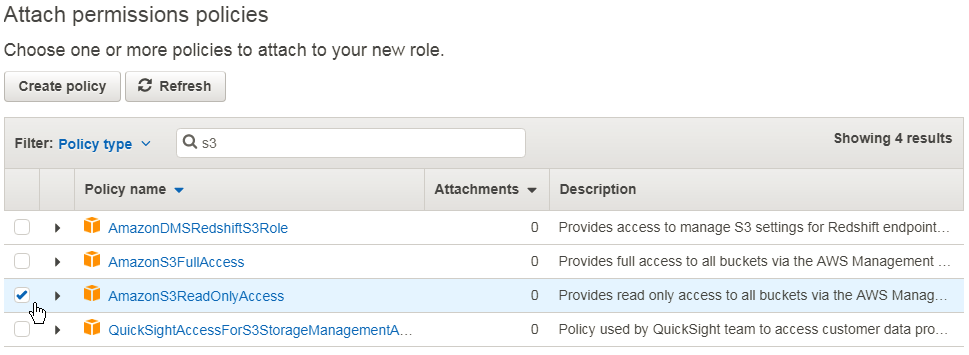
  • Attach permissions policies
    • AmazonS3ReadOnlyAccess
  • Review
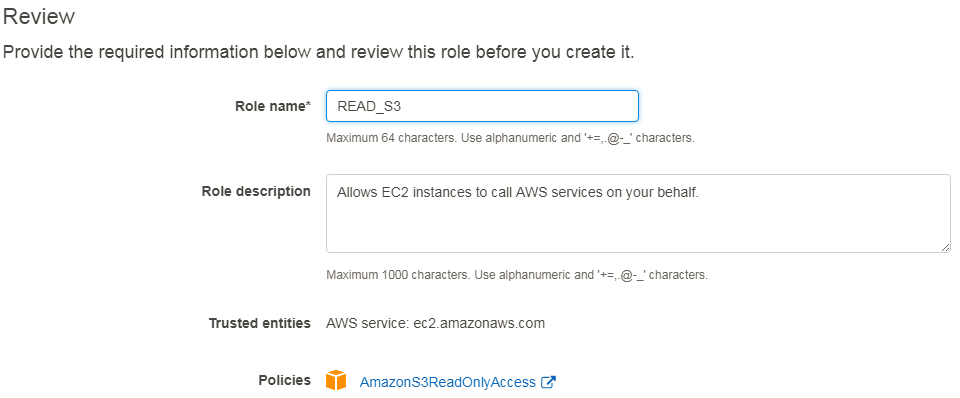
    • Role name: READ_S3
IAM-role: AWS – EC2
role-policy: s3 – ead-only
role: review & set name

Attach Role to EC2-Instance

  1. Services
  2. EC2
  3. Instances
  4. Instance Settings
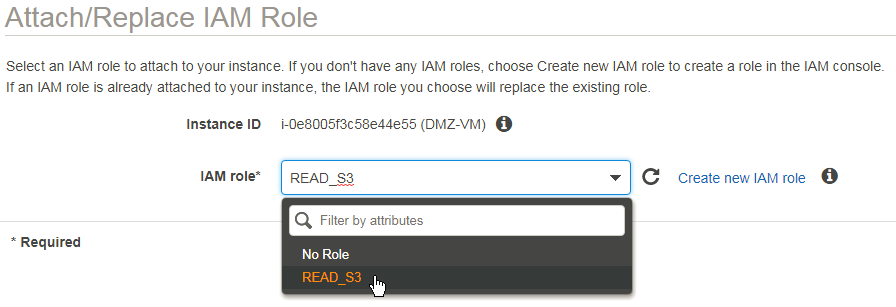
  • attach IAM-Role
    • READ_S3
EC2-instance: attach IAM Role
Instance: attach Role „READ_S3“

Prepare Linux Setup
Within the EC2-Instance to which the IAM-Role has been attached.

ubuntu@ip-10-2-0-193:~$ sudo apt-get install -y python-pip
ubuntu@ip-10-2-0-193:~$ sudo apt install -y awscli
ubuntu@ip-10-2-0-193:~$ pip install boto3
ubuntu@ip-10-2-0-193:~$ pip install requests

Check Access to „meta-data“ => „IAM“ => „Security-Credentials“
The Script has to know the name of the role to use.

ubuntu@ip-10-2-0-193:~$ curl http://169.254.169.254/latest/meta-data/iam/security-credentials/READ_S3
{
  "Code" : "Success",
  "LastUpdated" : "2018-02-27T20:16:38Z",
  "Type" : "AWS-HMAC",
  "AccessKeyId" : "ASIAI5EHDXGCAQBR7AA",
  "SecretAccessKey" : "6qWNxrTDU2FTynEkkJHl4pADQ4/xdQqgr89tF8x",
  "Token" : "FQoDYXdzEMX//////////wEaDBVs9pF5ec5XdDPiFCK3A5zquC32puTTqR9jV2BiViEBtagFXJ13++wq+lSUoCxL7sZwSCwa9njCWppjv5ShoKdqfkAWWivecZ18Px8SLoO7T83pZCeyri+WKKVdzNrt5tvrftxxlRVMvj+/Hy683KJi4GeheOEAC0XuiNwFC0IMM5xwJatdzXlann6I/A1zLSC5p/iydHPug9YvgEn3+cwTa2CCBNjzk4Sh0NsGkdhVggjZNcYe/jWSxdcCJJNc5cSTz76z2G+vFppbWnL0Rz4iKGRVXXs81upazvtbheffVWApUiL0ULhS2jrxEzFioPNX73AGlwaNM9jD0Zk5N2BSQuQE9yxyKcetkcCZQ85B4pkmxgldPTStQng+zeYv/rAZjyURFHGHTPhOLaHnnZyn89EfjThZ8rYhq1RJpu8Gqx9Z58Jclyj0YiHQe6IfF77N8PBLc0lGu7iT3yc6cp3n2kdsmuK3N3+WmRQI0G+OMJvMSx6eH31IVgwF+nEwkl0epW13D+3RQEdaCwm9b5wV9UFBkXtI4XPgF08gS2qwiyRO25ztuWD1USq9ZchrmJIOMHO4BX1XpOmf0M9drpbmIYbP4EoovnW1AU=",
  "Expiration" : "2018-02-28T02:48:10Z"

Fetch the IAM-Role-Credentials using python.requests()
Attention: recreated the Role in the meantime, so the credentials have been modified.

ubuntu@ip-10-2-0-193:~$ python
Python 2.7.12 (default, Dec  4 2017, 14:50:18)
[GCC 5.4.0 20160609] on linux2
Type "help", "copyright", "credits" or "license" for more information.

>>> import requests
>>> import boto3

>>> r = requests.get('http://169.254.169.254/latest/meta-data/iam/security-credentials/READ_S3')
>>> cred = r.json()
>>> print cred
{u'Code': u'Success', u'LastUpdated': u'2018-02-27T20:33:14Z', u'AccessKeyId': u'ASIAIRKJFTEBQLSFR6A', u'SecretAccessKey': u'USXXJb1zoCa13FBRrUR5AWwaH0ymo+af8DmW7eQ', u'Token': u'FQoDYXdzEMb//////////wEaDGxRlk0fbmRHnfL8mSK3A0tyJcQ2JgXY+fEnjFioduAnU/FRhth+DhLHzJWnwSw0/isO/tP72wFkneklld1JtAkRkRxH9SjRwqWKpybtW6cEITEksP976Ym7sjxoT+NglC4KNk9DfaRgvJgB8EqDqgG1oZHoJ91O+US+vxPlLAifh7Fvepuw+2nmwPDpOIPz7H6Q2pAr/i7AEncyMGCwZejVhnY5lk8+aDmYMqS7ymfe1n/DyjwEfiYH4kFJplOtubXMsc+rlTg2KtMSovMRX4h+SrdH6bpVpT4DeIvivyH5ABFL66YMyW76P8GGdaGtb8ohxQZ3zeR1gGYs5WEBcziZVEGJDEopKLSUgqgkC1dUFLk0XLfB8vaEGjNsaaT3gaRm2AWAEVonLFyUr+uWvdxptOmFPIMUwUlNitXJkqG44fQEuOw5oDHANJ7zZtPYrWQUhmJzHubJZbvJ313GlPfUQzs7bkDBxoBXIgKIPMpK09uxh48iEByLdqoHyAtkL4qWddQVywuEgEH7Qw/X1/20ngaXqVVSjEa3hu/98EvxKOoushMpeLiG1JyxZJR5nQGH/YgxC17t2ipzsrWPepPkZfz5aAo3IDX1AU=', u'Expiration': u'2018-02-28T02:50:12Z', u'Type': u'AWS-HMAC'}
>>>

Use the credentials to create a Session-Object

>>> session = boto3.Session(
...     aws_access_key_id=cred["AccessKeyId"],
...     aws_secret_access_key=cred["SecretAccessKey"],
...     aws_session_token=cred["Token"],
... )
>>>

Read all S3-Buckets, print out their attributes („Name“)

>>> s3 = session.resource('s3', region_name='us-east-1')
>>>
>>> for b in s3.buckets.all():
...   print b
...
s3.Bucket(name='allones')
>>>

Is this all?

  • Only one Bucket?

Yes – and it’s located in Frankfurt.

S3: Buckets

Further reading:
Python API for Amazon S3: Examples

Cisco IOS Service-Containers: Run an x86-VM inside a Router (Part 5: Install the Service-VM)

The CSR1000V-Router has already been prepared (Create a CSR1000V-Instance with nested Virtualiation support) and in (Part 4: Package the Service-VM into an OVA) we copied the OVA-Image of our „ubuntu-server“-VM to this Router.

Add the internal Network-Interface between Router and Service-VM

SERVICECONTAINER#conf t
Enter configuration commands, one per line.  End with CNTL/Z.
SERVICECONTAINER(config)#int virtualportgroup 0
*Feb  3 19:05:17.206: %LINEPROTO-5-UPDOWN: Line protocol on Interface VirtualPortGroup0, changed state to up
SERVICECONTAINER(config-if)#ip addr 192.168.0.1 255.255.255.0
SERVICECONTAINER(config-if)#exit

SERVICECONTAINER(config)#virtual-service
SERVICECONTAINER(config-virt-serv-global)#signing level unsigned
% Support for unsigned packages has been user-enabled. Unsigned packages are not endorsed by Cisco Systems, Inc. User assumes all responsibility
SERVICECONTAINER(config-virt-serv-global)#ex

SERVICECONTAINER(config)#ip dhcp pool SERVICE
SERVICECONTAINER(dhcp-config)# network 192.168.0.0 255.255.255.0
SERVICECONTAINER(dhcp-config)# exit

SERVICECONTAINER(config)#virtual-service UBUNTU
SERVICECONTAINER(config-virt-serv)#vnic gateway virtualPortGroup 0
SERVICECONTAINER(config-virt-serv-vnic)#guest ip address 192.168.0.2
SERVICECONTAINER(config-virt-serv-vnic)#end
SERVICECONTAINER#
*Feb  3 19:06:27.474: %SYS-5-CONFIG_I: Configured from console by console

Install the Service-VM

SERVICECONTAINER#debug virtual-service all
virtual service all debugging is on
SERVICECONTAINER#term mon
% Console already monitors
SERVICECONTAINER#term width 0
SERVICECONTAINER#virtual-service install name UBUNTU package bootflash:ubuntu1604.ova
Installing package 'bootflash:/ubuntu1604.ova' for virtual-service 'UBUNTU'. Once the install has finished, the VM may be activated. Use 'show virtual-service list' for progress.

*Feb  3 19:07:43.518: VIRTUAL-SERVICE [UBUNTU]: Sending install req for [UBUNTU], path=bootflash:/ubuntu1604.ova, uri= uid=0
*Feb  3 19:07:43.529: VIRTUAL-INSTANCE: Message sent for INSTALL TDL request: Virtual-instance name: UBUNTU, UID: 0
*Feb  3 19:07:43.529: VIRTUAL-SERVICE: Started response timer for tid DD000001 - 30 minutes
*Feb  3 19:05:14.205: %IOSXE-4-PLATFORM: R0/0: kernel: dev->name [intsvc0]: dev_entry not populated

SERVICECONTAINER#show virtual-service list
System busy installing virtual-service 'UBUNTU'. The request may take several minutes...
Virtual Service List:


Name                    Status             Package Name
------------------------------------------------------------------------------
UBUNTU                  Installing         ubuntu1604.ova


*Feb  3 19:08:00.645: %VMAN-5-PACKAGE_SIGNING_LEVEL_ON_INSTALL: R0/0: vman: Package 'ubuntu1604.ova' for service container 'UBUNTU' is 'unsigned', signing level cached on original install is 'unsigned'
*Feb  3 19:08:09.216: VIRTUAL-SERVICE: Install response handler: VM[UBUNTU]: Owner IOSd trans_id 3707764737
*Feb  3 19:08:09.216: VIRTUAL-SERVICE [UBUNTU]: vm[UBUNTU] set owner [IOSd]
*Feb  3 19:08:09.225: VIRTUAL-SERVICE [UBUNTU]: application_name: 'ubuntu' application_vendor: '' application_version: '1.1'
*Feb  3 19:08:09.226: VIRTUAL-SERVICE [UBUNTU]: Default profile info: license_name: '', license_ver: ''
*Feb  3 19:08:09.226: VIRTUAL-SERVICE: Install pkg response for tid DD000001: rc=0, descr=Install Success
*Feb  3 19:08:09.226: VIRTUAL-SERVICE [UBUNTU]: License type: none, no license needed
*Feb  3 19:08:09.226: %VIRT_SERVICE-5-INSTALL_STATE: Successfully installed virtual service UBUNTU
*Feb  3 19:08:09.243: VIRTUAL-SERVICE: Received local transport activation request
*Feb  3 19:08:09.244: VIRTUAL-SERVICE: Enabling vman local transport

SERVICECONTAINER#show virtual-service list
Virtual Service List:

Name                    Status             Package Name
------------------------------------------------------------------------------
UBUNTU                  Installed          ubuntu1604.ova

*Feb  3 19:08:32.758: %ONEP_BASE-6-SS_ENABLED: ONEP: Service set Base was enabled by Default
*Feb  3 19:08:33.259: VIRTUAL-SERVICE: Local transport 'activation' request processed

Activate the installed Service-VM

SERVICECONTAINER#conf t
Enter configuration commands, one per line.  End with CNTL/Z.
SERVICECONTAINER(config)#virtual-service UBUNTU
SERVICECONTAINER(config-virt-serv)#activate
SERVICECONTAINER(config-virt-serv)#end

% Activating virtual-service 'UBUNTU', this might take a few minutes. Use 'show virtual-service list' for progress.

*Feb  3 19:09:57.772: VIRTUAL-SERVICE [UBUNTU]: Activate CLI: appl->owner [IOSd]
*Feb  3 19:09:57.775: VIRTUAL-INSTANCE: Message sent for ACTIVATE TDL request: Virtual service name: UBUNTU, UID: 0
*Feb  3 19:09:57.775: VIRTUAL-SERVICE [UBUNTU]: Started virtual service (0) activate response timer - 30 minutes
*Feb  3 19:10:06.052: %SYS-5-CONFIG_I: Configured from console by console
*Feb  3 19:10:06.383: VIRTUAL-SERVICE [UBUNTU]: Activate response handler: got owner [IOSd]
*Feb  3 19:10:06.383: VIRTUAL-SERVICE: clnt_type 0: Interface counter is '1'
*Feb  3 19:10:06.383: VIRTUAL-SERVICE: Information for virtual port grp '0' is received
*Feb  3 19:10:06.384: VIRTUAL-SERVICE [UBUNTU]: Deliver intf response, vm =UBUNTU, counter=1
*Feb  3 19:10:06.384: VIRTUAL-SERVICE [UBUNTU]: Received interface id=0, type=1, state=1
*Feb  3 19:10:06.384: VIRTUAL-SERVICE [UBUNTU]: Received virtual port group interface 0 with service MAC 001e.e5b1.cfba, state: up
*Feb  3 19:10:06.385: VIRTUAL-INSTANCE: Message sent for IF MTU TDL message: appliance 'UBUNTU'
*Feb  3 19:10:06.385: VIRTUAL-SERVICE [UBUNTU]: Activate response handler: rsp_rc 0
*Feb  3 19:10:06.385: VIRTUAL-SERVICE [UBUNTU]: Deliver response: appliance_state 3 rsp_rc 0 if_notify name UBUNTU clnt_type 0 act_state 0
*Feb  3 19:10:06.385: %VIRT_SERVICE-5-ACTIVATION_STATE: Successfully activated virtual service UBUNTUconf t
*Feb  3 19:10:06.385: VIRTUAL-SERVICE [UBUNTU]: Stopped virtual service (1) response timer
*Feb  3 19:10:06.385: VIRTUAL-SERVICE: Delivered Virt-manager response message to virtual service 'UBUNTU' - Response: 'OK'
*Feb  3 19:10:06.385: VIRTUAL-SERVICE [UBUNTU]: set owner to 'IOSd' in appliance

SERVICECONTAINER#show virtual-service list
Virtual Service List:

Name                    Status             Package Name
------------------------------------------------------------------------------
UBUNTU                  Activated          ubuntu1604.ova

SERVICECONTAINER#show ip dhcp bind
Bindings from all pools not associated with VRF:
IP address      Client-ID/              Lease expiration        Type       State      Interface
                Hardware address/
                User name
192.168.0.2     001e.e5b1.cfba          Feb 04 2018 07:20 PM    Automatic  Active     VirtualPortGroup0

Access the VM using the (virtual) Serial-Console

SERVICECONTAINER#virtual-service connect name UBUNTU console
Connected to appliance. Exit using ^c^c^c

Ubuntu 16.04.3 LTS ubuntu-server ttyS0

ubuntu-server login: user
Password:
Last login: Sat Feb  3 20:23:27 CET 2018 on ttyS0
Welcome to Ubuntu 16.04.3 LTS (GNU/Linux 4.4.0-87-generic x86_64)

 * Documentation:  https://help.ubuntu.com
 * Management:     https://landscape.canonical.com
 * Support:        https://ubuntu.com/advantage

9 packages can be updated.
7 updates are security updates.


user@ubuntu-server:~$ who
user     ttyS0        2018-02-03 23:12

Logout: 3x [CTRL]+

user@ubuntu-server:~$ ^C

Access the VM using SSH via the internal Network

SERVICECONTAINER#ssh -l user 192.168.0.2
Password:
Welcome to Ubuntu 16.04.3 LTS (GNU/Linux 4.4.0-87-generic x86_64)

 * Documentation:  https://help.ubuntu.com
 * Management:     https://landscape.canonical.com
 * Support:        https://ubuntu.com/advantage

9 packages can be updated.
7 updates are security updates.

Last login: Sat Feb  3 23:12:21 2018
user@ubuntu-server:~$ who
user     pts/0        2018-02-03 23:13 (192.168.0.1)

Check the local python/NAPALM-Setup to get facts about the containing router

user@ubuntu-server:~$ python
Python 2.7.12 (default, Dec  4 2017, 14:50:18)
[GCC 5.4.0 20160609] on linux2
Type "help", "copyright", "credits" or "license" for more information.

>>> import napalm

>>> iosdriver = napalm.get_network_driver('ios')
dpass', optional_args={'port': 22, 'dest_file_system': 'bootflash:'})sword='rmon

>>> router.open()

>>> print router.get_facts()
{u'os_version': u'Virtual XE Software (X86_64_LINUX_IOSD-UNIVERSALK9-M), Version 16.7.1, RELEASE SOFTWARE (fc6)', u'uptime': 12840, u'interface_list': [u'GigabitEthernet1', u'GigabitEthernet2', u'GigabitEthernet3', u'VirtualPortGroup0'], u'vendor': u'Cisco', u'serial_number': u'9SNHUBYAML', u'model': u'CSR1000V', u'hostname': u'SERVICECONTAINER', u'fqdn': u'SERVICECONTAINER.lab.local'}

NAPALM Validation (Static rule)

Yesterday I attended a short presentation held by David Barroso introducing the NAPALM-„Validation“-Module.

Configuring the Network fully automated is just half the way to go.
Checking the Network-State the other half.

Python-Script
Had to try it out the easy-way using just python (without ansible) first:

import napalm

#just to get the DICT returned by the "compliance_report"-Method in a readable manner on the screen
import pprint
pp = pprint.PrettyPrinter()

iosdriver = napalm.get_network_driver('ios')

DEVICE="192.168.2.139"
USER="rmond"
PASS="rmondpassword"
router = iosdriver(hostname=DEVICE, username=USER,  password=PASS, optional_args={'port': 22, 'dest_file_system': 'bootflash:'})

router.open()
report = router.compliance_report("validate.yaml")
router.close()

pp.pprint(report)

Static YAML-File
Validating against the following static „validate.yaml“-File:

- get_facts:
    hostname: CSR-1-DC
    os_version: CSR1000V Software (X86_64_LINUX_IOSD-UNIVERSALK9-M), Version 15.4(2)S3, RELEASE SOFTWARE (fc2)
    interface_list:
        list:
            - GigabitEthernet1
            - GigabitEthernet2
            - GigabitEthernet3
            - GigabitEthernet4
            - VirtualPortGroup0
- get_interfaces_ip:
    GigabitEthernet1:
      ipv4:
       192.168.2.139:
         prefix_length: 25

leads to the following result

{u'complies': False,
 'get_facts': {u'complies': True,
               u'extra': [],
               u'missing': [],
               u'present': {'hostname': {u'complies': True,
                                         u'nested': False},
                            'interface_list': {u'complies': True,
                                               u'nested': True},
                            'os_version': {u'complies': True,
                                           u'nested': False}}},
 'get_interfaces_ip': {u'complies': False,
                       u'extra': [],
                       u'missing': [],
                       u'present': {'GigabitEthernet1': {u'complies': False,
                                                         u'diff': {u'complies': False,
                                                                   u'extra': [],
                                                                   u'missing': [],
                                                                   u'present': {'ipv4': {u'complies': False,
                                                                                         u'diff': {u'complies': False,
                                                                                                   u'extra': [],
                                                                                                   u'missing': [],
                                                                                                   u'present': {'192.168.2.139': {u'complies': False,
                                                                                                                                 u'diff': {u'complies': False,
                                                                                                                                           u'extra': [],
                                                                                                                                           u'missing': [],
                                                                                                                                           u'present': {'prefix_length': {u'actual_value': 24,
                                                                                                                                                                          u'complies': False,
                                                                                                                                                                          u'expected_value': 25,
                                                                                                                                                                          u'nested': False}}},
                                                                                                                                 u'nested': True}}},
                                                                                         u'nested': True}}},
                                                         u'nested': True}}},
 u'skipped': []}

Whats wrong with the Router?
„nested = True“ means – the issue is downward in the datastructure.

In the example, the first Object with „nested = False“ is „prefix_length“
The Prefix-Length („Subnet-Mask“) is wrong:

  • wanted: /25-Bit
  • configured: /24-Bit.

Validate the output of commands which use additional parameters
Example: Ping to the Default-Gateway

First: Get familiar with the datastructure returned by the command:

>>> pp.pprint(router.ping("192.168.2.1"))
{u'success': {u'packet_loss': 0,
              u'probes_sent': 5,
              u'results': [{u'ip_address': u'192.168.2.1', u'rtt': 0.0},
                           {u'ip_address': u'192.168.2.1', u'rtt': 0.0},
                           {u'ip_address': u'192.168.2.1', u'rtt': 0.0},
                           {u'ip_address': u'192.168.2.1', u'rtt': 0.0},
                           {u'ip_address': u'192.168.2.1', u'rtt': 0.0}],
              u'rtt_avg': 1.0,
              u'rtt_max': 2.0,
              u'rtt_min': 1.0,
              u'rtt_stddev': 0.0}}

add the following portion to the YAML-File:

- ping:
    _name: Default-Gateway
    _kwargs:
      destination: "192.168.2.1"
    success:
      packet_loss: 0

Result (Success)

>>> pp.pprint(router.compliance_report("validate.yaml"))
{'Default-Gateway': {u'complies': True,
                     u'extra': [],
                     u'missing': [],
                     u'present': {'success': {u'complies': True,
                                              u'nested': True}}},

Result (failure)

>>> pp.pprint(router.compliance_report("validate.yaml"))
{'Default-Gateway': {u'complies': False,
                     u'extra': [],
                     u'missing': [],
                     u'present': {'success': {u'complies': False,
                                              u'diff': {u'complies': False,
                                                        u'extra': [],
                                                        u'missing': [],
                                                        u'present': {'packet_loss': {u'actual_value': -1,
                                                                                     u'complies': False,
                                                                                     u'expected_value': 0,
                                                                                     u'nested': False}}},
                                              u'nested': True}}},

Cisco CSR1000V Software Upgrade – Automated

No. There’s no need to export the IOS-Config, deploy another Router-VM using an OVA and import the old IOS-Config to this new router.

  • even, if finetuned… This strategy might lower the downtime!?
  • VMware uses this strategy when upgrading NSX-Edge-Gateways very successfully!

But this is a lab environment, i’ll have to upgrade almost ten CSR1000v-Routers and there’s no time to do it manually router-by-router.

The common process is as it has been for the last decades:

  • copy the new csr1000v-bin-File into the routers bootflash
  • verify the file
  • set the boot-variable
  • reboot

Upload BIN-File into the routers
There might be dozens of valid possibilities to get the bin-file into the router.

I prefer SCP (Secure Copy Protocol) since i uses the same firewall-rules as SSH so it’s unlikely that firewalls will disturb the update process.

  • i downloaded the bin-file using a windows-machine
  • i’ll use PSCP from the Putty-software-suite

Basics: Loop over a set of IPs in Windows Command-Shell?
That’s all:

C:> for %i in (235,241,240,239,236,237,238,242,243) do @echo %i
235
241
240
239
236
237
238
242
243

Let’s go


c:\Users\admin\Downloads>dir *.bin

 Verzeichnis von c:\Users\admin\Downloads

16.12.2017  17:44       365.660.728 csr1000v-universalk9.16.03.05.SPA.bin
               1 Datei(en),    365.660.728 Bytes
               0 Verzeichnis(se), 73.892.016.128 Bytes frei

c:\Users\admin\Downloads>for %i in (235,241,240,239,236,237,238,242,243) do @start pscp -2 -scp -l rmond -pw rmondpass csr1000v-universalk916.03.05.SPA.bin 192.168.2.%i:bootflash:csr1000v-universalk9.16.03.05.SPA.bin

This will initiate 9 parallel SCP-Filetransfers:

  • nobody said, this would improve the transfer speed 😉
  • i’ll do something else in the meantime
9x PSCP-File-Transfers

Verify the transferred images

import napalm
from easysnmp import Session
 
#credentials
DEVICE="192.168.2.235"
USER="rmond"
PASS="rmondpass"
SNMPRW="WRITE"
IOSFILE="bootflash:csr1000v-universalk9.16.03.05.SPA.bin"
IOSMD5="49922f08698284312379b4e0a2534bc2"
VERIFIED="Verified"

SNMPOIDReload="1.3.6.1.4.1.9.2.9.9.0"
SNMPOIDReloadVal=2
 
#instanciate NAPALM
iosdriver = napalm.get_network_driver('ios')
 
#connect to device
router = iosdriver(hostname=DEVICE, username=USER,  password=PASS, optional_args={'port': 22, 'dest_file_system': 'bootflash:'})
router.open()

#construct command to verify the integrity 
cliVerify=["verify /md5 "+IOSFILE+" "+IOSMD5]
result=router.cli(cliVerify)[cliVerify[0]]

Set the Bootvar and check, if it’s set

#%Error verifying 
#Verified
if (result.find(VERIFIED)>-1):
    print "(1) uploaded File: OK"
    cmdBootSystem="boot system flash bootflash:csr1000v-universalk9.16.03.05.SPA.bin"
    #push boot-system-command to router
    router.load_merge_candidate(config=cmdBootSystem)
    router.commit_config()

    cliShowBootvar=["show bootvar"]
    result=router.cli(cliShowBootvar)[cliShowBootvar[0]]
    #disconnet
    router.close()
    if (result.find("BOOT variable = "+IOSFILE)>-1):
        print "(2) boot-Variable set"
        print "=> Router "+DEVICE+" ready to reload"

Reload the Router using SNMP

        #snmp-server system-shutdown = 1.3.6.1.4.1.9.2.9.9.0 => Value 2 => Reload
        session = Session(hostname=DEVICE, community=SNMPRW, version=2)
        session.set(SNMPOIDReload,SNMPOIDReloadVal,"INTEGER")
else:
    #disconnet
    router.close()

The Router reboots

***
*** --- SHUTDOWN in 0:00:00 ---
*** Message from network to all terminals:
***
Null Message

Be patient.

W-DCFW#show ver | inc IOS.*Version
Cisco IOS XE Software, Version 16.03.05
Cisco IOS Software [Denali], CSR1000V Software (X86_64_LINUX_IOSD-UNIVERSALK9-M), Version 16.3.5, RELEASE SOFTWARE (fc1)

The new software-release is up and running.

Pull configs from CSR1000v using NAPALM

I usually use an „wr“-command-alias, an EEM-Applet or the IOS-Archive-Feature to copy the running-config to a central repository when an admin enters the „write“-command [copy running-config startup-config].

Sometimes it’s handy to pull the current running-config from a device.

Following Centralized access to device-configuration and other state-information using NAPALM – NAPALM makes this very easy:

import napalm

#credentials
DEVICE="192.168.2.139"
USER="rmond"
PASS="rmondpass"

#instanciate NAPALM
iosdriver = napalm.get_network_driver('ios')

#connect to device
router = iosdriver(hostname=DEVICE, username=USER,  password=PASS, optional_args={'port': 22, 'dest_file_system': 'bootflash:'})
router.open()

#read the hostname from the device
facts = router.get_facts()
hostname= facts["hostname"]

#read the device-config
clishowrun=['show running-config']
configRun=router.cli(clishowrun)[clishowrun[0]]

#disconnet
router.close()

#construct config-filename
filename = hostname+".cfg"

#write config-text into the file
with open(filename, "w") as f:
  print >>f, configRun

Automated RMON Alarm/Event-configuration for class-based QoS-Monitoring using NAPALM

In Configure RMON Alarms&Events by script I’ve shown a short python-algorithm to to discover all Cisco class-based QoS (cbQoS) packet-/drop-counters and to generate RMON-alarms for each. The router monitors these counters every 300s, calculates the delta for the interval and raises RMON-events when there were packets/drops or when the have been before but not anymore.

This RMON-event has been configured as an syslog-message to an syslog-receiver etc.

The existing script just generated a list of cli-commands which had to be entered manually to the router-config.
Not a valid aproach when having hundreds devices to be configured.

Now i want the script to automatically configure the router.

  • add both „rmon event“-objects for the rising- and the falling-threshold of the monitored alarms
  • read the existing „rmon alarm“-objects from the device config, which have been configured by this script during a former run
  • remove these existing alarms
  • discover all cbQoS-packet/drop-counters
  • add corresponding „rmon alarm“-objects

I’d like to refer to Centralized access to device-configuration and other state-information using NAPALM for some basic information regarding NAPALM and how to create the „router“-object in python.

NAPALM: Read existing RMON alarms.
I’ll use the following python-logic to

  • remote-execute the command
  • immedeately pull the cli-output out of the python-dictionary: the CLI-Command is the dict-key
>>> cligetrmon=['show rmon alarms | inc RMONevent']
>>> rmonalarms = router.cli(cligetrmon)[cligetrmon[0]]
>>> print rmonalarms
Alarm 10001 is active, owned by RMONevent

Generate CLI to delete these RMON alarms

>>> cmdnormon = ""
>>> for alarm in rmonalarms.split('\n'):
...  alarmid = alarm.split(' ')[1]
...  cmdnormon += "no rmon alarm "+alarmid+"\n"
...
>>>
>>> print cmdnormon
no rmon alarm 10001

Static CLI to add required RMON events

>>> cmdrmonevent = "rmon event 10 log owner RMONevent\n"
>>> cmdrmonevent += "rmon event 11 log owner RMONevent\n"

Read Cisco cbQoS-MIB to fetch interesting QoS-counters, generate CLI for RMON-alarms

>>> from easysnmp import Session
>>> hostname = "192.168.2.72"
>>> session = Session(hostname, community='READ', version=2)
>>>
... cbqos = session.walk('1.3.6.1.4.1.9.9.166.1.15.1.1.13')
>>>
... cmdrmon = ""
>>> alarmID = 10001
>>>
... for i in cbqos:
...   oidList=i.oid.split(".")
...   q=oidList.pop()
...   p=oidList.pop()
...   #print p,q
...   ifTypeID=int(session.get("1.3.6.1.4.1.9.9.166.1.1.1.1.2."+p).value)
...   ifDirID=int(session.get("1.3.6.1.4.1.9.9.166.1.1.1.1.3."+p).value)
...   if (ifDirID==2):
...     cmdrmon += "rmon alarm "+str(alarmID)+" "+i.oid+" 300 delta rising-threshold 1 11 falling-threshold 0 10 owner RMONevent\n"
...   alarmID += 1
...

Concatenate all commmands

>>> cmd = cmdrmonevent+cmdnormon+cmdrmon
>>> print cmd
rmon event 10 log owner RMONevent
rmon event 11 log owner RMONevent
no rmon alarm 10001
rmon alarm 10001 iso.3.6.1.4.1.9.9.166.1.15.1.1.13.18.65536 300 delta rising-threshold 1 11 falling-threshold 0 10 owner RMONevent
rmon alarm 10002 iso.3.6.1.4.1.9.9.166.1.15.1.1.13.18.131072 300 delta rising-threshold 1 11 falling-threshold 0 10 owner RMONevent
rmon alarm 10003 iso.3.6.1.4.1.9.9.166.1.15.1.1.13.18.196608 300 delta rising-threshold 1 11 falling-threshold 0 10 owner RMONevent
rmon alarm 10004 iso.3.6.1.4.1.9.9.166.1.15.1.1.13.34.65536 300 delta rising-threshold 1 11 falling-threshold 0 10 owner RMONevent
rmon alarm 10005 iso.3.6.1.4.1.9.9.166.1.15.1.1.13.34.131072 300 delta rising-threshold 1 11 falling-threshold 0 10 owner RMONevent
rmon alarm 10006 iso.3.6.1.4.1.9.9.166.1.15.1.1.13.34.196608 300 delta rising-threshold 1 11 falling-threshold 0 10 owner RMONevent

Push the commands to the Router

>>> router.load_merge_candidate(config=cmd)

Check the differences befor apply the changes

>>> print router.compare_config()
-no rmon alarm 10001
+rmon alarm 10001 iso.3.6.1.4.1.9.9.166.1.15.1.1.13.18.65536 300 delta rising-threshold 1 11 falling-threshold 0 10 owner RMONevent
+rmon alarm 10002 iso.3.6.1.4.1.9.9.166.1.15.1.1.13.18.131072 300 delta rising-threshold 1 11 falling-threshold 0 10 owner RMONevent
+rmon alarm 10003 iso.3.6.1.4.1.9.9.166.1.15.1.1.13.18.196608 300 delta rising-threshold 1 11 falling-threshold 0 10 owner RMONevent
+rmon alarm 10004 iso.3.6.1.4.1.9.9.166.1.15.1.1.13.34.65536 300 delta rising-threshold 1 11 falling-threshold 0 10 owner RMONevent
+rmon alarm 10005 iso.3.6.1.4.1.9.9.166.1.15.1.1.13.34.131072 300 delta rising-threshold 1 11 falling-threshold 0 10 owner RMONevent
+rmon alarm 10006 iso.3.6.1.4.1.9.9.166.1.15.1.1.13.34.196608 300 delta rising-threshold 1 11 falling-threshold 0 10 owner RMONevent

Verify the pushed commands at the router-CLI

IOS-RTR#dir *.txt
Directory of bootflash:/*.txt

Directory of bootflash:/

   21  -rw-         898  Nov 24 2017 15:05:32 +00:00  merge_config.txt
7835619328 bytes total (6613028864 bytes free)

IOS-RTR#more merge_config.txt
rmon event 10 log owner RMONevent
rmon event 11 log owner RMONevent
no rmon alarm 10001
rmon alarm 10001 iso.3.6.1.4.1.9.9.166.1.15.1.1.13.18.65536 300 delta rising-threshold 1 11 falling-threshold 0 10 owner RMONevent
rmon alarm 10002 iso.3.6.1.4.1.9.9.166.1.15.1.1.13.18.131072 300 delta rising-threshold 1 11 falling-threshold 0 10 owner RMONevent
rmon alarm 10003 iso.3.6.1.4.1.9.9.166.1.15.1.1.13.18.196608 300 delta rising-threshold 1 11 falling-threshold 0 10 owner RMONevent
rmon alarm 10004 iso.3.6.1.4.1.9.9.166.1.15.1.1.13.34.65536 300 delta rising-threshold 1 11 falling-threshold 0 10 owner RMONevent
rmon alarm 10005 iso.3.6.1.4.1.9.9.166.1.15.1.1.13.34.131072 300 delta rising-threshold 1 11 falling-threshold 0 10 owner RMONevent
rmon alarm 10006 iso.3.6.1.4.1.9.9.166.1.15.1.1.13.34.196608 300 delta rising-threshold 1 11 falling-threshold 0 10 owner RMONevent

Commit the changes

>>> router.commit_config()

Or discard them

>>> router.discard_config()

It’s possible to rollback committed changes.

>>> router.rollback()

Finally: Disconnect the session with the device

>>> router.close()

Again: A brief look to the router

IOS-RTR#show run | inc rmon
! Last configuration change at 19:08:59 UTC Fri Nov 24 2017 by rmond
! NVRAM config last updated at 19:09:00 UTC Fri Nov 24 2017 by rmond
username rmond privilege 15 secret 5 $1$7VnE$2O18Vfcr4y7eO5gY7l4xx1
rmon event 10 log owner RMONevent
rmon event 11 log owner RMONevent
rmon alarm 10001 cbQosCMStatsEntry.13.18.65536 300 delta rising-threshold 1 11 falling-threshold 0 10 owner RMONevent
rmon alarm 10002 cbQosCMStatsEntry.13.18.131072 300 delta rising-threshold 1 11 falling-threshold 0 10 owner RMONevent
rmon alarm 10003 cbQosCMStatsEntry.13.18.196608 300 delta rising-threshold 1 11 falling-threshold 0 10 owner RMONevent
rmon alarm 10004 cbQosCMStatsEntry.13.34.65536 300 delta rising-threshold 1 11 falling-threshold 0 10 owner RMONevent
rmon alarm 10005 cbQosCMStatsEntry.13.34.131072 300 delta rising-threshold 1 11 falling-threshold 0 10 owner RMONevent
rmon alarm 10006 cbQosCMStatsEntry.13.34.196608 300 delta rising-threshold 1 11 falling-threshold 0 10 owner RMONevent
IOS-RTR#

It’s already written to NVRAM

IOS-RTR#show startup-config | inc rmon
! Last configuration change at 19:08:59 UTC Fri Nov 24 2017 by rmond
! NVRAM config last updated at 19:09:00 UTC Fri Nov 24 2017 by rmond
username rmond privilege 15 secret 5 $1$7VnE$2O18Vfcr4y7eO5gY7l4xx1
rmon event 10 log owner RMONevent
rmon event 11 log owner RMONevent
rmon alarm 10001 cbQosCMStatsEntry.13.18.65536 300 delta rising-threshold 1 11 falling-threshold 0 10 owner RMONevent
rmon alarm 10002 cbQosCMStatsEntry.13.18.131072 300 delta rising-threshold 1 11 falling-threshold 0 10 owner RMONevent
rmon alarm 10003 cbQosCMStatsEntry.13.18.196608 300 delta rising-threshold 1 11 falling-threshold 0 10 owner RMONevent
rmon alarm 10004 cbQosCMStatsEntry.13.34.65536 300 delta rising-threshold 1 11 falling-threshold 0 10 owner RMONevent
rmon alarm 10005 cbQosCMStatsEntry.13.34.131072 300 delta rising-threshold 1 11 falling-threshold 0 10 owner RMONevent
rmon alarm 10006 cbQosCMStatsEntry.13.34.196608 300 delta rising-threshold 1 11 falling-threshold 0 10 owner RMONevent

Centralized access to device-configuration and other state-information using NAPALM

Since I still want to build a centralized solution for automated configuration of RMON-alarms to monitor Cisco cbQoS-packet/drop-counters a solution to retrieve and modify device configurations was needed.

The NAPALM (Network Automation and Programmability Abstraction Layer with Multivendor support) Framework seems to provide the required features.
NAPALM Installation
Some NAPALM-IOS dependencies have to be fulfilled first.

sudo apt-get install -y --force-yes libssl-dev libffi-dev python-dev python-cffi

The „partial installation“ seems to be not working anymore, the full installation uses some KB more ressources, not worth to think about the partial installation…

pip install napalm

IOS Preperation
To allow remote-access to the centralized NAPALM server these features need to be enabled in each IOS device:

  • Remote-Access via SSH,
  • SCP (Secure Copy),
  • the IOS „Archive“-feature is the foundation of NAPALM config-operations.
IOS-RTR#conf t
Enter configuration commands, one per line.  End with CNTL/Z.

! AAA preferred for production-systems, of course
IOS-RTR(config)#username rmond privilege 15 secret rmondpass

! required
IOS-RTR(config)#ip scp server enable

! no annoying [yes/no]-prompts for file-operations anymore
IOS-RTR(config)#file prompt quiet

! create the folder in the filesystem for the Archive
IOS-RTR(config)#do mkdir bootflash:/ARCHIVE

IOS-RTR(config)#archive
IOS-RTR(config-archive)#path bootflash:/ARCHIVE/bak-

Explore Napalm

Go the the python shell:

user@snmp-server:~$ python
>>> import napalm
>>> iosdriver = napalm.get_network_driver('ios')

Autodiscovery of the router-filesystem doesn’t work, i know the filesystem of my router and pass it as „optional argument“ to router-object.
*** todo: troubleshoot/fix the autodiscovery ***

>>> router = iosdriver(hostname='192.168.2.72', username='rmond',  password='rmondpass', 
optional_args={'port': 22, 'dest_file_system': 'bootflash:'})
>>> router.open()

Go to the router cli-shell:

  • user „rmond“ is logged in
IOS-RTR#who
    Line       User       Host(s)              Idle       Location
*  1 vty 0     user       idle                 00:00:00 192.168.2.109
   2 vty 1     rmond      idle                 00:00:02 192.168.2.89

Back to python, try some NAPALM-functions.

>>> print router.get_facts()
{u'os_version': u'CSR1000V Software (X86_64_LINUX_IOSD-UNIVERSALK9-M), Version 15.4(2)S3, RELEASE SOFTWARE (fc2)', 
u'uptime': 657600, u'interface_list': [u'GigabitEthernet1', u'GigabitEthernet2', u'GigabitEthernet3'], u'vendor': u'Cisco', 
u'serial_number': u'afdökjl0123', u'model': u'CSR1000V', u'hostname': u'IOS-RTR', u'fqdn': u'IOS-RTR.lab.local'}

Execute interactive EXEC-Commands.

>>> cliping=['ping 192.168.2.1']
>>> print router.cli(cliping)
{'ping 192.168.2.1': u'Type escape sequence to abort.\n
Sending 5, 100-byte ICMP Echos to 192.168.2.1, timeout is 2 seconds:\n!!!!!\n
Success rate is 100 percent (5/5), round-trip min/avg/max = 1/1/2 ms'}

Fetch the current running-config.

>>> clishowrun=['show running-config']
>>> print router.cli(clishowrun)
{'show running-config': u'Building configuration...\n\nCurrent configuration : 2411 bytes\n!\n
! Last configuration change at 12:52:32 UTC Fri Nov 24 2017 by user\n! NVRAM config last updated at 10:24:26 UTC Fri Nov 24 2017 by user\n!\n
version 15.4\nservice timestamps debug datetime msec\nservice timestamps log datetime msec\n
...rmon event 10 log owner RMONevent\nrmon event 11 log owner RMONevent\n
rmon alarm 10001 cbQosCMStatsEntry.2.18.65536 300 delta rising-threshold 1 11 falling-threshold 0 10 owner RMONevent\n
...
end'}

Read some lines from the running-config, filter using the pipe.

>>> cligetrmon=['show rmon alarms | inc RMONevent']
>>> print router.cli(cligetrmon)
{'show rmon alarms | inc RMONevent': u'Alarm 10001 is active, owned by RMONevent'}

Log-out if you are finished:

>>> router.close()

Configure RMON Alarms&Events by script

Getting back to the original task..
Use a script on a centralized Controller-VM to figure out for which SNMP-OID RMON-Alarms should get configured

Get all current QoS-Drop-Counters, check the traffic-direction to monitor only outbount-queues, generate RMON-Alarms.

hostname = "192.168.2.72"

session = Session(hostname, community='READ', version=2)

cbqos = session.walk('1.3.6.1.4.1.9.9.166.1.15.1.1.13')

cmds = ["Configure on Host \""+hostname+"\"\n---"]
cmds.append("rmon event 10 log owner RMONevent")
cmds.append("rmon event 11 log owner RMONevent")

alarmID = 10001

for i in cbqos:
  oidList=i.oid.split(".")
  q=oidList.pop()
  p=oidList.pop()
  #print p,q
  ifTypeID=int(session.get("1.3.6.1.4.1.9.9.166.1.1.1.1.2."+p).value)
  ifDirID=int(session.get("1.3.6.1.4.1.9.9.166.1.1.1.1.3."+p).value)
  if (ifDirID==2):
    cmds.append("rmon alarm "+str(alarmID)+" "+i.oid+" 300 delta rising-threshold 1 11 falling-threshold 0 10 owner RMONevent")
  alarmID += 1

for cmd in cmds:
  print cmd

Example Output:

Configure on Host "192.168.2.72"
---
rmon event 10 log owner RMONevent
rmon event 11 log owner RMONevent
rmon alarm 10001 enterprises.9.9.166.1.15.1.1.13.18.65536 300 delta rising-threshold 1 11 falling-threshold 0 10 owner RMONevent
rmon alarm 10002 enterprises.9.9.166.1.15.1.1.13.18.131072 300 delta rising-threshold 1 11 falling-threshold 0 10 owner RMONevent
rmon alarm 10003 enterprises.9.9.166.1.15.1.1.13.18.196608 300 delta rising-threshold 1 11 falling-threshold 0 10 owner RMONevent
rmon alarm 10004 enterprises.9.9.166.1.15.1.1.13.34.65536 300 delta rising-threshold 1 11 falling-threshold 0 10 owner RMONevent
rmon alarm 10005 enterprises.9.9.166.1.15.1.1.13.34.131072 300 delta rising-threshold 1 11 falling-threshold 0 10 owner RMONevent
rmon alarm 10006 enterprises.9.9.166.1.15.1.1.13.34.196608 300 delta rising-threshold 1 11 falling-threshold 0 10 owner RMONevent

Todo: Verify existing RMON-Alarm/Event-Configuration at the device
Todo: Push the config automatically to the device