This user-account could get privileges from a Radius/TACACS+-Server which could provide access-logs, too.
- Generate RSA-Key: Windows as SSH-Client
I prefer Putty, usually in form of „mRemoteNG“, so i use PuttyGen to generate the RSA keypair.
- Windows.Start => PuttyGen
- (x) RSA, 4096-bits are supported, use it
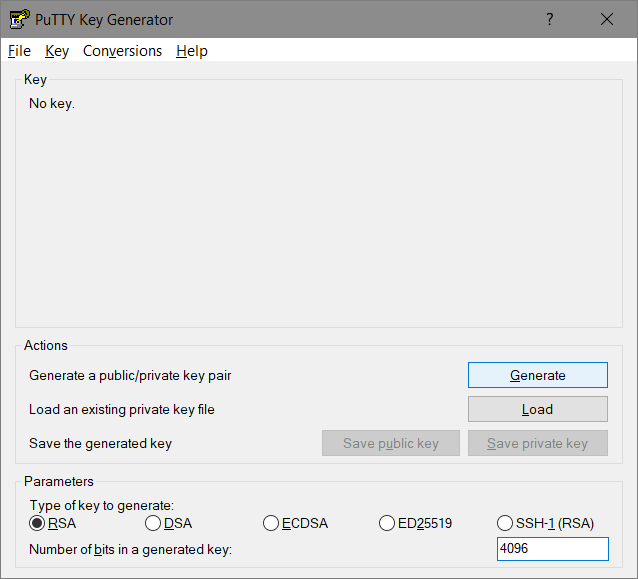
- [Generate]
- move the mouse to improve the randomgenerator
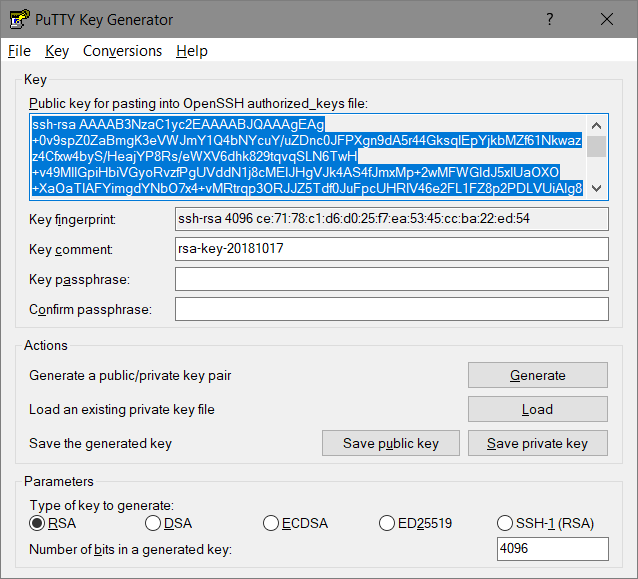
- change the „comment“ – for example replace it by an username
- add a passphrase – using this key-pair is possible only for people knowing this passphrase
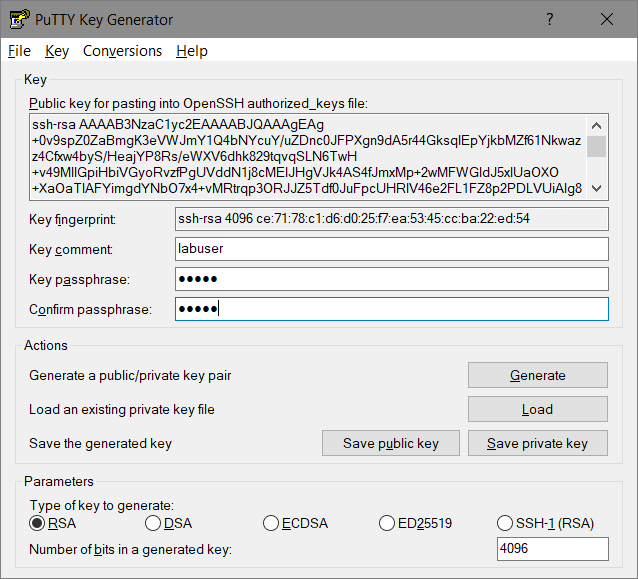
- Save both parts of the RSA keypair:
- [Save public key] => Filename for example „labuser.pub“
- [Save private key] => Filename for example „labuser.ppk“
- Verify
C:>dir labuser*.* -l
-rw-rw-rw-   1 user     group        2710 Oct 17 18:26 labuser.ppk
-rw-rw-rw-   1 user     group         820 Oct 17 18:26 labuser.pub
- Since the contained keys are BASE64-Encoded (The Secure Shell (SSH) Public Key File Format) you could extract them using grep.
C:>cat labuser.pub
---- BEGIN SSH2 PUBLIC KEY ----
Comment: "labuser"
AAAAB3NzaC1yc2EAAAABJQAAAgEAg+0v9spZ0ZaBmgK3eVWJmY1Q4bNYcuY/uZDn
c0JFPXgn9dA5r44GksqIEpYjkbMZf61Nkwazz4Cfxw4byS/HeajYP8Rs/eWXV6dh
k829tqvqSLN6TwH+v49MllGpiHbiVGyoRvzfPgUVddN1j8cMEIJHgVJk4AS4fJmx
Mp+2wMFWGldJ5xlUaOXO+XaOaTlAFYimgdYNbO7x4+vMRtrqp3ORJJZ5Tdf0JuFp
cUHRlV46e2FL1FZ8p2PDLVUiAlg8o8yxI8D52r0A5VQToKz3wKUchTWIWqRmIfOR
fS5jJz8+yTb/swkFs4FzAEpxD8CgvArz7ewTkna0zm8/wbysZCH1lKyce7AmZCp9
lm1Nsythl+6ztB9M01AbzBo2ElVo3GZHEr3AclsON8aCKgf8hVaZww5BqN1YHvUj
dKH0Mb8i0zLs+XFSgV7rYXg1EcHyBqsRFAi5OdkuGwd5D2NfWkcwk2XBsi6qG8bP
951MlHi0SuiMTSTmskdf1OyzzIFaPYjaW9VQe36tg07MsBP48KOPEB4803k35gWx
Sw2nxAO4O9KisYNCfw0SHna9RiAWRsyykLUTe6Z39vzppTEiC+j2f6IQs9Celk4S
s9r8IIoI0yswtvc/DsJBLd8y0CmNwyZof9L5MSY1RlcBiCykUPh1Z+UFLEYrFBa1
qQCAwU8=
---- END SSH2 PUBLIC KEY ----
- THIS output could be directly used within Cisco-IOS command syntax:
C:>egrep "^[a-zA-Z0-9+\/=]+$" labuser.pub
AAAAB3NzaC1yc2EAAAABJQAAAgEAg+0v9spZ0ZaBmgK3eVWJmY1Q4bNYcuY/uZDn
c0JFPXgn9dA5r44GksqIEpYjkbMZf61Nkwazz4Cfxw4byS/HeajYP8Rs/eWXV6dh
k829tqvqSLN6TwH+v49MllGpiHbiVGyoRvzfPgUVddN1j8cMEIJHgVJk4AS4fJmx
Mp+2wMFWGldJ5xlUaOXO+XaOaTlAFYimgdYNbO7x4+vMRtrqp3ORJJZ5Tdf0JuFp
cUHRlV46e2FL1FZ8p2PDLVUiAlg8o8yxI8D52r0A5VQToKz3wKUchTWIWqRmIfOR
fS5jJz8+yTb/swkFs4FzAEpxD8CgvArz7ewTkna0zm8/wbysZCH1lKyce7AmZCp9
lm1Nsythl+6ztB9M01AbzBo2ElVo3GZHEr3AclsON8aCKgf8hVaZww5BqN1YHvUj
dKH0Mb8i0zLs+XFSgV7rYXg1EcHyBqsRFAi5OdkuGwd5D2NfWkcwk2XBsi6qG8bP
951MlHi0SuiMTSTmskdf1OyzzIFaPYjaW9VQe36tg07MsBP48KOPEB4803k35gWx
Sw2nxAO4O9KisYNCfw0SHna9RiAWRsyykLUTe6Z39vzppTEiC+j2f6IQs9Celk4S
s9r8IIoI0yswtvc/DsJBLd8y0CmNwyZof9L5MSY1RlcBiCykUPh1Z+UFLEYrFBa1
qQCAwU8=
- Generate RSA-Key: Linux as SSH-Client
- there might already exist a rsa-key in the „.ssh“-path of your home-directory
$ cd ~/.ssh/
$ ls -l
total 20
-rw------- 1 administrator administrator 1675 Aug 28 09:43 id_rsa
-rw-r--r-- 1 administrator administrator  405 Aug 28 09:43 id_rsa.pub
-rw-r--r-- 1 administrator administrator  222 Aug 28 11:07 known_hosts
$ cat id_rsa.pub
ssh-rsa AAAAB3NzaC1yc2EAAAADAQABAAABAQCohMsS3gJ/OcF4Hg43mKeVHKWl2lECCn0iZQu9QSrUjAb4PVHWXIbj11yy5Jh/ygMys0n9IED6357fkRmq8Cc8ujpU0sCen7kBFUt3UqbLg1PLT9wMmJAEv4dcxbX9WRvwYXjLd8+EgDYDmrj7vTB3xIvw1I2WWuUK2jPWbVI57vbyGtw224Qb9Qk0KQfyGiTvErZnddDg65/rn9Pyt7FQlzCwUPH0nyJVoFhiYYJYJszTKc8BTFB6VdIbALHc4atFmjYt7YDUvEvaZqOL+zwQtr7FmXsZ5oaRGV6ZChuBPTpNEL41w/Il1mSJicRykpD90O2AxlUFebQfABTWadnr administrator@lx-ubuntu
The RFC states that the key should get split into multiple lines containing max. 72 characters.
- use
- „cut“ to extract the encoded-key
- „fold“ to split the key into multiple lines
$ cut -d " " -f 2 id_rsa.pub
AAAAB3NzaC1yc2EAAAADAQABAAABAQCohMsS3gJ/OcF4Hg43mKeVHKWl2lECCn0iZQu9QSrUjAb4PVHWXIbj11yy5Jh/ygMys0n9IED6357fkRmq8Cc8ujpU0sCen7kBFUt3UqbLg1PLT9wMmJAEv4dcxbX9WRvwYXjLd8+EgDYDmrj7vTB3xIvw1I2WWuUK2jPWbVI57vbyGtw224Qb9Qk0KQfyGiTvErZnddDg65/rn9Pyt7FQlzCwUPH0nyJVoFhiYYJYJszTKc8BTFB6VdIbALHc4atFmjYt7YDUvEvaZqOL+zwQtr7FmXsZ5oaRGV6ZChuBPTpNEL41w/Il1mSJicRykpD90O2AxlUFebQfABTWadnr

$ cut -d " " -f 2 id_rsa.pub | fold -b -w 72
AAAAB3NzaC1yc2EAAAADAQABAAABAQCohMsS3gJ/OcF4Hg43mKeVHKWl2lECCn0iZQu9QSrU
jAb4PVHWXIbj11yy5Jh/ygMys0n9IED6357fkRmq8Cc8ujpU0sCen7kBFUt3UqbLg1PLT9wM
mJAEv4dcxbX9WRvwYXjLd8+EgDYDmrj7vTB3xIvw1I2WWuUK2jPWbVI57vbyGtw224Qb9Qk0
KQfyGiTvErZnddDg65/rn9Pyt7FQlzCwUPH0nyJVoFhiYYJYJszTKc8BTFB6VdIbALHc4atF
mjYt7YDUvEvaZqOL+zwQtr7FmXsZ5oaRGV6ZChuBPTpNEL41w/Il1mSJicRykpD90O2AxlUF
ebQfABTWadnr
- otherwise generate a new rsa key-pair („newid_rsa“)
$ ssh-keygen -t rsa -b 4096
Generating public/private rsa key pair.
Enter file in which to save the key (/home/administrator/.ssh/id_rsa): newid_rsa
Enter passphrase (empty for no passphrase): *****
Enter same passphrase again: *****
Your identification has been saved in newid_rsa.
Your public key has been saved in newid_rsa.pub.
The key fingerprint is:
SHA256:4g/JkvpFQmlTaOE2VQAZ9IHfz/+6NJiI8W/WVt9TJGA administrator@lx-ubuntu
The key's randomart image is:
+---[RSA 4096]----+
|   .=B=o.        |
|   .== .    E    |
|   .O...   . .   |
|   + o. .     . .|
|    . + So     o |
|     * * .oo  . .|
|    o B o ooo. .o|
|   . o o .o.+. .o|
|  ...   .o..o+. .|
+----[SHA256]-----+

$ ls -l
total 36
...
-rw------- 1 administrator administrator 3326 Oct 18 07:19 newid_rsa
-rw-r--r-- 1 administrator administrator  749 Oct 18 07:19 newid_rsa.pub
- IOS-Router: Add those public-keys to your IOS-Config
- i’ll use both clients (linux & windows) with the same cisco-user-account „labuser“
conf t
ip ssh pubkey-chain
username labuser
  key-string
AAAAB3NzaC1yc2EAAAABJQAAAgEAg+0v9spZ0ZaBmgK3eVWJmY1Q4bNYcuY/uZDn
c0JFPXgn9dA5r44GksqIEpYjkbMZf61Nkwazz4Cfxw4byS/HeajYP8Rs/eWXV6dh
k829tqvqSLN6TwH+v49MllGpiHbiVGyoRvzfPgUVddN1j8cMEIJHgVJk4AS4fJmx
Mp+2wMFWGldJ5xlUaOXO+XaOaTlAFYimgdYNbO7x4+vMRtrqp3ORJJZ5Tdf0JuFp
cUHRlV46e2FL1FZ8p2PDLVUiAlg8o8yxI8D52r0A5VQToKz3wKUchTWIWqRmIfOR
fS5jJz8+yTb/swkFs4FzAEpxD8CgvArz7ewTkna0zm8/wbysZCH1lKyce7AmZCp9
lm1Nsythl+6ztB9M01AbzBo2ElVo3GZHEr3AclsON8aCKgf8hVaZww5BqN1YHvUj
dKH0Mb8i0zLs+XFSgV7rYXg1EcHyBqsRFAi5OdkuGwd5D2NfWkcwk2XBsi6qG8bP
951MlHi0SuiMTSTmskdf1OyzzIFaPYjaW9VQe36tg07MsBP48KOPEB4803k35gWx
Sw2nxAO4O9KisYNCfw0SHna9RiAWRsyykLUTe6Z39vzppTEiC+j2f6IQs9Celk4S
s9r8IIoI0yswtvc/DsJBLd8y0CmNwyZof9L5MSY1RlcBiCykUPh1Z+UFLEYrFBa1
qQCAwU8=
exit
username labuser
  key-string
AAAAB3NzaC1yc2EAAAADAQABAAABAQCohMsS3gJ/OcF4Hg43mKeVHKWl2lECCn0iZQu9QSrU
jAb4PVHWXIbj11yy5Jh/ygMys0n9IED6357fkRmq8Cc8ujpU0sCen7kBFUt3UqbLg1PLT9wM
mJAEv4dcxbX9WRvwYXjLd8+EgDYDmrj7vTB3xIvw1I2WWuUK2jPWbVI57vbyGtw224Qb9Qk0
KQfyGiTvErZnddDg65/rn9Pyt7FQlzCwUPH0nyJVoFhiYYJYJszTKc8BTFB6VdIbALHc4atF
mjYt7YDUvEvaZqOL+zwQtr7FmXsZ5oaRGV6ZChuBPTpNEL41w/Il1mSJicRykpD90O2AxlUF
ebQfABTWadnr
exit

exit
exit
end
- Now two RSA-keys are valid to authenticate the user „labuser“
- The Router stores only the key-hashes:
VBOX-CSR-1#show run | section key-chain
ip ssh pubkey-chain
  username labuser
   key-hash ssh-rsa CE7178C1D6D025F7EA5345CCBA22ED54
   key-hash ssh-rsa ABBF42AB330CA79B235FB369FCC4D53E
- btw. look (above) – puttygen displayed the hash
ssh-rsa 4096 ce:71:78:c1:d6:d0:25:f7:ea:53:45:cc:ba:22:ed:54
so you could save time to just configure the hash.
- Prove SSH-Client-access: Linux
$ who
administrator pts/0        Oct 18 17:37 (192.168.56.1)
Linux re-uses the name of the current linux-user to login into the ssh-device unless a user is specified
$ ssh 192.168.56.102
Password:
The IOS-Router prompts for a password for users who have no known-public-key in the running-config – and there is no public-key for a user named „administrator“.
- This is the default-behaviour:
(config)# ip ssh server algorithm authentication publickey keyboard password
- Change this undesired behaviour (disable „keyboard“ and „password“):
conf t
  ip ssh server algorithm authentication publickey
end
Now the router blocks the access since the publickey of „administrator“ is not known.
$ ssh 192.168.56.102
administrator@192.168.56.102: Permission denied (publickey).
- Let the linux-user „administrator“ log into the router as „labuser“:
- Manually specify a username to use and gain CLI access
$ ssh -l labuser 192.168.56.102
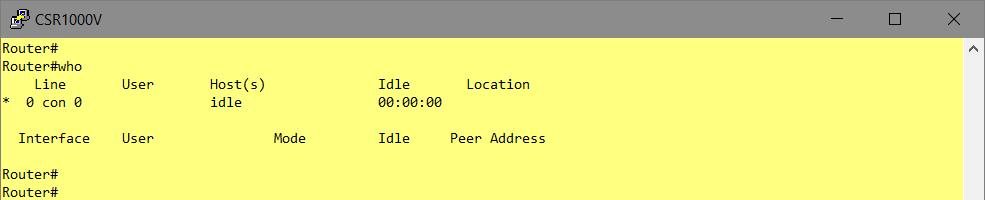
VBOX-CSR-1>who
Line User Host(s) Idle Location
0 con 0 idle 00:02:43
* 1 vty 0 labuser idle 00:00:00 192.168.56.101
- You don’t want to configure an „enable secret“-password in 2018..
VBOX-CSR-1>enable
% No password set
- configure a local user-privilege or use for example the Cisco ISE for centralized Authorization and additional Accounting if needed.
conf t
  username labuser privilege 15
end
- Check – you’ll access privileged-mode immediately
$ ssh -l labuser 192.168.56.102
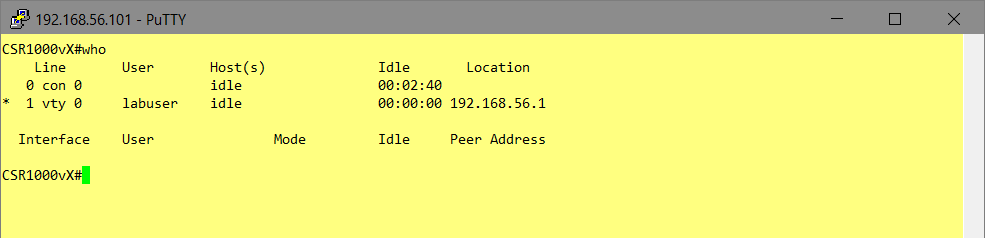
VBOX-CSR-1#who
Line User Host(s) Idle Location
0 con 0 idle 00:00:10
* 1 vty 0 labuser idle 00:00:00 192.168.56.101
Interface User Mode Idle Peer Address
VBOX-CSR-1#show priv
Current privilege level is 15
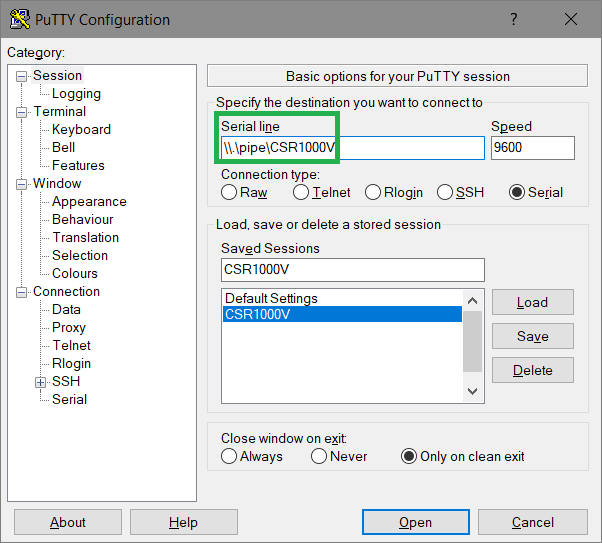
- Prove SSH-Client-access: Windows/Putty
- Specify the „Auto-Login-Username“: „labuser“
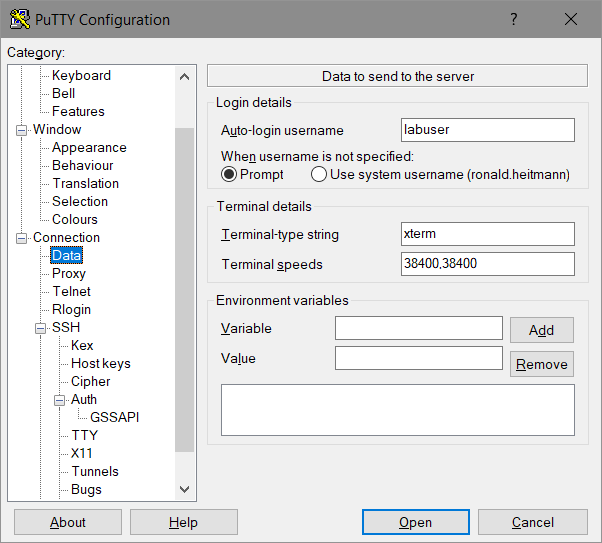
- Specify the private-key-file (*.ppk)
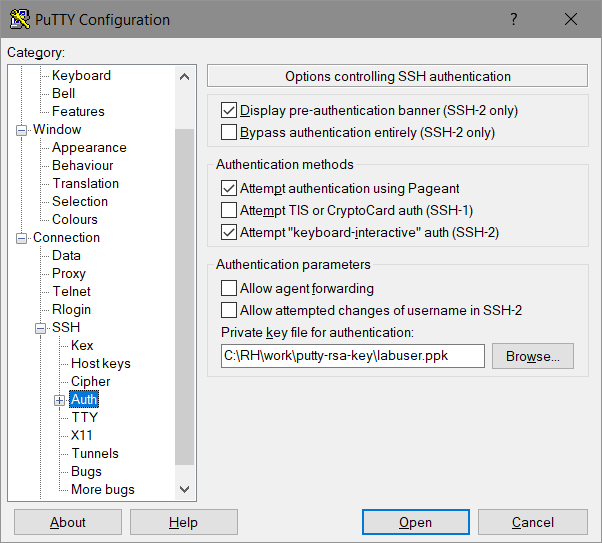
- [Open]
- since the ppk-file was password-protected (in PuttyGen) this password has to be entered:
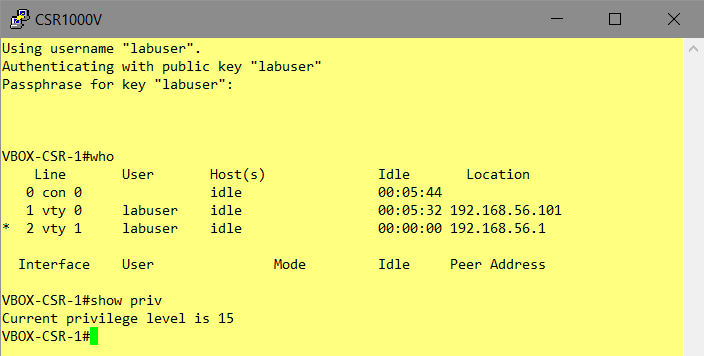
- privilege-15 access for the windows-user
[btw. the linux-ssh-client „labuser“ is still logged in]
That’s all.