Cloud-Init for VMs in private and public Clouds

Initialize VMs in a vSphere private Cloud using Cloud-Init

Cloud-Init Datasource for VMware GuestInfo is deprecated

The Web is full of explanations, how to use „Cloud-Init Datasource for VMware GuestInfo“ but https://github.com/vmware-archive/cloud-init-vmware-guestinfo it is deprecated.

It is now integrated natively into Cloud-Init

Cloud-Init 21.3 has been released https://discourse.ubuntu.com/t/release-of-cloud-init-21-3/23857 which integrates this software.

New name:

I’d expect it to be in the current Ubuntu 21.10 (Impish Indri) https://cloud-images.ubuntu.com/impish/current/ – the release notes for 21.10 don’t specify the exact version.

Ubuntu 20.04 (Focal Fossa) is still at cloud-init 20.1-10 according to https://wiki.ubuntu.com/FocalFossa/ReleaseNotes which is too old.

Prepare a VM-Template

Unfortunately Ubuntu provides the „cloud“-images in OVA-Format.

Create VM-Template from OVA

Deploy

  • impish-server-cloudimg-amd64.ova

as

  • VM
  • keep all settings set to default

Customize VM

  • disable (or remove) the „Serial“-port
  • disable vApp-Properties
    • those would break the cloud-init process later on
    • VM=>Configure
    • Settings=>vApp-Options
    • disable [ ] vApp-Properties

Convert to Template

  • VM-Template „ubuntu-impish-21.10-cloudimg“.

Clone a VM from this VM-Template

This shouldn’t be done manually, I’d suggest using terraform

Verify that Cloud-Init 21.3 is available and the „VMware“-Datasource is included

Cloud-Init Version

Release 21.3 is available:

ubuntu@ubuntu:~$ cloud-init --version
/usr/bin/cloud-init 21.3-1-g6803368d-0ubuntu3

Check the Cloud-Init Datasource

Datasource „vmware“ is included:

ubuntu@ubuntu:~$ cloud-id
vmware

Ubuntu 20.04 – Static Server IP-Address

Of course, every release of an linux-distribution has to change the way very basic network settings are configured. 😉

  • Ubuntu 20.04 Server LTS

to be fair:

  • „netplan“ has been in place since at least release 17.10
  • the „subiquity“-tool which has written the yaml-file has been confusing me…

Step 1: Figure out – which IP/DNS-Settings where set by DHCP

user@hostname:~/map-local$ sudo netplan ip leases ens160
# This is private data. Do not parse.
ADDRESS=172.16.9.107
NETMASK=255.255.255.0
ROUTER=172.16.9.254
SERVER_ADDRESS=172.16.9.252
T1=43200
T2=75600
LIFETIME=86400
DNS=208.67.222.222 208.67.220.220
CLIENTID=ff9f6e847110020000ab11b9a540e7d1e0d2b5

Step 2: Disable (if required) automation tools – here „subiquity“

This is YAML:

user@hostname:~/map-local$ cat /etc/netplan/00-installer-config.yaml
# This is the network config written by 'subiquity'
network:
  ethernets:
    ens160:
      dhcp4: true
  version: 2

user@hostname:~/map-local$ cat /etc/cloud/cloud.cfg.d/subiquity-disable-cloudinit-networking.cfg
network: {config: disabled}

Optional: Try a temporarily YAML-File before Apply

  • safeguard if you are using a ssh-connection
  • Roll back, after a Timeout
user@hostname:~/map-local$ joe netplan-temp.yaml

user@hostname:~/map-local$ cat netplan-temp.yaml
# This is the network config written by 'ron'
network:
  ethernets:
    ens160:
      addresses: [172.16.9.9/24]
      gateway4: 172.16.9.254
      nameservers:
        addresses: [208.67.222.222, 208.67.220.220]
  version: 2

user@hostname:~/map-local$ sudo netplan try –config-file netplan-temp.yaml -timeout 120

user@hostname:~/map-local$ sudo cp netplan-temp.yaml /etc/netplan/00-installer-config.yaml

Step 3: Edit/Apply NetPlan Config

  • Apply
user@hostname:~/map-local$ sudo joe /etc/netplan/00-installer-config.yaml
user@hostname:~/map-local$ cat /etc/netplan/00-installer-config.yaml
# This is the network config written by 'ron'
network:
  ethernets:
    ens160:
      addresses: [172.16.9.9/24]
      gateway4: 172.16.9.254
      nameservers:
        addresses: [208.67.222.222, 208.67.220.220]
  version: 2

user@hostname:~/map-local$ sudo netplan apply 

Disclaimer

Since i’m trying to get rid of Evernote, too anoying too often, i’ll start to document non-private-stuff here.

BASH „History“: display ISO-Timestamp

Have just been somehow annoyed by the default-format of the „history“-bash command:

510  2020-12-05T17:46:33 echo 'export HISTTIMEFORMAT="%G-%m-%dT%T "' >> ~/.bash_profile
511  2020-12-05T17:46:42 source ~/.bash_profile
512  2020-12-05T17:46:47 history

Disclaimer

Since i’m trying to get rid of Evernote, too anoying too often, i’ll start to document non-private-stuff here.

Cisco IOS – Public-Key User-Authentication

It’s a two step process to get rid of insecure username/password-authentication.

  1. Generate a RSA keypair at your SSH-client
  2. btw. Cisco-IOS doesn’t support DSA-keys

  3. Configure your network device(s) to assign the (public-)key of this keypair to an user-account

This user-account could get privileges from a Radius/TACACS+-Server which could provide access-logs, too.

  1. Generate RSA-Key: Windows as SSH-Client
  2. I prefer Putty, usually in form of „mRemoteNG“, so i use PuttyGen to generate the RSA keypair.

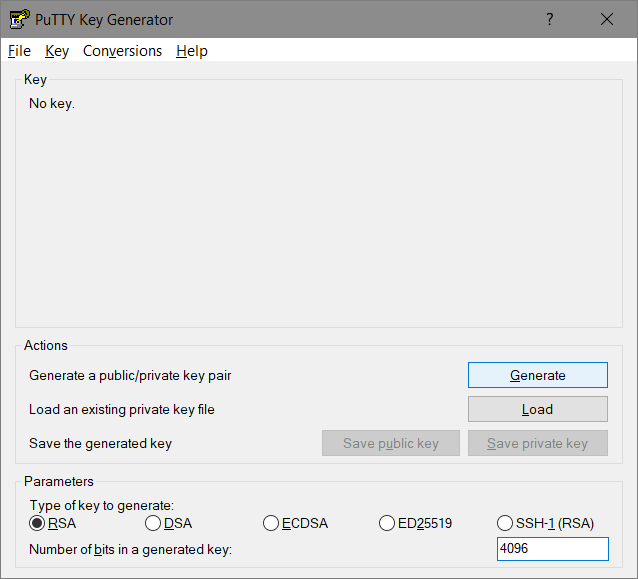
    • Windows.Start => PuttyGen
    • (x) RSA, 4096-bits are supported, use it
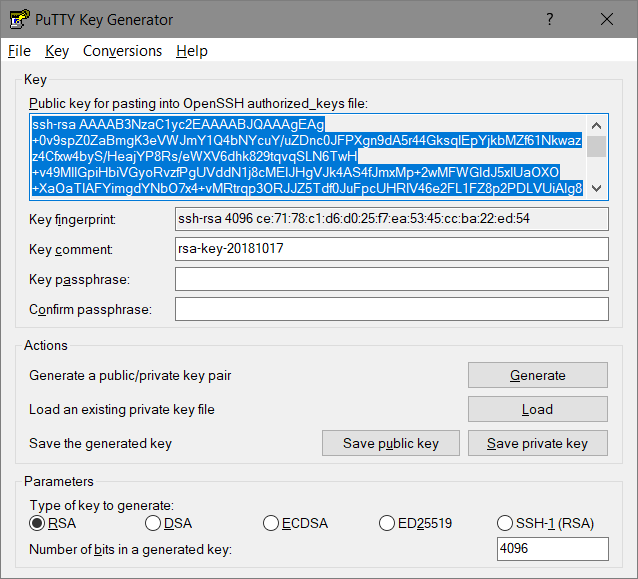
    • [Generate]
    • move the mouse to improve the randomgenerator
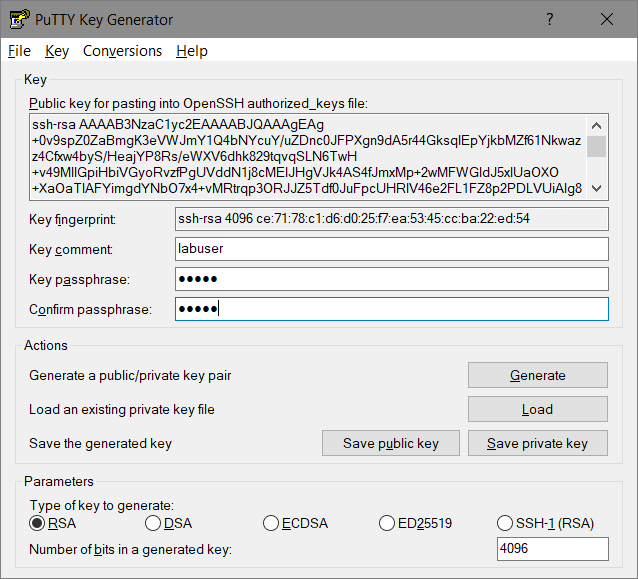
    • change the „comment“ – for example replace it by an username
    • add a passphrase – using this key-pair is possible only for people knowing this passphrase
    • Save both parts of the RSA keypair:
      • [Save public key] => Filename for example „labuser.pub“
      • [Save private key] => Filename for example „labuser.ppk“
    • Verify
    • C:>dir labuser*.* -l
      -rw-rw-rw-   1 user     group        2710 Oct 17 18:26 labuser.ppk
      -rw-rw-rw-   1 user     group         820 Oct 17 18:26 labuser.pub
      
    • Since the contained keys are BASE64-Encoded (The Secure Shell (SSH) Public Key File Format) you could extract them using grep.
    • C:>cat labuser.pub
      ---- BEGIN SSH2 PUBLIC KEY ----
      Comment: "labuser"
      AAAAB3NzaC1yc2EAAAABJQAAAgEAg+0v9spZ0ZaBmgK3eVWJmY1Q4bNYcuY/uZDn
      c0JFPXgn9dA5r44GksqIEpYjkbMZf61Nkwazz4Cfxw4byS/HeajYP8Rs/eWXV6dh
      k829tqvqSLN6TwH+v49MllGpiHbiVGyoRvzfPgUVddN1j8cMEIJHgVJk4AS4fJmx
      Mp+2wMFWGldJ5xlUaOXO+XaOaTlAFYimgdYNbO7x4+vMRtrqp3ORJJZ5Tdf0JuFp
      cUHRlV46e2FL1FZ8p2PDLVUiAlg8o8yxI8D52r0A5VQToKz3wKUchTWIWqRmIfOR
      fS5jJz8+yTb/swkFs4FzAEpxD8CgvArz7ewTkna0zm8/wbysZCH1lKyce7AmZCp9
      lm1Nsythl+6ztB9M01AbzBo2ElVo3GZHEr3AclsON8aCKgf8hVaZww5BqN1YHvUj
      dKH0Mb8i0zLs+XFSgV7rYXg1EcHyBqsRFAi5OdkuGwd5D2NfWkcwk2XBsi6qG8bP
      951MlHi0SuiMTSTmskdf1OyzzIFaPYjaW9VQe36tg07MsBP48KOPEB4803k35gWx
      Sw2nxAO4O9KisYNCfw0SHna9RiAWRsyykLUTe6Z39vzppTEiC+j2f6IQs9Celk4S
      s9r8IIoI0yswtvc/DsJBLd8y0CmNwyZof9L5MSY1RlcBiCykUPh1Z+UFLEYrFBa1
      qQCAwU8=
      ---- END SSH2 PUBLIC KEY ----
      
    • THIS output could be directly used within Cisco-IOS command syntax:
    • C:>egrep "^[a-zA-Z0-9+\/=]+$" labuser.pub
      AAAAB3NzaC1yc2EAAAABJQAAAgEAg+0v9spZ0ZaBmgK3eVWJmY1Q4bNYcuY/uZDn
      c0JFPXgn9dA5r44GksqIEpYjkbMZf61Nkwazz4Cfxw4byS/HeajYP8Rs/eWXV6dh
      k829tqvqSLN6TwH+v49MllGpiHbiVGyoRvzfPgUVddN1j8cMEIJHgVJk4AS4fJmx
      Mp+2wMFWGldJ5xlUaOXO+XaOaTlAFYimgdYNbO7x4+vMRtrqp3ORJJZ5Tdf0JuFp
      cUHRlV46e2FL1FZ8p2PDLVUiAlg8o8yxI8D52r0A5VQToKz3wKUchTWIWqRmIfOR
      fS5jJz8+yTb/swkFs4FzAEpxD8CgvArz7ewTkna0zm8/wbysZCH1lKyce7AmZCp9
      lm1Nsythl+6ztB9M01AbzBo2ElVo3GZHEr3AclsON8aCKgf8hVaZww5BqN1YHvUj
      dKH0Mb8i0zLs+XFSgV7rYXg1EcHyBqsRFAi5OdkuGwd5D2NfWkcwk2XBsi6qG8bP
      951MlHi0SuiMTSTmskdf1OyzzIFaPYjaW9VQe36tg07MsBP48KOPEB4803k35gWx
      Sw2nxAO4O9KisYNCfw0SHna9RiAWRsyykLUTe6Z39vzppTEiC+j2f6IQs9Celk4S
      s9r8IIoI0yswtvc/DsJBLd8y0CmNwyZof9L5MSY1RlcBiCykUPh1Z+UFLEYrFBa1
      qQCAwU8=
      
  3. Generate RSA-Key: Linux as SSH-Client
    • there might already exist a rsa-key in the „.ssh“-path of your home-directory
    • $ cd ~/.ssh/
      $ ls -l
      total 20
      -rw------- 1 administrator administrator 1675 Aug 28 09:43 id_rsa
      -rw-r--r-- 1 administrator administrator  405 Aug 28 09:43 id_rsa.pub
      -rw-r--r-- 1 administrator administrator  222 Aug 28 11:07 known_hosts
      
      $ cat id_rsa.pub
      ssh-rsa AAAAB3NzaC1yc2EAAAADAQABAAABAQCohMsS3gJ/OcF4Hg43mKeVHKWl2lECCn0iZQu9QSrUjAb4PVHWXIbj11yy5Jh/ygMys0n9IED6357fkRmq8Cc8ujpU0sCen7kBFUt3UqbLg1PLT9wMmJAEv4dcxbX9WRvwYXjLd8+EgDYDmrj7vTB3xIvw1I2WWuUK2jPWbVI57vbyGtw224Qb9Qk0KQfyGiTvErZnddDg65/rn9Pyt7FQlzCwUPH0nyJVoFhiYYJYJszTKc8BTFB6VdIbALHc4atFmjYt7YDUvEvaZqOL+zwQtr7FmXsZ5oaRGV6ZChuBPTpNEL41w/Il1mSJicRykpD90O2AxlUFebQfABTWadnr administrator@lx-ubuntu
      

      The RFC states that the key should get split into multiple lines containing max. 72 characters.

    • use
      • „cut“ to extract the encoded-key
      • „fold“ to split the key into multiple lines
    • $ cut -d " " -f 2 id_rsa.pub
      AAAAB3NzaC1yc2EAAAADAQABAAABAQCohMsS3gJ/OcF4Hg43mKeVHKWl2lECCn0iZQu9QSrUjAb4PVHWXIbj11yy5Jh/ygMys0n9IED6357fkRmq8Cc8ujpU0sCen7kBFUt3UqbLg1PLT9wMmJAEv4dcxbX9WRvwYXjLd8+EgDYDmrj7vTB3xIvw1I2WWuUK2jPWbVI57vbyGtw224Qb9Qk0KQfyGiTvErZnddDg65/rn9Pyt7FQlzCwUPH0nyJVoFhiYYJYJszTKc8BTFB6VdIbALHc4atFmjYt7YDUvEvaZqOL+zwQtr7FmXsZ5oaRGV6ZChuBPTpNEL41w/Il1mSJicRykpD90O2AxlUFebQfABTWadnr
      
      $ cut -d " " -f 2 id_rsa.pub | fold -b -w 72
      AAAAB3NzaC1yc2EAAAADAQABAAABAQCohMsS3gJ/OcF4Hg43mKeVHKWl2lECCn0iZQu9QSrU
      jAb4PVHWXIbj11yy5Jh/ygMys0n9IED6357fkRmq8Cc8ujpU0sCen7kBFUt3UqbLg1PLT9wM
      mJAEv4dcxbX9WRvwYXjLd8+EgDYDmrj7vTB3xIvw1I2WWuUK2jPWbVI57vbyGtw224Qb9Qk0
      KQfyGiTvErZnddDg65/rn9Pyt7FQlzCwUPH0nyJVoFhiYYJYJszTKc8BTFB6VdIbALHc4atF
      mjYt7YDUvEvaZqOL+zwQtr7FmXsZ5oaRGV6ZChuBPTpNEL41w/Il1mSJicRykpD90O2AxlUF
      ebQfABTWadnr
      
    • otherwise generate a new rsa key-pair („newid_rsa“)
    • $ ssh-keygen -t rsa -b 4096
      Generating public/private rsa key pair.
      Enter file in which to save the key (/home/administrator/.ssh/id_rsa): newid_rsa
      Enter passphrase (empty for no passphrase): *****
      Enter same passphrase again: *****
      Your identification has been saved in newid_rsa.
      Your public key has been saved in newid_rsa.pub.
      The key fingerprint is:
      SHA256:4g/JkvpFQmlTaOE2VQAZ9IHfz/+6NJiI8W/WVt9TJGA administrator@lx-ubuntu
      The key's randomart image is:
      +---[RSA 4096]----+
      |   .=B=o.        |
      |   .== .    E    |
      |   .O...   . .   |
      |   + o. .     . .|
      |    . + So     o |
      |     * * .oo  . .|
      |    o B o ooo. .o|
      |   . o o .o.+. .o|
      |  ...   .o..o+. .|
      +----[SHA256]-----+
      
      $ ls -l
      total 36
      ...
      -rw------- 1 administrator administrator 3326 Oct 18 07:19 newid_rsa
      -rw-r--r-- 1 administrator administrator  749 Oct 18 07:19 newid_rsa.pub
      
  4. IOS-Router: Add those public-keys to your IOS-Config
    • i’ll use both clients (linux & windows) with the same cisco-user-account „labuser“
    • conf t
      ip ssh pubkey-chain
      username labuser
        key-string
      AAAAB3NzaC1yc2EAAAABJQAAAgEAg+0v9spZ0ZaBmgK3eVWJmY1Q4bNYcuY/uZDn
      c0JFPXgn9dA5r44GksqIEpYjkbMZf61Nkwazz4Cfxw4byS/HeajYP8Rs/eWXV6dh
      k829tqvqSLN6TwH+v49MllGpiHbiVGyoRvzfPgUVddN1j8cMEIJHgVJk4AS4fJmx
      Mp+2wMFWGldJ5xlUaOXO+XaOaTlAFYimgdYNbO7x4+vMRtrqp3ORJJZ5Tdf0JuFp
      cUHRlV46e2FL1FZ8p2PDLVUiAlg8o8yxI8D52r0A5VQToKz3wKUchTWIWqRmIfOR
      fS5jJz8+yTb/swkFs4FzAEpxD8CgvArz7ewTkna0zm8/wbysZCH1lKyce7AmZCp9
      lm1Nsythl+6ztB9M01AbzBo2ElVo3GZHEr3AclsON8aCKgf8hVaZww5BqN1YHvUj
      dKH0Mb8i0zLs+XFSgV7rYXg1EcHyBqsRFAi5OdkuGwd5D2NfWkcwk2XBsi6qG8bP
      951MlHi0SuiMTSTmskdf1OyzzIFaPYjaW9VQe36tg07MsBP48KOPEB4803k35gWx
      Sw2nxAO4O9KisYNCfw0SHna9RiAWRsyykLUTe6Z39vzppTEiC+j2f6IQs9Celk4S
      s9r8IIoI0yswtvc/DsJBLd8y0CmNwyZof9L5MSY1RlcBiCykUPh1Z+UFLEYrFBa1
      qQCAwU8=
      exit
      username labuser
        key-string    
      AAAAB3NzaC1yc2EAAAADAQABAAABAQCohMsS3gJ/OcF4Hg43mKeVHKWl2lECCn0iZQu9QSrU
      jAb4PVHWXIbj11yy5Jh/ygMys0n9IED6357fkRmq8Cc8ujpU0sCen7kBFUt3UqbLg1PLT9wM
      mJAEv4dcxbX9WRvwYXjLd8+EgDYDmrj7vTB3xIvw1I2WWuUK2jPWbVI57vbyGtw224Qb9Qk0
      KQfyGiTvErZnddDg65/rn9Pyt7FQlzCwUPH0nyJVoFhiYYJYJszTKc8BTFB6VdIbALHc4atF
      mjYt7YDUvEvaZqOL+zwQtr7FmXsZ5oaRGV6ZChuBPTpNEL41w/Il1mSJicRykpD90O2AxlUF
      ebQfABTWadnr
      exit
      
      exit
      exit
      end
      
    • Now two RSA-keys are valid to authenticate the user „labuser“
      • The Router stores only the key-hashes:
      VBOX-CSR-1#show run | section key-chain
      ip ssh pubkey-chain
        username labuser
         key-hash ssh-rsa CE7178C1D6D025F7EA5345CCBA22ED54
         key-hash ssh-rsa ABBF42AB330CA79B235FB369FCC4D53E
      
    • btw. look (above) – puttygen displayed the hash
    • ssh-rsa 4096 ce:71:78:c1:d6:d0:25:f7:ea:53:45:cc:ba:22:ed:54
      

      so you could save time to just configure the hash.

  5. Prove SSH-Client-access: Linux
    • Who am i?
    • $ who
      administrator pts/0        Oct 18 17:37 (192.168.56.1)
      

      Linux re-uses the name of the current linux-user to login into the ssh-device unless a user is specified

      $ ssh 192.168.56.102
      Password:
      

      The IOS-Router prompts for a password for users who have no known-public-key in the running-config – and there is no public-key for a user named „administrator“.

      • This is the default-behaviour:
      (config)# ip ssh server algorithm authentication publickey keyboard password
      
      • Change this undesired behaviour (disable „keyboard“ and „password“):
      conf t
        ip ssh server algorithm authentication publickey
      end
      
        Now the router blocks the access since the publickey of „administrator“ is not known.
      $ ssh 192.168.56.102
      administrator@192.168.56.102: Permission denied (publickey).
      
    • Let the linux-user „administrator“ log into the router as „labuser“:
      • Manually specify a username to use and gain CLI access
    • $ ssh -l labuser 192.168.56.102
      
      VBOX-CSR-1>who
          Line       User       Host(s)              Idle       Location
         0 con 0                idle                 00:02:43
      *  1 vty 0     labuser    idle                 00:00:00 192.168.56.101
      
    • You don’t want to configure an „enable secret“-password in 2018..
    • VBOX-CSR-1>enable
      % No password set
      
      • configure a local user-privilege or use for example the Cisco ISE for centralized Authorization and additional Accounting if needed.
      • conf t
          username labuser privilege 15
        end
        
      • Check – you’ll access privileged-mode immediately
      • $ ssh -l labuser 192.168.56.102
        
        VBOX-CSR-1#who
            Line       User       Host(s)              Idle       Location
           0 con 0                idle                 00:00:10
        *  1 vty 0     labuser    idle                 00:00:00 192.168.56.101
        
          Interface    User               Mode         Idle     Peer Address
        
        VBOX-CSR-1#show priv
        Current privilege level is 15
        
  6. Prove SSH-Client-access: Windows/Putty
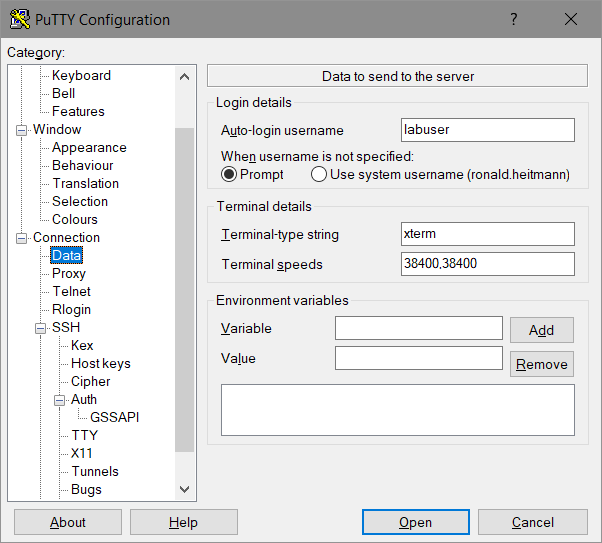
    • Specify the „Auto-Login-Username“: „labuser“
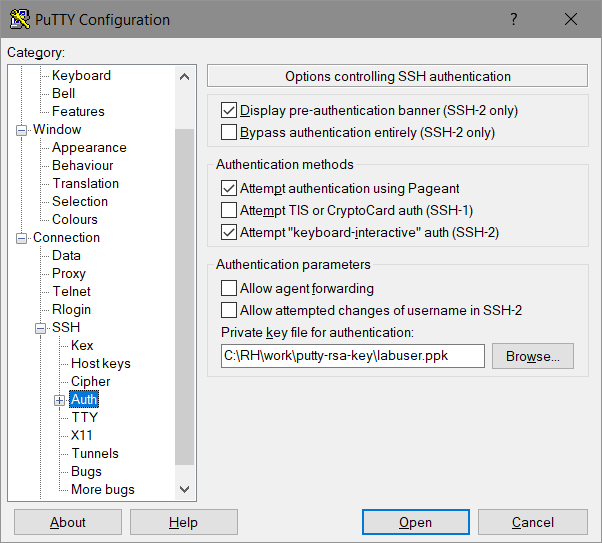
    • Specify the private-key-file (*.ppk)
    • [Open]
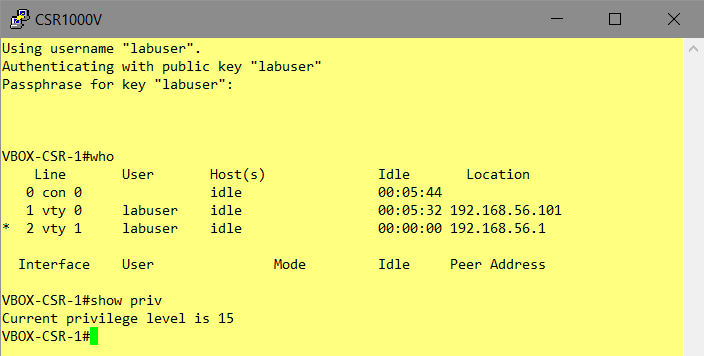
      • since the ppk-file was password-protected (in PuttyGen) this password has to be entered:
      • privilege-15 access for the windows-user

      [btw. the linux-ssh-client „labuser“ is still logged in]

That’s all.

COT – Common OVF-Tool – Import of VCenter HTTPS Certificate

Background: Python-Requests wants to verify https-certificates, which makes sense to me.
– but my VCenter uses a self-signed Certificate

$ python
Python 2.7.15rc1 (default, Apr 15 2018, 21:51:34)
[GCC 7.3.0] on linux2
Type "help", "copyright", "credits" or "license" for more information.
>>> import requests
>>> requests.get("https://<vcenter-ip>")
Traceback (most recent call last):
  File "<stdin>", line 1, in <module>
  File "/usr/lib/python2.7/dist-packages/requests/api.py", line 72, in get
    return request('get', url, params=params, **kwargs)
  File "/usr/lib/python2.7/dist-packages/requests/api.py", line 58, in request
    return session.request(method=method, url=url, **kwargs)
  File "/usr/lib/python2.7/dist-packages/requests/sessions.py", line 520, in request
    resp = self.send(prep, **send_kwargs)
  File "/usr/lib/python2.7/dist-packages/requests/sessions.py", line 630, in send
    r = adapter.send(request, **kwargs)
  File "/usr/lib/python2.7/dist-packages/requests/adapters.py", line 506, in send
    raise SSLError(e, request=request)
requests.exceptions.SSLError: HTTPSConnectionPool(host='192.168.2.13', port=443): Max retries exceeded with url: / (Caused by SSLError(SSLError(1, u'[SSL: CERTIFICATE_VERIFY_FAILED] certificate verify failed (_ssl.c:726)'),))

Don’t think about ignoring certificate errors 😉

Prerequisites

sudo apt-get install unzip

Download the certificate from the VCenter:

wget --no-check-certificate https://<vcenter-ip>/certs/download
mv download download.zip
unzip download.zip

Install the certificate:

cd certs
$ ls -l
total 8
-rw-r--r-- 1 administrator administrator 1294 Apr 29  2016 d2f59c0d.0
-rw-r--r-- 1 administrator administrator  702 Oct 15 14:36 d2f59c0d.r0

$ export REQUESTS_CA_BUNDLE=d2f59c0d.0

Now Python.requests validates the vCenter:

$ python
Python 2.7.15rc1 (default, Apr 15 2018, 21:51:34)
[GCC 7.3.0] on linux2
Type "help", "copyright", "credits" or "license" for more information.
>>> import requests
>>> requests.get("https://<vcenter-ip>")
<Response [200]>

Add the Export to ~/.bashrc

sudo vi ~/.bashrc

at the end of the file

export REQUESTS_CA_BUNDLE=~/certs/d2f59c0d.0

COT – Common OVF Tool

…this article should have been published at 2017-11-23, i forgot to press the right botton.

So, an update might be needed, anyone still interested in cot today?

Release 2.1 (2018-01-29) is the current release, containing some fixes (https://github.com/glennmatthews/cot/blob/master/CHANGELOG.rst)

  • COT installation using PIP

So, let’s go, following

administrator@lx-ubuntu:~$ sudo pip install cot
sudo: pip: command not found


thats embarassing.

Install PIP first

$ sudo apt-get update
$ sudo apt-get install python-pip

$ pip --version
pip 9.0.1 from /usr/lib/python2.7/dist-packages (python 2.7)

Try it again

$ sudo pip install cot
...
Successfully installed backports.shutil-get-terminal-size-1.0.0 colorlog-3.1.4 cot-2.1.0 ndg-httpsclient-0.5.1 pyvmomi-6.7.0.2018.9 verboselogs-1.7
$ cot --version
Common OVF Tool (COT), version 2.1.0
Copyright (C) 2013-2017 the COT project developers.
  • Optional: Argument-Completion

Not essential, but handy.

$sudo pip install argcomplete
...
Successfully installed argcomplete-1.9.4
  • COT helpers

A full installation requires so called „cot-helpers“ to use all features.

$ cot install-helpers --verify-only
Results:
-------------
COT manpages: DIRECTORY NOT FOUND: /usr/local/man/man1
fatdisk:      NOT FOUND
mkisofs:      NOT FOUND
ovftool:      NOT FOUND
qemu-img:     NOT FOUND
vmdktool:     NOT FOUND
$ sudo apt-get install xutils-dev
...
Setting up xutils-dev (1:7.7+5ubuntu1) ...
$ sudo cot install-helpers
...
Results:
-------------
COT manpages: already installed, no updates needed
fatdisk:      INSTALLATION FAILED: [Errno 1] Helper program './RUNME' exited with error 1
mkisofs:      version 2.1, present at /usr/bin/mkisofs
ovftool:      INSTALLATION FAILED: No support for automated installation of ovftool, as VMware requires a site login to
              download it. See https://www.vmware.com/support/developer/ovf/
qemu-img:     version 2.11.1, present at /usr/bin/qemu-img
vmdktool:     version 1.4, present at /usr/local/bin/vmdktool
[Errno 1] Unable to install some helpers

first fix „fatdisk“ which is used to inject configs into OVA-Files


$ sudo cp /usr/include/x86_64-linux-gnu/bits/stdint-intn.h /usr/include/x86_64-linux-gnu/bits/stdint-intn.h.bak
$ sudo vi /usr/include/x86_64-linux-gnu/bits/stdint-intn.h


uncomment

 typedef __int64_t int64_t;


to

//typedef __int64_t int64_t;


and run the helper-installation again:

$ sudo cot install-helpers
...
NOTICE  : Successfully installed 'fatdisk'
Results:
-------------
COT manpages: already installed, no updates needed
fatdisk:      successfully installed to /usr/local/bin/fatdisk, version 1.0
mkisofs:      version 2.1, present at /usr/bin/mkisofs
ovftool:      INSTALLATION FAILED: No support for automated installation of ovftool, as VMware requires a site login to
              download it. See https://www.vmware.com/support/developer/ovf/
qemu-img:     version 2.11.1, present at /usr/bin/qemu-img
vmdktool:     version 1.4, present at /usr/local/bin/vmdktool
[Errno 1] Unable to install some helpers


But it threw a lot of warnings..
warning: format ‘%lu’ expects argument of type ‘long unsigned int’, but argument 3 has type ‘int64_t {aka long long int}’ [-Wformat=]
… but it compiles… Memo: Try manual compilation…

$ mkdir fatdisk
$ cd fatdisk
$ wget -O fatdisk.tgz https://github.com/goblinhack/fatdisk/archive/master.tar.gz
$ tar zxf fatdisk.tgz
$ cd fatdisk-master/
$ ./RUNME

OFVTool of course has to be installed manually
Download from VMware: OVFTOOL-Download

Upload to the Linux-Server using Putty-SCP(PSCP) and public-key-authentication:

C:\Downloads&gt;pscp -scp -i C:\rh.priv.ppk VMware-ovftool-4.3.0-7948156-lin.x86_64.bundle administrator@192.168.56.101:
VMware-ovftool-4.3.0-7948 | 35623 kB | 35623.9 kB/s | ETA: 00:00:00 | 100%

At the Linux-Server

$ ls -l
total 35644
-rw-r--r-- 1 administrator administrator 36478864 Oct 15 18:36 VMware-ovftool-4.3.0-7948156-lin.x86_64.bundle
$ chmod a+x VMware-ovftool-4.3.0-7948156-lin.x86_64.bundle
$ sudo ./VMware-ovftool-4.3.0-7948156-lin.x86_64.bundle
...
Installing VMware OVF Tool component for Linux 4.3.0
    Configuring...
[######################################################################] 100%
Installation was successful.
administrator@lx-ubuntu:~$ cot install-helpers --verify-only
Results:
-------------
COT manpages: already installed, no updates needed
fatdisk:      version 1.0, present at /usr/local/bin/fatdisk
mkisofs:      version 2.1, present at /usr/bin/mkisofs
ovftool:      version 4.3, present at /usr/bin/ovftool
qemu-img:     version 2.11.1, present at /usr/bin/qemu-img
vmdktool:     version 1.4, present at /usr/local/bin/vmdktool
Linux: a start job is running for wait for Network to be configured

A new linux-VM takes ages to boot:

  • it waits for 2 minutes for the network to come up

Linux: Boot-Delay – network not up

  • Whats the reason for the delay?

„routable“ interfaces with not router-address provided by the dhcp-service never come up for the „networkd-wait-online“-service.

find more information at GitHub Issue 3752 – systemd-networkd can’t configure interface if dhcp server does not provide routers

administrator@lx-ubuntu:~$ networkctl
IDX LINK             TYPE               OPERATIONAL SETUP
  1 lo               loopback           carrier     unmanaged
  2 enp0s3           ether              routable    configuring
  3 enp0s8           ether              routable    configured

3 links listed.

State: forever „configuring“ not „configured“

administrator@lx-ubuntu:~$ networkctl status enp0s3
2: enp0s3
       Link File: /lib/systemd/network/99-default.link
    Network File: /run/systemd/network/10-netplan-enp0s3.network
            Type: ether
           State: routable (configuring)
            Path: pci-0000:00:03.0
          Driver: e1000
          Vendor: Intel Corporation
           Model: 82540EM Gigabit Ethernet Controller (PRO/1000 MT Desktop Adapter)
      HW Address: 08:00:27:37:db:ef (PCS Systemtechnik GmbH)
         Address: 192.168.56.101
                  fe80::a00:27ff:fe37:dbef
  • Background information

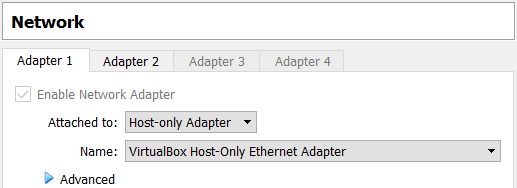
„enp0s3“ is a virtual-box „host-only“ network with no routing provided

VirtualBox – host-local network

  • Action Plan: „Set this interface to not be checked.“
  1. locate the systemd-unit-file:
  2. Path: /run/systemd/generator/network-online.target.wants
    File: systemd-networkd-wait-online.service

  3. Edit (sudo) file
  4. add „ignore“-Option
  5. docs: networkd wait online service

sudo vi /run/systemd/generator/network-online.target.wants/systemd-networkd-wait-online.service

The service specific configuration options are configured in the „[Service]“ section.

[Service]
Type=oneshot
ExecStart=/lib/systemd/systemd-networkd-wait-online --ignore=enp0s3
RemainAfterExit=yes
  • reboot

Now the VM boots like lightning.

Ubuntu – Install Ansible

It should be easy, and it is – but no single-command installation:

administrator@lx-ubuntu:$ sudo apt-get install ansible
Reading package lists... Done
Building dependency tree
Reading state information... Done
E: Unable to locate package ansible

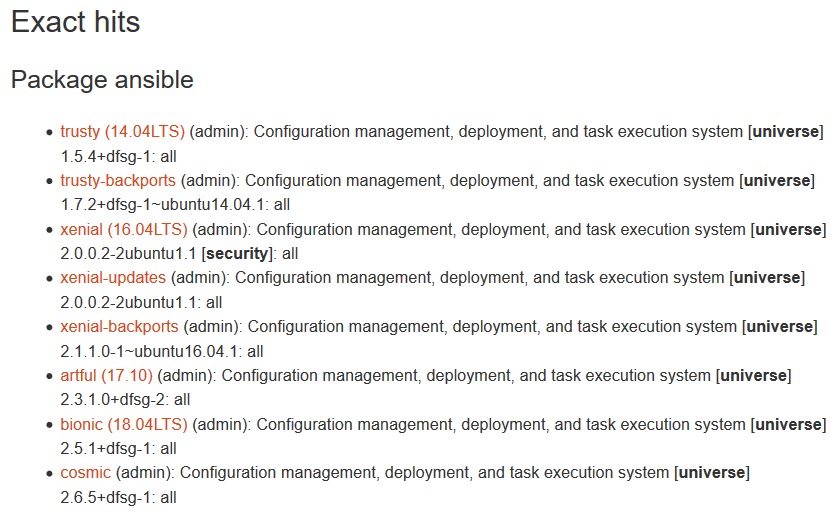
Look at the Ubuntu Packet-Search for Ansible:

  • it’s in the „universe“-repository

Add the „universe“-repository:

administrator@lx-ubuntu:$ sudo add-apt-repository universe
'universe' distribution component enabled for all sources.
Hit:1 http://archive.ubuntu.com/ubuntu bionic InRelease
Get:2 http://archive.ubuntu.com/ubuntu bionic-security InRelease [83.2 kB]
Get:3 http://archive.ubuntu.com/ubuntu bionic-updates InRelease [88.7 kB]
Get:4 http://archive.ubuntu.com/ubuntu bionic/universe amd64 Packages [8,570 kB]
Get:5 http://archive.ubuntu.com/ubuntu bionic/universe Translation-en [4,941 kB]
Get:6 http://archive.ubuntu.com/ubuntu bionic-security/universe amd64 Packages [84.5 kB]
Get:7 http://archive.ubuntu.com/ubuntu bionic-security/universe Translation-en [46.4 kB]
Get:8 http://archive.ubuntu.com/ubuntu bionic-updates/universe amd64 Packages [556 kB]
Get:9 http://archive.ubuntu.com/ubuntu bionic-updates/universe Translation-en [143 kB]
Fetched 14.5 MB in 18s (824 kB/s)
Reading package lists... Done

Now it works:

administrator@lx-ubuntu:$ sudo apt-get install ansible
Reading package lists... Done
Building dependency tree
Reading state information... Done
The following additional packages will be installed:
  ieee-data libpython-stdlib libpython2.7-minimal libpython2.7-stdlib python python-asn1crypto python-certifi
  python-cffi-backend python-chardet python-crypto python-cryptography python-enum34 python-httplib2 python-idna
  python-ipaddress python-jinja2 python-jmespath python-kerberos python-libcloud python-lockfile python-markupsafe
  python-minimal python-netaddr python-openssl python-paramiko python-pkg-resources python-pyasn1 python-requests
  python-selinux python-simplejson python-six python-urllib3 python-xmltodict python-yaml python2.7 python2.7-minimal
Suggested packages:
  cowsay sshpass python-doc python-tk python-crypto-doc python-cryptography-doc python-cryptography-vectors
  python-enum34-doc python-jinja2-doc python-lockfile-doc ipython python-netaddr-docs python-openssl-doc
  python-openssl-dbg python-gssapi python-setuptools python-socks python-ntlm python2.7-doc binutils binfmt-support
Recommended packages:
  python-winrm
The following NEW packages will be installed:
  ansible ieee-data libpython-stdlib libpython2.7-minimal libpython2.7-stdlib python python-asn1crypto python-certifi
  python-cffi-backend python-chardet python-crypto python-cryptography python-enum34 python-httplib2 python-idna
  python-ipaddress python-jinja2 python-jmespath python-kerberos python-libcloud python-lockfile python-markupsafe
  python-minimal python-netaddr python-openssl python-paramiko python-pkg-resources python-pyasn1 python-requests
  python-selinux python-simplejson python-six python-urllib3 python-xmltodict python-yaml python2.7 python2.7-minimal
0 upgraded, 37 newly installed, 0 to remove and 3 not upgraded.
Need to get 12.1 MB of archives.
After this operation, 79.4 MB of additional disk space will be used.
Do you want to continue? [Y/n] y
Get:1 http://archive.ubuntu.com/ubuntu bionic/main amd64 libpython2.7-minimal amd64 2.7.15~rc1-1 [334 kB]
Get:2 http://archive.ubuntu.com/ubuntu bionic/main amd64 python2.7-minimal amd64 2.7.15~rc1-1 [1,292 kB]
Get:3 http://archive.ubuntu.com/ubuntu bionic/main amd64 python-minimal amd64 2.7.15~rc1-1 [28.1 kB]
Get:4 http://archive.ubuntu.com/ubuntu bionic/main amd64 libpython2.7-stdlib amd64 2.7.15~rc1-1 [1,910 kB]
Get:5 http://archive.ubuntu.com/ubuntu bionic/main amd64 python2.7 amd64 2.7.15~rc1-1 [238 kB]
Get:6 http://archive.ubuntu.com/ubuntu bionic/main amd64 libpython-stdlib amd64 2.7.15~rc1-1 [7,620 B]
Get:7 http://archive.ubuntu.com/ubuntu bionic/main amd64 python amd64 2.7.15~rc1-1 [140 kB]
Get:8 http://archive.ubuntu.com/ubuntu bionic/main amd64 python-asn1crypto all 0.24.0-1 [72.7 kB]
Get:9 http://archive.ubuntu.com/ubuntu bionic/main amd64 python-cffi-backend amd64 1.11.5-1 [63.4 kB]
Get:10 http://archive.ubuntu.com/ubuntu bionic/main amd64 python-enum34 all 1.1.6-2 [34.8 kB]
Get:11 http://archive.ubuntu.com/ubuntu bionic/main amd64 python-idna all 2.6-1 [32.4 kB]
Get:12 http://archive.ubuntu.com/ubuntu bionic/main amd64 python-ipaddress all 1.0.17-1 [18.2 kB]
Get:13 http://archive.ubuntu.com/ubuntu bionic/main amd64 python-six all 1.11.0-2 [11.3 kB]
Get:14 http://archive.ubuntu.com/ubuntu bionic-security/main amd64 python-cryptography amd64 2.1.4-1ubuntu1.2 [221 kB]
Get:15 http://archive.ubuntu.com/ubuntu bionic/main amd64 python-markupsafe amd64 1.0-1build1 [13.0 kB]
Get:16 http://archive.ubuntu.com/ubuntu bionic/main amd64 python-jinja2 all 2.10-1 [94.6 kB]
Get:17 http://archive.ubuntu.com/ubuntu bionic/main amd64 python-pyasn1 all 0.4.2-3 [46.7 kB]
Get:18 http://archive.ubuntu.com/ubuntu bionic/main amd64 python-paramiko all 2.0.0-1ubuntu1 [110 kB]
Get:19 http://archive.ubuntu.com/ubuntu bionic/main amd64 python-pkg-resources all 39.0.1-2 [128 kB]
Get:20 http://archive.ubuntu.com/ubuntu bionic/main amd64 python-yaml amd64 3.12-1build2 [115 kB]
Get:21 http://archive.ubuntu.com/ubuntu bionic/main amd64 python-crypto amd64 2.6.1-8ubuntu2 [244 kB]
Get:22 http://archive.ubuntu.com/ubuntu bionic/main amd64 python-httplib2 all 0.9.2+dfsg-1 [34.6 kB]
Get:23 http://archive.ubuntu.com/ubuntu bionic/main amd64 ieee-data all 20180204.1 [1,539 kB]
Get:24 http://archive.ubuntu.com/ubuntu bionic/main amd64 python-netaddr all 0.7.19-1 [213 kB]
Get:25 http://archive.ubuntu.com/ubuntu bionic/universe amd64 ansible all 2.5.1+dfsg-1 [3,197 kB]
Get:26 http://archive.ubuntu.com/ubuntu bionic/main amd64 python-certifi all 2018.1.18-2 [144 kB]
Get:27 http://archive.ubuntu.com/ubuntu bionic/main amd64 python-chardet all 3.0.4-1 [80.3 kB]
Get:28 http://archive.ubuntu.com/ubuntu bionic/main amd64 python-jmespath all 0.9.3-1ubuntu1 [21.2 kB]
Get:29 http://archive.ubuntu.com/ubuntu bionic/universe amd64 python-kerberos amd64 1.1.14-1 [22.5 kB]
Get:30 http://archive.ubuntu.com/ubuntu bionic/main amd64 python-urllib3 all 1.22-1 [85.1 kB]
Get:31 http://archive.ubuntu.com/ubuntu bionic/main amd64 python-requests all 2.18.4-2 [58.3 kB]
Get:32 http://archive.ubuntu.com/ubuntu bionic/main amd64 python-lockfile all 1:0.12.2-2 [14.6 kB]
Get:33 http://archive.ubuntu.com/ubuntu bionic/main amd64 python-simplejson amd64 3.13.2-1 [61.2 kB]
Get:34 http://archive.ubuntu.com/ubuntu bionic/universe amd64 python-libcloud all 2.2.1-1 [1,235 kB]
Get:35 http://archive.ubuntu.com/ubuntu bionic/main amd64 python-openssl all 17.5.0-1ubuntu1 [41.3 kB]
Get:36 http://archive.ubuntu.com/ubuntu bionic/universe amd64 python-selinux amd64 2.7-2build2 [138 kB]
Get:37 http://archive.ubuntu.com/ubuntu bionic/universe amd64 python-xmltodict all 0.11.0-1 [10.3 kB]
Fetched 12.1 MB in 18s (672 kB/s)
Extracting templates from packages: 100%
Selecting previously unselected package libpython2.7-minimal:amd64.
(Reading database ... 102195 files and directories currently installed.)
Preparing to unpack .../0-libpython2.7-minimal_2.7.15~rc1-1_amd64.deb ...
Unpacking libpython2.7-minimal:amd64 (2.7.15~rc1-1) ...
Selecting previously unselected package python2.7-minimal.
Preparing to unpack .../1-python2.7-minimal_2.7.15~rc1-1_amd64.deb ...
Unpacking python2.7-minimal (2.7.15~rc1-1) ...
Selecting previously unselected package python-minimal.
Preparing to unpack .../2-python-minimal_2.7.15~rc1-1_amd64.deb ...
Unpacking python-minimal (2.7.15~rc1-1) ...
Selecting previously unselected package libpython2.7-stdlib:amd64.
Preparing to unpack .../3-libpython2.7-stdlib_2.7.15~rc1-1_amd64.deb ...
Unpacking libpython2.7-stdlib:amd64 (2.7.15~rc1-1) ...
Selecting previously unselected package python2.7.
Preparing to unpack .../4-python2.7_2.7.15~rc1-1_amd64.deb ...
Unpacking python2.7 (2.7.15~rc1-1) ...
Selecting previously unselected package libpython-stdlib:amd64.
Preparing to unpack .../5-libpython-stdlib_2.7.15~rc1-1_amd64.deb ...
Unpacking libpython-stdlib:amd64 (2.7.15~rc1-1) ...
Setting up libpython2.7-minimal:amd64 (2.7.15~rc1-1) ...
Setting up python2.7-minimal (2.7.15~rc1-1) ...
Linking and byte-compiling packages for runtime python2.7...
Setting up python-minimal (2.7.15~rc1-1) ...
Selecting previously unselected package python.
(Reading database ... 102942 files and directories currently installed.)
Preparing to unpack .../00-python_2.7.15~rc1-1_amd64.deb ...
Unpacking python (2.7.15~rc1-1) ...
Selecting previously unselected package python-asn1crypto.
Preparing to unpack .../01-python-asn1crypto_0.24.0-1_all.deb ...
Unpacking python-asn1crypto (0.24.0-1) ...
Selecting previously unselected package python-cffi-backend.
Preparing to unpack .../02-python-cffi-backend_1.11.5-1_amd64.deb ...
Unpacking python-cffi-backend (1.11.5-1) ...
Selecting previously unselected package python-enum34.
Preparing to unpack .../03-python-enum34_1.1.6-2_all.deb ...
Unpacking python-enum34 (1.1.6-2) ...
Selecting previously unselected package python-idna.
Preparing to unpack .../04-python-idna_2.6-1_all.deb ...
Unpacking python-idna (2.6-1) ...
Selecting previously unselected package python-ipaddress.
Preparing to unpack .../05-python-ipaddress_1.0.17-1_all.deb ...
Unpacking python-ipaddress (1.0.17-1) ...
Selecting previously unselected package python-six.
Preparing to unpack .../06-python-six_1.11.0-2_all.deb ...
Unpacking python-six (1.11.0-2) ...
Selecting previously unselected package python-cryptography.
Preparing to unpack .../07-python-cryptography_2.1.4-1ubuntu1.2_amd64.deb ...
Unpacking python-cryptography (2.1.4-1ubuntu1.2) ...
Selecting previously unselected package python-markupsafe.
Preparing to unpack .../08-python-markupsafe_1.0-1build1_amd64.deb ...
Unpacking python-markupsafe (1.0-1build1) ...
Selecting previously unselected package python-jinja2.
Preparing to unpack .../09-python-jinja2_2.10-1_all.deb ...
Unpacking python-jinja2 (2.10-1) ...
Selecting previously unselected package python-pyasn1.
Preparing to unpack .../10-python-pyasn1_0.4.2-3_all.deb ...
Unpacking python-pyasn1 (0.4.2-3) ...
Selecting previously unselected package python-paramiko.
Preparing to unpack .../11-python-paramiko_2.0.0-1ubuntu1_all.deb ...
Unpacking python-paramiko (2.0.0-1ubuntu1) ...
Selecting previously unselected package python-pkg-resources.
Preparing to unpack .../12-python-pkg-resources_39.0.1-2_all.deb ...
Unpacking python-pkg-resources (39.0.1-2) ...
Selecting previously unselected package python-yaml.
Preparing to unpack .../13-python-yaml_3.12-1build2_amd64.deb ...
Unpacking python-yaml (3.12-1build2) ...
Selecting previously unselected package python-crypto.
Preparing to unpack .../14-python-crypto_2.6.1-8ubuntu2_amd64.deb ...
Unpacking python-crypto (2.6.1-8ubuntu2) ...
Selecting previously unselected package python-httplib2.
Preparing to unpack .../15-python-httplib2_0.9.2+dfsg-1_all.deb ...
Unpacking python-httplib2 (0.9.2+dfsg-1) ...
Selecting previously unselected package ieee-data.
Preparing to unpack .../16-ieee-data_20180204.1_all.deb ...
Unpacking ieee-data (20180204.1) ...
Selecting previously unselected package python-netaddr.
Preparing to unpack .../17-python-netaddr_0.7.19-1_all.deb ...
Unpacking python-netaddr (0.7.19-1) ...
Selecting previously unselected package ansible.
Preparing to unpack .../18-ansible_2.5.1+dfsg-1_all.deb ...
Unpacking ansible (2.5.1+dfsg-1) ...
Selecting previously unselected package python-certifi.
Preparing to unpack .../19-python-certifi_2018.1.18-2_all.deb ...
Unpacking python-certifi (2018.1.18-2) ...
Selecting previously unselected package python-chardet.
Preparing to unpack .../20-python-chardet_3.0.4-1_all.deb ...
Unpacking python-chardet (3.0.4-1) ...
Selecting previously unselected package python-jmespath.
Preparing to unpack .../21-python-jmespath_0.9.3-1ubuntu1_all.deb ...
Unpacking python-jmespath (0.9.3-1ubuntu1) ...
Selecting previously unselected package python-kerberos.
Preparing to unpack .../22-python-kerberos_1.1.14-1_amd64.deb ...
Unpacking python-kerberos (1.1.14-1) ...
Selecting previously unselected package python-urllib3.
Preparing to unpack .../23-python-urllib3_1.22-1_all.deb ...
Unpacking python-urllib3 (1.22-1) ...
Selecting previously unselected package python-requests.
Preparing to unpack .../24-python-requests_2.18.4-2_all.deb ...
Unpacking python-requests (2.18.4-2) ...
Selecting previously unselected package python-lockfile.
Preparing to unpack .../25-python-lockfile_1%3a0.12.2-2_all.deb ...
Unpacking python-lockfile (1:0.12.2-2) ...
Selecting previously unselected package python-simplejson.
Preparing to unpack .../26-python-simplejson_3.13.2-1_amd64.deb ...
Unpacking python-simplejson (3.13.2-1) ...
Selecting previously unselected package python-libcloud.
Preparing to unpack .../27-python-libcloud_2.2.1-1_all.deb ...
Unpacking python-libcloud (2.2.1-1) ...
Selecting previously unselected package python-openssl.
Preparing to unpack .../28-python-openssl_17.5.0-1ubuntu1_all.deb ...
Unpacking python-openssl (17.5.0-1ubuntu1) ...
Selecting previously unselected package python-selinux.
Preparing to unpack .../29-python-selinux_2.7-2build2_amd64.deb ...
Unpacking python-selinux (2.7-2build2) ...
Selecting previously unselected package python-xmltodict.
Preparing to unpack .../30-python-xmltodict_0.11.0-1_all.deb ...
Unpacking python-xmltodict (0.11.0-1) ...
Setting up ieee-data (20180204.1) ...
Processing triggers for mime-support (3.60ubuntu1) ...
Processing triggers for man-db (2.8.3-2) ...
Setting up libpython2.7-stdlib:amd64 (2.7.15~rc1-1) ...
Setting up python2.7 (2.7.15~rc1-1) ...
Setting up libpython-stdlib:amd64 (2.7.15~rc1-1) ...
Setting up python (2.7.15~rc1-1) ...
Setting up python-idna (2.6-1) ...
Setting up python-simplejson (3.13.2-1) ...
Setting up python-yaml (3.12-1build2) ...
Setting up python-asn1crypto (0.24.0-1) ...
Setting up python-crypto (2.6.1-8ubuntu2) ...
Setting up python-pyasn1 (0.4.2-3) ...
Setting up python-netaddr (0.7.19-1) ...
Setting up python-xmltodict (0.11.0-1) ...
Setting up python-jmespath (0.9.3-1ubuntu1) ...
Setting up python-certifi (2018.1.18-2) ...
Setting up python-kerberos (1.1.14-1) ...
Setting up python-pkg-resources (39.0.1-2) ...
Setting up python-markupsafe (1.0-1build1) ...
Setting up python-httplib2 (0.9.2+dfsg-1) ...
Setting up python-cffi-backend (1.11.5-1) ...
Setting up python-six (1.11.0-2) ...
Setting up python-selinux (2.7-2build2) ...
Setting up python-enum34 (1.1.6-2) ...
Setting up python-lockfile (1:0.12.2-2) ...
Setting up python-ipaddress (1.0.17-1) ...
Setting up python-urllib3 (1.22-1) ...
Setting up python-chardet (3.0.4-1) ...
Setting up python-jinja2 (2.10-1) ...
Setting up python-cryptography (2.1.4-1ubuntu1.2) ...
Setting up python-requests (2.18.4-2) ...
Setting up python-openssl (17.5.0-1ubuntu1) ...
Setting up python-paramiko (2.0.0-1ubuntu1) ...
Setting up ansible (2.5.1+dfsg-1) ...
Setting up python-libcloud (2.2.1-1) ...

Which version?

  • as „packages.ubuntu.com“ said: 2.5.1
administrator@lx-ubuntu:$ ansible --version
ansible 2.5.1
  config file = /etc/ansible/ansible.cfg
  configured module search path = [u'/home/administrator/.ansible/plugins/modules', u'/usr/share/ansible/plugins/modules']
  ansible python module location = /usr/lib/python2.7/dist-packages/ansible
  executable location = /usr/bin/ansible
  python version = 2.7.15rc1 (default, Apr 15 2018, 21:51:34) [GCC 7.3.0]

Linux – NetPlan Interface Configuration

Just added a second NIC to a Linux-VM…

  • new config-style – new luck 🙂
administrator@lx-ubuntu:/etc/netplan$ cat /etc/network/interfaces
# ifupdown has been replaced by netplan(5) on this system. See
# /etc/netplan for current configuration.
# To re-enable ifupdown on this system, you can run:
#    sudo apt install ifupdown

Ok, it seems to be easy to get back to good-old network-config-style.

But after reading https://netplan.io/examples this seems to be very handy.

The initial „netplan-file“ references only the initial NIC:

administrator@lx-ubuntu:~$ cd /etc/netplan/
administrator@lx-ubuntu:/etc/netplan$ cat 50-cloud-init.yaml
# This file is generated from information provided by
# the datasource.  Changes to it will not persist across an instance.
# To disable cloud-init's network configuration capabilities, write a file
# /etc/cloud/cloud.cfg.d/99-disable-network-config.cfg with the following:
# network: {config: disabled}
network:
    ethernets:
        enp0s3:
            addresses: []
            dhcp4: true
    version: 2

What’s the ID of the new NIC?

  • it’s „enp0s8“
administrator@lx-ubuntu:/etc/netplan$ ifconfig
enp0s3: flags=4163<UP,BROADCAST,RUNNING,MULTICAST>  mtu 1500
        inet 192.168.56.104  netmask 255.255.255.0  broadcast 192.168.56.255
        inet6 fe80::a00:27ff:fe37:dbef  prefixlen 64  scopeid 0x20<link>
        ether 08:00:27:37:db:ef  txqueuelen 1000  (Ethernet)
        RX packets 989  bytes 119568 (119.5 KB)
        RX errors 0  dropped 0  overruns 0  frame 0
        TX packets 704  bytes 105969 (105.9 KB)
        TX errors 0  dropped 0 overruns 0  carrier 0  collisions 0

enp0s8: flags=4163<UP,BROADCAST,RUNNING,MULTICAST>  mtu 1500
        inet 10.0.3.15  netmask 255.255.255.0  broadcast 10.0.3.255
        inet6 fe80::a00:27ff:fe8d:ab00  prefixlen 64  scopeid 0x20<link>
        ether 08:00:27:8d:ab:00  txqueuelen 1000  (Ethernet)
        RX packets 2  bytes 1180 (1.1 KB)
        RX errors 0  dropped 0  overruns 0  frame 0
        TX packets 5  bytes 944 (944.0 B)
        TX errors 0  dropped 0 overruns 0  carrier 0  collisions 0

lo: flags=73<UP,LOOPBACK,RUNNING>  mtu 65536
        inet 127.0.0.1  netmask 255.0.0.0
        inet6 ::1  prefixlen 128  scopeid 0x10<host>
        loop  txqueuelen 1000  (Local Loopback)
        RX packets 2032  bytes 123200 (123.2 KB)
        RX errors 0  dropped 0  overruns 0  frame 0
        TX packets 2032  bytes 123200 (123.2 KB)
        TX errors 0  dropped 0 overruns 0  carrier 0  collisions 0

Create a backup

administrator@lx-ubuntu:/etc/netplan$ sudo cp 50-cloud-init.yaml 50-cloud-init.yaml.bak

Modify the Netplan-File:

administrator@lx-ubuntu:/etc/netplan$ sudo vi 50-cloud-init.yaml

administrator@lx-ubuntu:/etc/netplan$ cat 50-cloud-init.yaml
# This file is generated from information provided by
# the datasource.  Changes to it will not persist across an instance.
# To disable cloud-init's network configuration capabilities, write a file
# /etc/cloud/cloud.cfg.d/99-disable-network-config.cfg with the following:
# network: {config: disabled}
network:
    ethernets:
        enp0s3:
            addresses: []
            dhcp4: true
        enp0s8:
            addresses: []
            dhcp4: true
    version: 2

Activate the new Config:

administrator@lx-ubuntu:/etc/netplan$ sudo netplan apply

Verify the result

administrator@lx-ubuntu:/etc/netplan$ ifconfig
enp0s3: flags=4163<UP,BROADCAST,RUNNING,MULTICAST>  mtu 1500
        inet 192.168.56.104  netmask 255.255.255.0  broadcast 192.168.56.255
        inet6 fe80::a00:27ff:fe37:dbef  prefixlen 64  scopeid 0x20<link>
        ether 08:00:27:37:db:ef  txqueuelen 1000  (Ethernet)
        RX packets 989  bytes 119568 (119.5 KB)
        RX errors 0  dropped 0  overruns 0  frame 0
        TX packets 704  bytes 105969 (105.9 KB)
        TX errors 0  dropped 0 overruns 0  carrier 0  collisions 0

enp0s8: flags=4163<UP,BROADCAST,RUNNING,MULTICAST>  mtu 1500
        inet 10.0.3.15  netmask 255.255.255.0  broadcast 10.0.3.255
        inet6 fe80::a00:27ff:fe8d:ab00  prefixlen 64  scopeid 0x20<link>
        ether 08:00:27:8d:ab:00  txqueuelen 1000  (Ethernet)
        RX packets 2  bytes 1180 (1.1 KB)
        RX errors 0  dropped 0  overruns 0  frame 0
        TX packets 5  bytes 944 (944.0 B)
        TX errors 0  dropped 0 overruns 0  carrier 0  collisions 0

lo: flags=73<UP,LOOPBACK,RUNNING>  mtu 65536
        inet 127.0.0.1  netmask 255.0.0.0
        inet6 ::1  prefixlen 128  scopeid 0x10<host>
        loop  txqueuelen 1000  (Local Loopback)
        RX packets 2032  bytes 123200 (123.2 KB)
        RX errors 0  dropped 0  overruns 0  frame 0
        TX packets 2032  bytes 123200 (123.2 KB)
        TX errors 0  dropped 0 overruns 0  carrier 0  collisions 0