Azure AZ-303 – Skills Outline

I’ve been wondering about the differences between the (free) Microsoft-Azure Online-Training and the (paid) AZ-303 Instructor-Led Training. After having a quick look at the „AZ-303 Exam Skills Outline“ there seems to be an 1:1-Mapping between „Exam Skills Outline“ and the instructor led training.

Exam Skills Outline

According to https://query.prod.cms.rt.microsoft.com/cms/api/am/binary/RE4psD6 the exam is made up from 15 modules:

The changes to the schedule starting at 25th of May 2021 are of cosmetic nature, Microsoft fixed some typos and removed some minor AAD-sub-topics…

1) Implement and Monitor an Azure Infrastructure (50-55%)
1.1) Cloud infrastructure monitoring
1.2) Storage accounts
1.3) VMs for Windows and Linux
1.4) Automate deployment and configuration of resources
1.5) Virtual networking
1.6) Azure Active Directory
1.7) Implement and manage hybrid identities (~Azure AD Connect)

2) Implement Management and Security Solutions (25-30%)
2.1) Manage workloads in Azure
2.2) Load balancing and network security
2.3) Implement and manage Azure governance solutions
2.4) Manage security for applications

3) Implement Solutions for Apps (10-15%)
3.1) Implement an application infrastructure
3.2) Container-based applications

4) Implement and Manage Data Platforms (10-15%)
4.1) Implement NoSQL databases
4.2) Implement Azure SQL databases

AZ303 Instructor-Led Training

The official Microsoft Instructor-Led Training for AZ303 is made up of 15 Modules:

  • there is an 1:1 mapping – but the order of modules has been „shuffled“
  1. Azure Active Directory => 1.6
  2. Hybrid Identities => 1.7
  3. Networking => 1.5
  4. VMs => 1.3
  5. Load Balancing and Network Security => 2.2
  6. Storage Accounts => 1.2
  7. NoSQL Databases => 4.1
  8. Azure SQL Databases => 4.2
  9. Automate Deployment and Configuration of Resources => 1.4
  10. Azure Governance Solutions => 2.3
  11. Security for Applications => 2.4
  12. Manage Workloads in Azure => 2.1
  13. Container-Based Applications => 3.2
  14. Implement an Application Infrastructure => 3.1
  15. Cloud Infrastructure Monitoring => 1.1

Let’s go

It should be possible to repeat a 5day class within 28 days

AZ-303 Schedule

Pi-Hole DHCP-Server: Offer static ip-routes

Background

My WIFI is bound to my Internet-Router and it is seperated from my home-office by an routed stateful-firewall. Some WIFI devices (for example my printer) need access to this home-office ip-range.

Pi-Hole DHCP Service

The DHCP-Service of my pi-hole server usually offers just dhcp-option #3 – the default-gateway.

Disable DHCP-Option 3 (Default Gatway)

The pi-hole Web-GUI doesn’t allow to specify additional dhcp-options, so first disable offering the default-gateway-option:

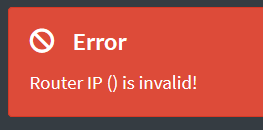
pi-hole disable dhcp-server option 3 „Router (gateway) IP address“

which is not allowed (my opinion: a bug since this is no feature)

Stop here and use another dhcp-service?

Use the „Router-Option“ as fallback for „old“ clients

Fortunately RFC3442 („The Classless Static Route Option for Dynamic Host Configuration Protocol (DHCP) version 4“) https://datatracker.ietf.org/doc/html/rfc3442 states:

If the DHCP server returns both a Classless Static Routes option and
   a Router option, the DHCP client MUST ignore the Router option.

So this can stay enabled, it’ll be ignored – and, just for the case an old DHCP-Client doesn’t implement the Classless Static-Routes Option it’ll ignore it and can use the Default-Gateway-option.

Implementation

  1. leave the Web-GUI as it is
  2. go the the SSH-bash-shell
  3. add additional dhcp-options

Leave the auto-generated config-files as they are

adminname@pi-hole-server:/etc/dnsmasq.d $ ls -l
total 16
-rw-r--r-- 1 root root 1524 May 22 13:16 01-pihole.conf
-rw-r--r-- 1 root root  490 May 22 13:16 02-pihole-dhcp.conf
-rw-r--r-- 1 root root  143 Dec  8 14:04 04-pihole-static-dhcp.conf

adminname@pi-hole-server:cat 01-pihole.conf
# Pi-hole: A black hole for Internet advertisements
# (c) 2017 Pi-hole, LLC (https://pi-hole.net)
# Network-wide ad blocking via your own hardware.
#
# Dnsmasq config for Pi-hole's FTLDNS
#
# This file is copyright under the latest version of the EUPL.
# Please see LICENSE file for your rights under this license.

###############################################################################
#      FILE AUTOMATICALLY POPULATED BY PI-HOLE INSTALL/UPDATE PROCEDURE.      #
# ANY CHANGES MADE TO THIS FILE AFTER INSTALL WILL BE LOST ON THE NEXT UPDATE #
#                                                                             #
#        IF YOU WISH TO CHANGE THE UPSTREAM SERVERS, CHANGE THEM IN:          #
#                      /etc/pihole/setupVars.conf                             #
#                                                                             #
#        ANY OTHER CHANGES SHOULD BE MADE IN A SEPARATE CONFIG FILE           #
#                    WITHIN /etc/dnsmasq.d/yourname.conf                      #
###############################################################################

addn-hosts=/etc/pihole/local.list
...

add your config in a seperated config-file

So lets add „/etc/dnsmasq.d/yourname.conf“:

I’d like to create

  1. a Default-Route (0.0.0.0/0) via the WIFI-Router 172.16.1.1
  2. static routes for all private (RFC1918) address-ranges via the Firewall 172.16.1.2
sudo echo "
dhcp-option=option:classless-static-route,0.0.0.0/0,172.16.1.1,10.0.0.0/8,172.16.1.2,172.16.0.0/12,172.16.1.2,192.168.0.0/16,172.16.1.2" > 99-user-settings.conf

restart the DHCP-Service

sudo service pihole-FTL reload

refresh the DHCP-Client

Horrible – Windows 10 states a „default-gateway“ to be set 🙁

C:\Users\user>ipconfig /renew "WLAN"

Windows-IP-Konfiguration

Drahtlos-LAN-Adapter WLAN:
   Verbindungsspezifisches DNS-Suffix: prod.local
   IPv4-Adresse  . . . . . . . . . . : 172.16.1.14
   Subnetzmaske  . . . . . . . . . . : 255.255.255.0
   Standardgateway . . . . . . . . . : 172.16.1.1

Check results

But the ip routing-table is fine: even Windows 10 implements RFC3442:

C:\Users\user>route print
===========================================================================
IPv4-Routentabelle
===========================================================================
Aktive Routen:
     Netzwerkziel    Netzwerkmaske          Gateway    Schnittstelle Metrik
          0.0.0.0          0.0.0.0       172.16.1.1     172.16.1.14     35
         10.0.0.0        255.0.0.0       172.16.1.2     172.16.1.14     36
        127.0.0.0        255.0.0.0   Auf Verbindung       127.0.0.1    331
        127.0.0.1  255.255.255.255   Auf Verbindung       127.0.0.1    331
       172.16.0.0      255.240.0.0       172.16.1.2     172.16.1.14     36
      192.168.0.0      255.255.0.0       172.16.1.2     172.16.1.14     36
       172.16.1.0    255.255.255.0   Auf Verbindung     172.16.1.14    291
  255.255.255.255  255.255.255.255   Auf Verbindung     172.16.1.14    291
===========================================================================

Android?

Forget it, Google seems to not priotize fixing basic low-level IP-Stack issues, it’s embarrassing: https://issuetracker.google.com/issues/36920068

Microsoft Certified: Azure Solutions Architect Expert

Certification Path

According to https://docs.microsoft.com/en-us/learn/certifications/azure-solutions-architect/ two exams

are required.

Online Training

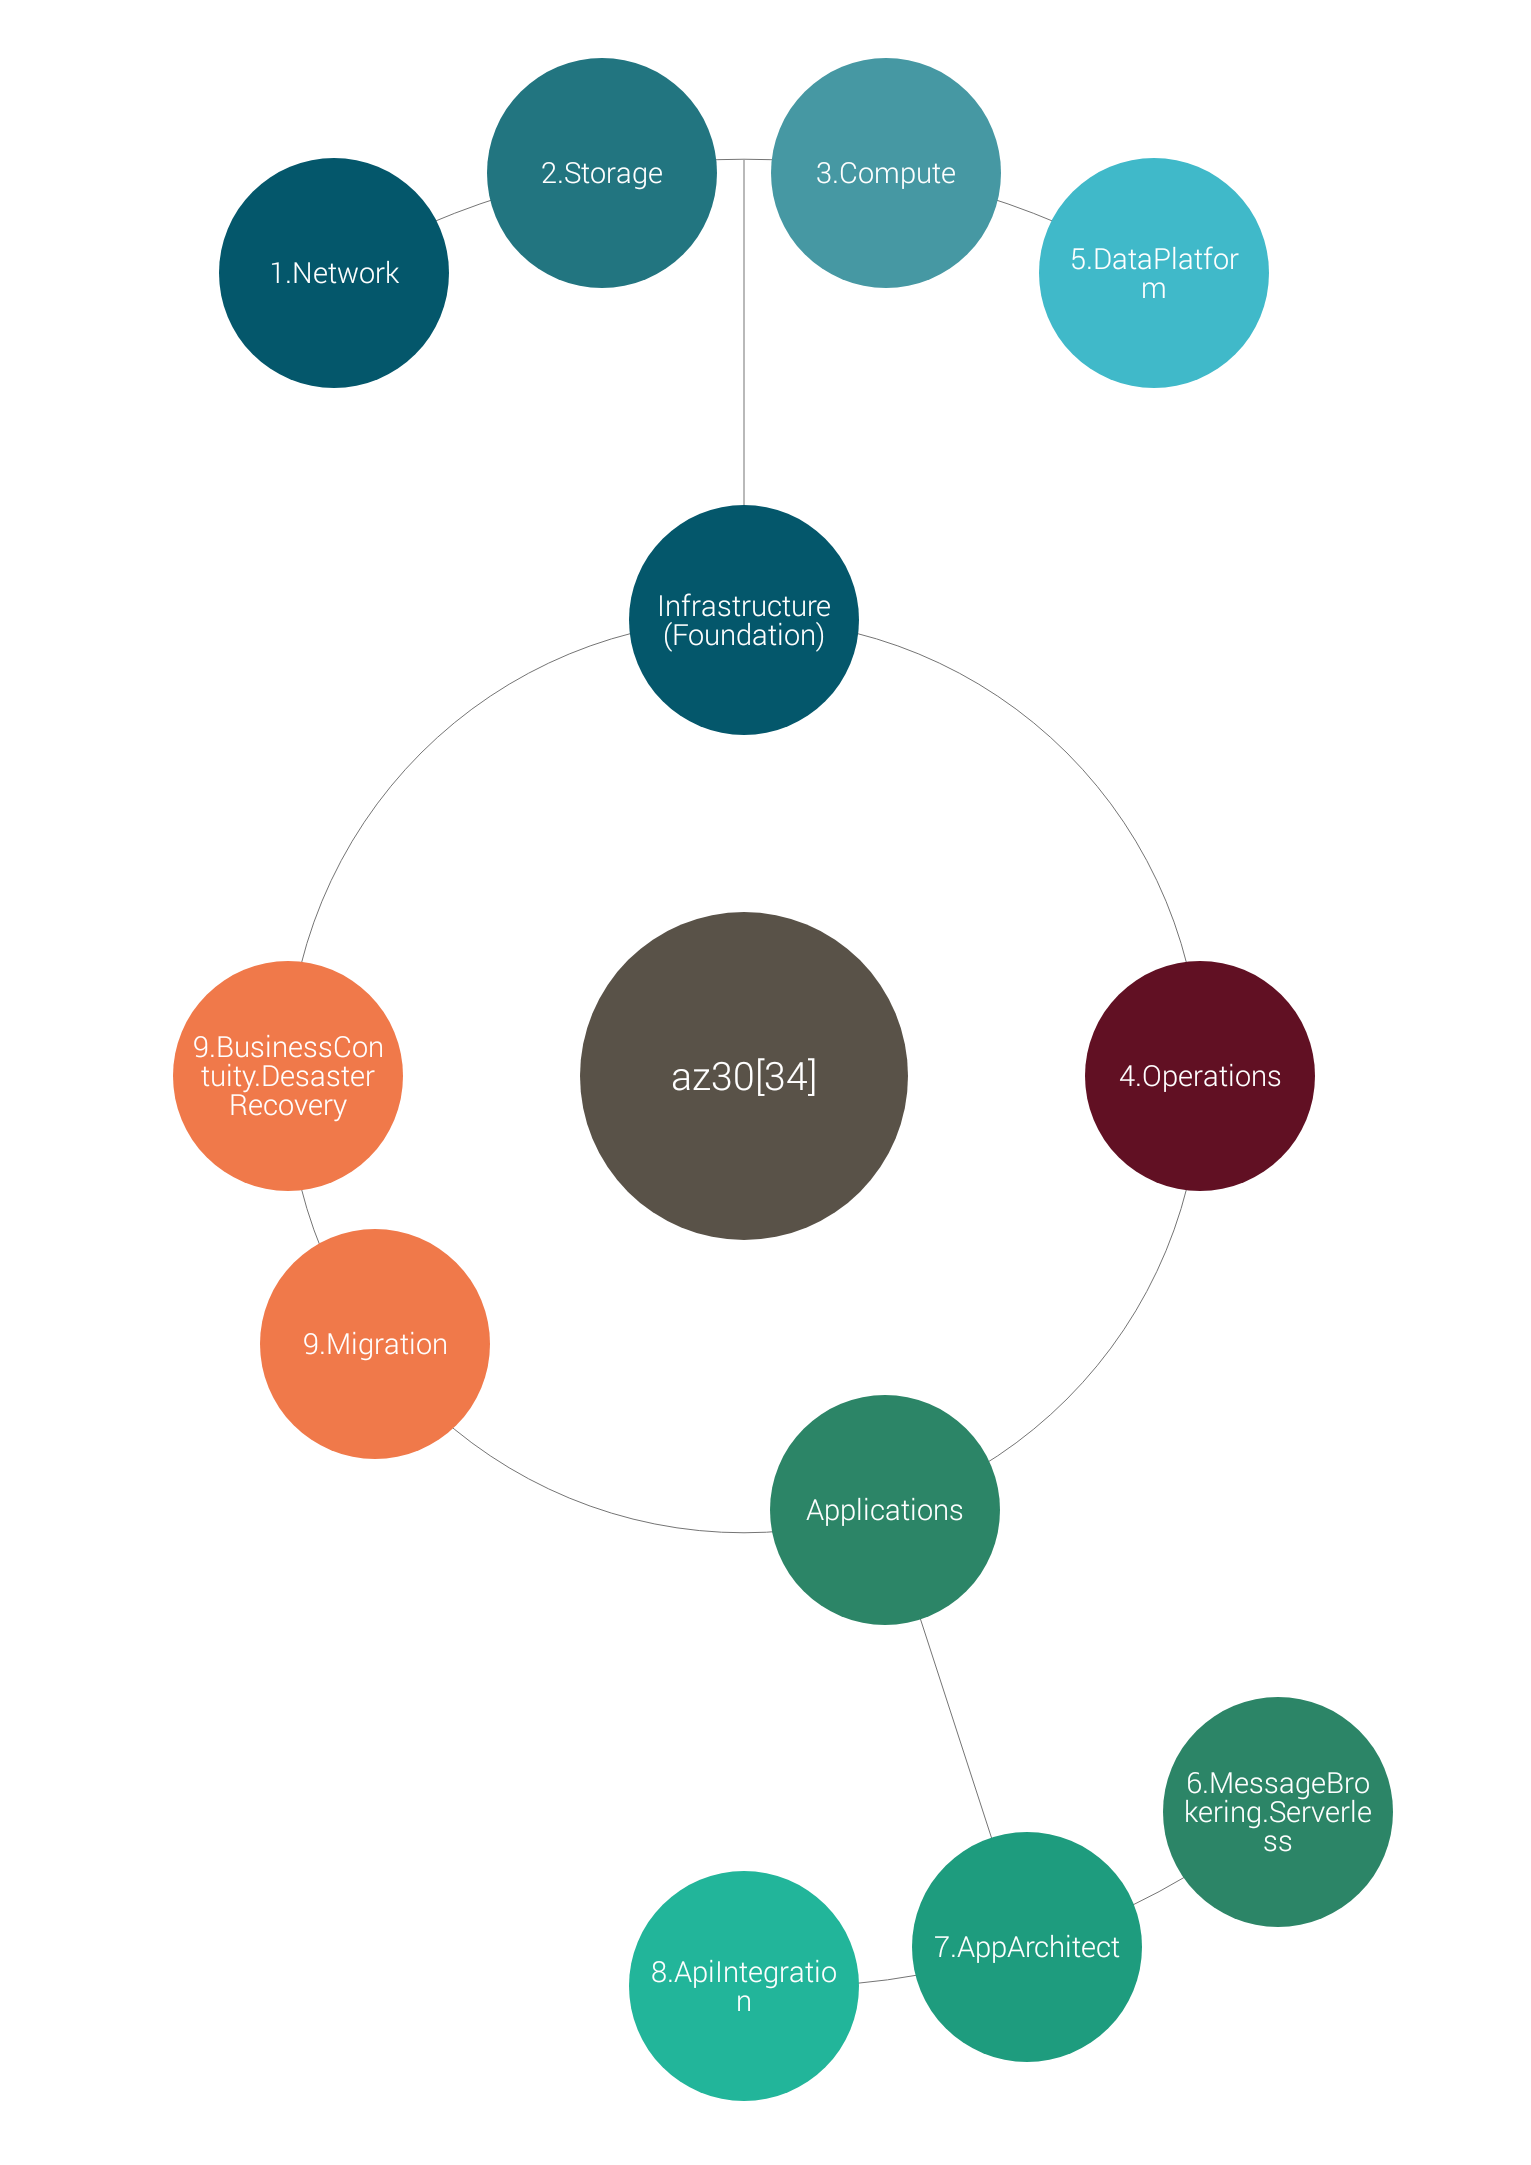
Online Training, free of charge – sponsored by Microsoft – is available: Surprisingly the same 9 modules for both exams, i’ve been putting them in a slightly different order:

  • Infrastructure
    • 4 Modules
  • Operations
  • Applications
    • 3 Modules
  • Migration
    • sharing a common module with
  • Business Continuity / Recovery
Azure Solutions Architect Expert – Training modules

AZ303 Instructor-Led Training

The official Microsoft Instructor-Led Training for AZ303 is made up of 15 Modules:

  1. Azure Active Directory
  2. Hybrid Identities
  3. Networking
  4. VMs
  5. Load Balancing and Network Security
  6. Storage Accounts
  7. NoSQL Databases
  8. Azure SQL Databases
  9. Automate Deployment and Configuration of Resources
  10. Azure Governance Solutions
  11. Security for Applications
  12. Manage Workloads in Azure
  13. Container-Based Applications
  14. Implement an Application Infrastructure
  15. Cloud Infrastructure Monitoring

Exam 303 – What might be the required skills?

The free training – 9 Modules for both AZ303 and AZ304 – the paid training for AZ303: 15 Modules:

  • how to map the 15 AZ303-Modules into the 9 AZ303/AZ304-Modules?

Determine Power-CLI Object-Type

Background

If you needed to pass some „Objects“ to a Power-Shell function you need the name of their Types.

Example

Four Parameters need to be passed to the function:

  • two Objects
    1. VI-Server
    2. Virtual-Machine
  • two Strings:
    1. diskName
    2. diskSize
function resizeVMDisk { Param([VMware.VimAutomation.ViCore.Types.V1.VIServer]$server, [VMware.VimAutomation.ViCore.Types.V1.Inventory.VirtualMachine]$vm, [string]$diskName, [string]$diskSize)

Algorithm

  1. Find an existing PowerCLI-Function which already uses the Object-Parameter you need.

In my case:

Get-VMHost

2) Pull the MetaData of this Command.

3) Display the „Attributes“ of the relevant Object-Parameter

4) Look for „Target Type List“

Result

„VM“ = [VMware.VimAutomation.ViCore.Types.V1.Inventory.VirtualMachine]

„Server“ = [VMware.VimAutomation.ViCore.Types.V1.VIServer]

Example

C:\LAB> $cmd = Get-Command -Module VMware.VimAutomation.Core -Name Get-VMHost
C:\LAB> $meta = New-Object System.Management.Automation.CommandMetadata ($cmd)
C:\LAB> $meta

Name                    : Get-VMHost
CommandType             : VMware.VimAutomation.ViCore.Cmdlets.Commands.GetVMHost
DefaultParameterSetName : Default
SupportsShouldProcess   : False
SupportsPaging          : False
PositionalBinding       : True
SupportsTransactions    : False
HelpUri                 :
RemotingCapability      : PowerShell
ConfirmImpact           : None
Parameters              : {[Name, System.Management.Automation.ParameterMetadata], [NoRecursion, System.Management.Automation.ParameterMetadata], [VM,
                          System.Management.Automation.ParameterMetadata], [ResourcePool, System.Management.Automation.ParameterMetadata]…}


C:\LAB> $meta.Parameters["VM"].Attributes

Position                        : -2147483648
ParameterSetName                : SecondaryParameterSet
ValueFromPipeline               : True
Mandatory                       : False
ExperimentName                  :
ExperimentAction                : None
ValueFromPipelineByPropertyName : False
ValueFromRemainingArguments     : False
HelpMessage                     :
HelpMessageBaseName             :
HelpMessageResourceId           :
DontShow                        : False
TypeId                          : System.Management.Automation.ParameterAttribute

TypeId : System.Management.Automation.ValidateNotNullOrEmptyAttribute

Critical                        : True
ContextPrincipalName            :
ContextOptional                 : False
ContextRelationName             :
TargetTypeList                  : {VMware.VimAutomation.ViCore.Types.V1.Inventory.VirtualMachine}
TransformNullOptionalParameters : True
TypeId                          : VMware.VimAutomation.Sdk.Util10Ps.BaseCmdlet.ObnArgumentTransformationAttribute


C:\LAB> $meta.Parameters["Server"].Attributes

Position                        : -2147483648
ParameterSetName                : Default
ValueFromPipeline               : False
Mandatory                       : False
ExperimentName                  :
ExperimentAction                : None
ValueFromPipelineByPropertyName : False
ValueFromRemainingArguments     : False
HelpMessage                     :
HelpMessageBaseName             :
HelpMessageResourceId           :
DontShow                        : False
TypeId                          : System.Management.Automation.ParameterAttribute

Position                        : -2147483648
ParameterSetName                : ById
ValueFromPipeline               : False
Mandatory                       : False
ExperimentName                  :
ExperimentAction                : None
ValueFromPipelineByPropertyName : False
ValueFromRemainingArguments     : False
HelpMessage                     :
HelpMessageBaseName             :
HelpMessageResourceId           :
DontShow                        : False
TypeId                          : System.Management.Automation.ParameterAttribute

Position                        : -2147483648
ParameterSetName                : DistributedSwitch
ValueFromPipeline               : False
Mandatory                       : False
ExperimentName                  :
ExperimentAction                : None
ValueFromPipelineByPropertyName : False
ValueFromRemainingArguments     : False
HelpMessage                     :
HelpMessageBaseName             :
HelpMessageResourceId           :
DontShow                        : False
TypeId                          : System.Management.Automation.ParameterAttribute

Position                        : -2147483648
ParameterSetName                : SecondaryParameterSet
ValueFromPipeline               : False
Mandatory                       : False
ExperimentName                  :
ExperimentAction                : None
ValueFromPipelineByPropertyName : False
ValueFromRemainingArguments     : False
HelpMessage                     :
HelpMessageBaseName             :
HelpMessageResourceId           :
DontShow                        : False
TypeId                          : System.Management.Automation.ParameterAttribute

Critical                        : True
ContextPrincipalName            :
ContextOptional                 : False
ContextRelationName             :
TargetTypeList                  : {VMware.VimAutomation.ViCore.Types.V1.VIServer}
TransformNullOptionalParameters : True
TypeId                          : VMware.VimAutomation.Sdk.Util10Ps.BaseCmdlet.ObnArgumentTransformationAttribute

VMware ESXi: Generate Self-Signed Certificate for FQDN and retrieve SSL-Thumbprint

Background

VMware wants us to prepopulate an Excel-Sheet with SSH-Keys and SSL-Thumbprints of all ESXi-Hosts, who have been freshly deployed minutes before, which effectivly protects against man-in-the-middle-attacks – maybe a problem in US-datacenters.

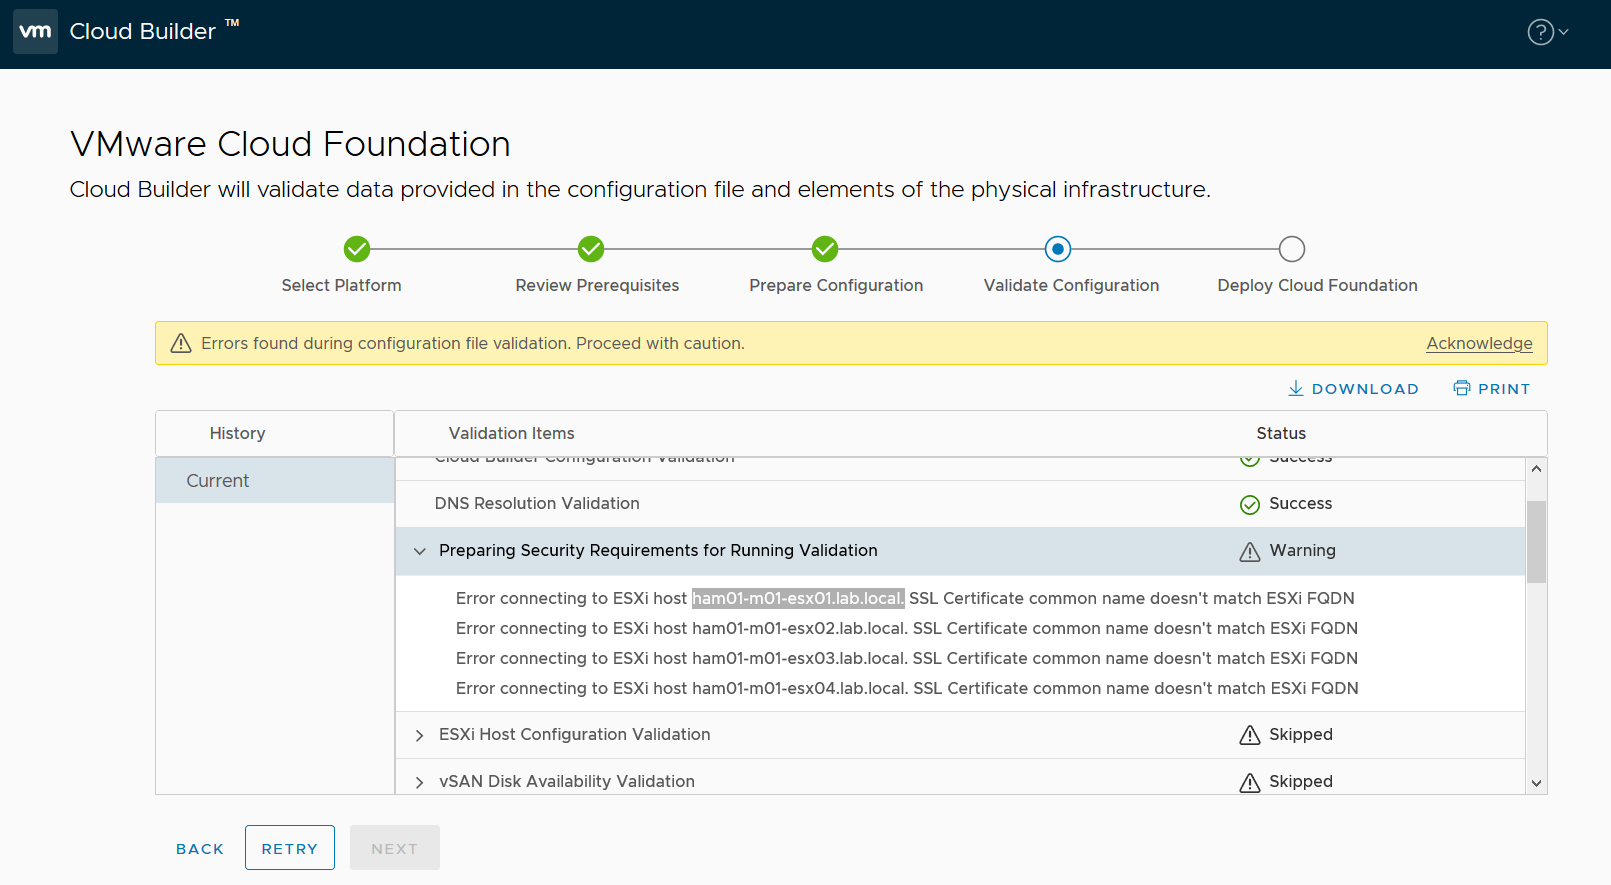
Beginning with VMware Cloud Foundation Release VCF 4.2 the Cloud-Builder-App verifies the „CN“ of all ESXi-SSL-Certificates, which is in default-setup set to „localhost“ (to be overwritten when connecting to the vCenter so this is seemed to be no issue) – not accepted, CN has to be set to <server-fqdn>.

VCF PreCheck: SSL Certificate CN Error

Solution

plink.exe

„plink.exe“ from the Putty-Suite allows to be called from PowerShell in automated fashion without interactive Password-Prompt. (In May 2021 there seems to be no other choice for Power-Shell Core 7)

Algorithm

  1. generate „correct“ self-signed certificate with „CN“ set to „fqdn“ not for „localhost“
  2. read the new certificate SSL-sha256-thumbprint
  3. reboot the ESXi-Host to activate the new SSL-Server-Certificate

Result

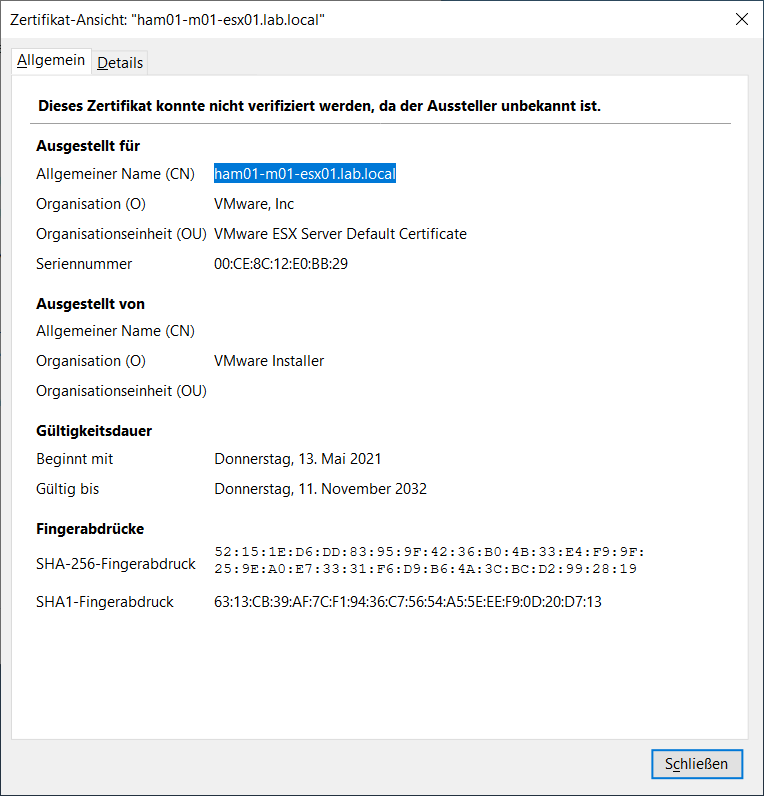
Correct SSL Server-Certificate

Server SSL-Certificate with correct CN

Log for four ESXi-Hosts

Contains SSL-Thumbprints to get copied into the VCF-Excel-Sheet.

Variables

  • $VMPassword
  • $VMUsername

have to be prepopulated.

PS T:\vmware vcf4> .\esxi_ssl_ssh.ps1
Generate SSL Self-Signed Certificate [ham01-m01-esx01]
Keyboard-interactive authentication prompts from server:
End of keyboard-interactive prompts from server
Fetch SSL-Thumbprint
Generate SSL Self-Signed Certificate [ham01-m01-esx02]
Keyboard-interactive authentication prompts from server:
End of keyboard-interactive prompts from server
Fetch SSL-Thumbprint
Generate SSL Self-Signed Certificate [ham01-m01-esx03]
Keyboard-interactive authentication prompts from server:
End of keyboard-interactive prompts from server
Fetch SSL-Thumbprint
Generate SSL Self-Signed Certificate [ham01-m01-esx04]
Keyboard-interactive authentication prompts from server:
End of keyboard-interactive prompts from server
Fetch SSL-Thumbprint

*** Result ***
172.16.11.101 ham01-m01-esx01
SSL-Thumbprint: D2:6E:01:AD:36:82:3E:D2:AC:F3:66:6E:27:FC:A5:2C:26:99:57:8D:E6:D9:24:E3:42:61:F3:C3:52:65:8C:36
172.16.11.102 ham01-m01-esx02
SSL-Thumbprint: 21:67:3F:11:E4:FE:F3:D2:D9:C6:C2:66:85:7D:3D:3F:02:49:F2:FE:D6:74:86:E1:8E:BE:CC:A2:66:41:72:D2
172.16.11.103 ham01-m01-esx03
SSL-Thumbprint: F6:D3:12:BD:53:36:F0:E5:FD:C9:F9:3C:41:60:80:79:C8:C4:69:30:52:AF:6C:AF:24:C3:C6:DE:2A:75:80:14
172.16.11.104 ham01-m01-esx04
SSL-Thumbprint: AC:0B:D0:E3:6D:03:12:3F:7E:69:5F:0F:75:F0:F5:F2:E1:59:61:46:83:35:1F:AD:2C:15:9D:EB:C1:9D:EF:DE

PowerShell Sourcecode

$NestedESXiHosts = @{
    "ham01-m01-esx01"=@{"vmk0"="172.16.11.101"};
    "ham01-m01-esx02"=@{"vmk0"="172.16.11.102"};
    "ham01-m01-esx03"=@{"vmk0"="172.16.11.103"};
    "ham01-m01-esx04"=@{"vmk0"="172.16.11.104"};
}

$NestedESXiHosts.GetEnumerator() | Sort-Object -Property key | Foreach-Object {
	$VMName = $_.Key
	$VMIPAddress = $_.Value.vmk0
	
	write-host -ForegroundColor Green "Generate SSL Self-Signed Certificate [$VMName]"
	#
	$SSLThumbPrint = echo y | plink -ssh -pw $VMPassword $VMUsername@$VMIPAddress "/sbin/generate-certificates;openssl x509 -in /etc/vmware/ssl/rui.crt -fingerprint -sha256 -noout;reboot;"
    #
	write-host -ForegroundColor Green "Fetch SSL-Thumbprint"
	#
	$SSLThumbPrint = $SSLThumbPrint.split("=")[1]
	$_.Value.SSL = $SSLThumbPrint
}

write-host
write-host -ForegroundColor Green "*** Result ***"

$NestedESXiHosts.GetEnumerator() | Sort-Object -Property key | Foreach-Object {
	$VMName = $_.Key
	$VMIPAddress = $_.Value.vmk0
	$VMSSL = $_.Value.SSL
	write-host -ForegroundColor Green "$VMIPAddress $VMName"
	write-host "SSL-Thumbprint: $VMSSL"
}              

Firefox: Allow Restricted TCP-Ports

Disclaimer

I don’t think, „hiding“ a webserver behind a non-standard TCP-Port is a security feature („security by obscurity“) but on the other hand restricting access to non-standard Ports seems to not increase the personal security measure, it just wastes time of anybody who needs to access such a service – and – it’s absolutely allowed to run a web-server on any port which isn’t used by another service 😉

Solution (if you (think, you) know what you’re doing)

As always

about:config

Add as „String“ if it’s missing:

network.security.ports.banned.override

Add the Service you want to acccess

8081,8082,8083

Disclaimer

Since i’m trying to get rid of Evernote, too anoying too often, i’ll start to document non-private-stuff here.

Virtual Machine with direct Storage Access

Business Case

My QNAP-NAS (TS-431X2) is slow

  • this must not be QNAPs fault, maybe the drives (4 disks, RAID5, between 147..167 MB/second for sequential read) are the root cause
  • adding a SSD-Cache didn’t improve performance when I had a 3-disk RAID 5
    • many people around the world are troubleshooting this without success

so I decided to

  1. use the QNAP-NAS as a Virtual-Tape-Library for Backup-Purposes etc
  2. use my ESXi-Host as Storage-Server
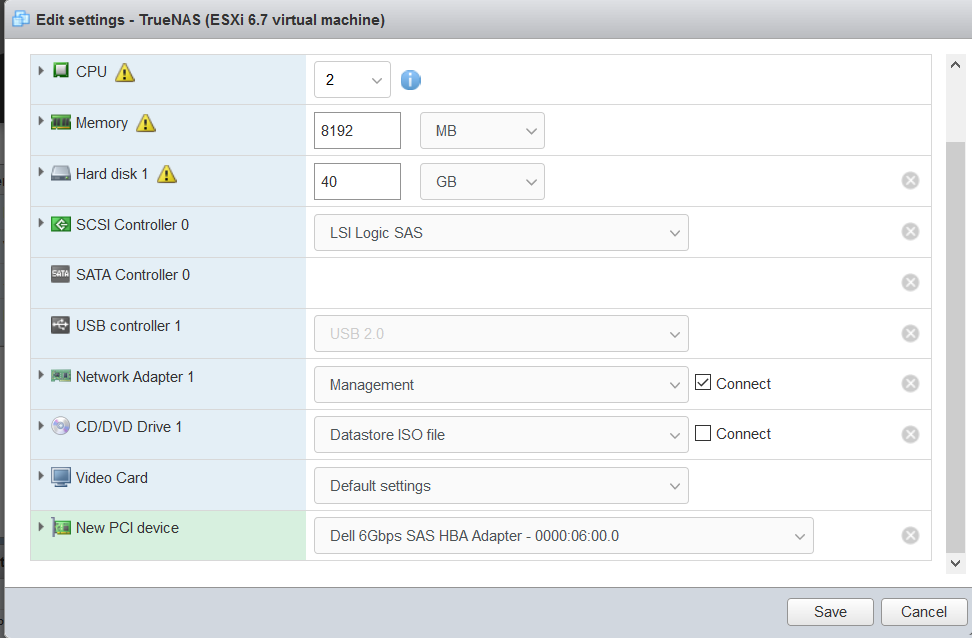
„Storage Server“ VM

I regularily use „Nested ESXi“-Hosts for Lab Environments which should access the storage, so I decided to first give NFS a try – ESXi has no built in NFS-Server, so a small VM using Free-NAS, True-NAS, I didn’t decide yet, should provide „feature parity“ to the QNAP System.

RDM is no option

Adding my former „QNAP Cache SSD“ to the ESXi-Host showed that it was impossible (as expected) to passthrough this disk to a VM.

RDM is no option since it doesn’t allow direct hardware access, eg. SMART-Counters or other statistics.

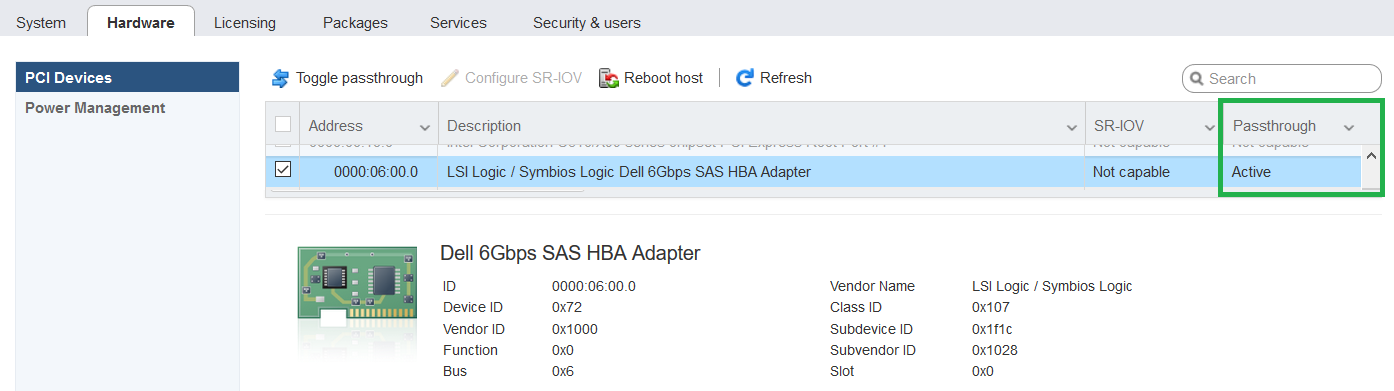
PCIe SATA-Controller: Dell PERC H310

A PERC H310 can get used as a passthrough device for a VM which will get full hardware access for up to 8 disks.

  • as far I remember, this hardware has been released in 2011, but it might still be fast enough to be no bottleneck

IT Firmware

There’s nothing wrong with the original H310-RAID-Firmware, but since I won’t need those features i’d prefer the „IT“-Firmware, which offers much larger buffers to handle bursts easily.

This firmware has to be programmed, a lot of guides for this exist – I had to combine https://www.vladan.fr/flash-dell-perc-h310-with-it-firmware/ providing a link to a nice Dell-Firmware („6gbpsas.fw“) and a precise description what to do – but the „megarec.exe“ found in the archive didn’t work at my Asus mainboard („Error 8192“) so I found another megarec-release https://www.taste-of-it.de/flash-dell-perc-h310-mit-lsi-9211-8i-it-mode/ here.

[root@esx:~] esxcli hardware pci list | egrep -B8 -A26 "Device Name: Dell"
0000:06:00.0
   Address: 0000:06:00.0
   Segment: 0x0000
   Bus: 0x06
   Slot: 0x00
   Function: 0x0
   VMkernel Name: vmhba2
   Vendor Name: LSI Logic / Symbios Logic
   Device Name: Dell 6Gbps SAS HBA Adapter
   Configured Owner: VMkernel
   Current Owner: VMkernel
   Vendor ID: 0x1000
   Device ID: 0x0072
   SubVendor ID: 0x1028
   SubDevice ID: 0x1f1c
   Device Class: 0x0107
   Device Class Name: Serial Attached SCSI controller
   Programming Interface: 0x00
   Revision ID: 0x03
   Interrupt Line: 0x05
   IRQ: 5
   Interrupt Vector: 0x35
   PCI Pin: 0x00
   Spawned Bus: 0x00
   Flags: 0x3201
   Module ID: 4161
   Module Name: mpt2sas
   Chassis: 0
   Physical Slot: 1
   Slot Description: PCIE1
   Passthru Capable: true
   Parent Device: PCI 0:0:28:0
   Dependent Device: PCI 0:6:0:0
   Reset Method: Function reset
   FPT Sharable: true

[root@esx:~] esxcli device driver list
Device   Driver    Status  KB Article
-------  --------  ------  ----------
vmnic0   igbn      normal
vmhba2   mpt2sas   normal
vmnic2   ixgben    normal
vmhba1   vmw_ahci  normal
vmhba32  vmkusb    normal
vmnic1   igbn      normal
vmhba0   vmw_ahci  normal

[root@esx:~] esxtop
 4:48:13pm up 19 min, 852 worlds, 5 VMs, 17 vCPUs; CPU load average: 0.03, 0.03, 0.12

 ADAPTR PATH                 NPTH AQLEN   CMDS/s  READS/s WRITES/s MBREAD/s MBWRTN/s DAVG/cmd KAVG/cmd GAVG/cmd QAVG/cmd
 vmhba0 -                       1   992     0.77     0.19     0.58     0.00     0.00     0.71     0.03     0.74     0.01
 vmhba1 -                       1   992     0.00     0.00     0.00     0.00     0.00     0.00     0.00     0.00     0.00
 vmhba2 -                       1   600     0.00     0.00     0.00     0.00     0.00     0.00     0.00     0.00     0.00
vmhba64 -                       0  1024     0.00     0.00     0.00     0.00     0.00     0.00     0.00     0.00     0.00

PCIe-Passthrough

Passthrough has to be enabled manually, reboot the host and voila:

Dell PERC H310 IT-Firmware: Passthrough active

Now this device can get added to _one_ VM:

Add other device: PCI device
New PCI Device: Controller Passthrough

The (Ubuntu 20.04 Server-)VM seems to be fine with this setup:

Disk as seen by the VM