Amazon AWS – Use IAM-role to authenticate python-script on EC2-Instance to S3-API

Today i wanted to stop using hard-coded S3-Credentials in my scripts running on EC2-Instances.
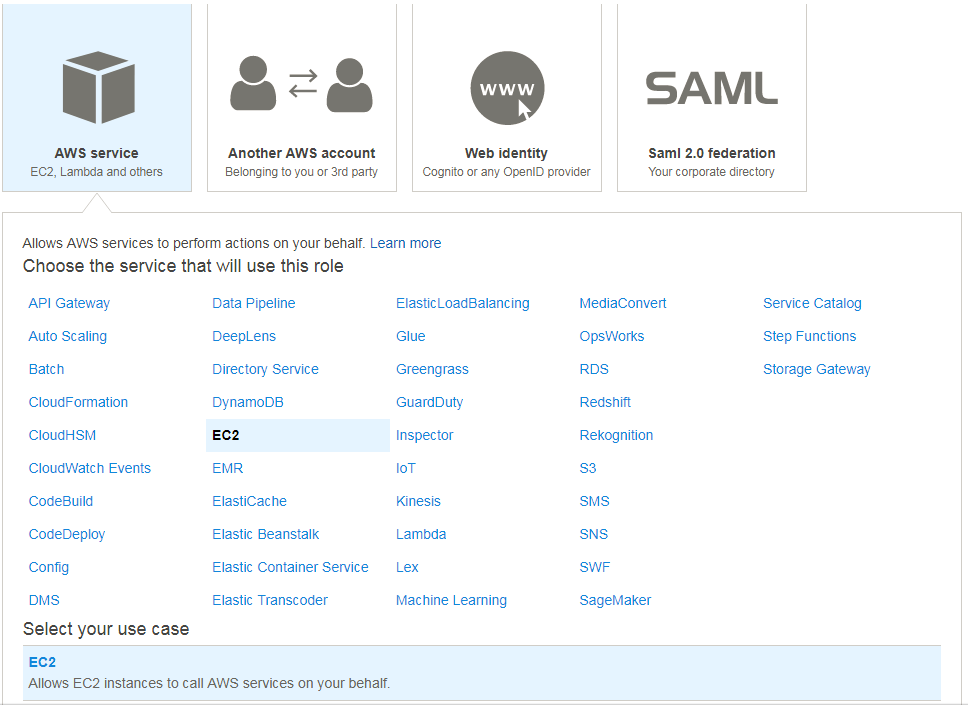
Create an IAM-Role

  1. Services
  2. IAM
  3. Roles
  4. [Create Role]
  • Select type of trusted entity
    • AWS-Service
    • EC2
    • [Next: Permissions]
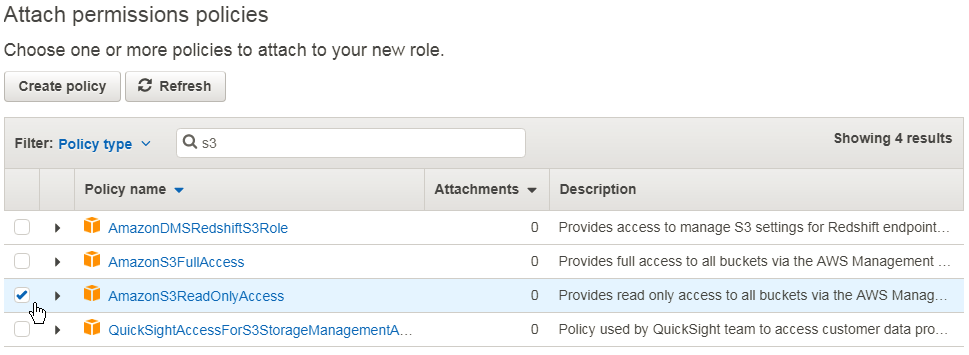
  • Attach permissions policies
    • AmazonS3ReadOnlyAccess
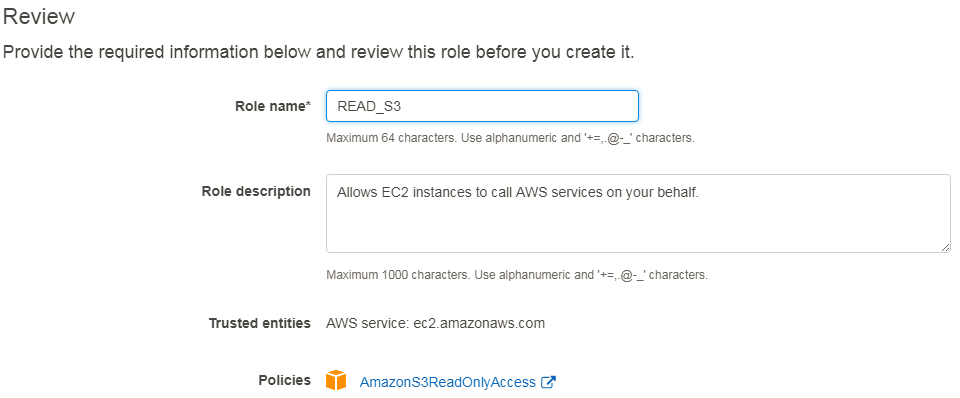
  • Review
    • Role name: READ_S3
IAM-role: AWS – EC2
role-policy: s3 – ead-only
role: review & set name

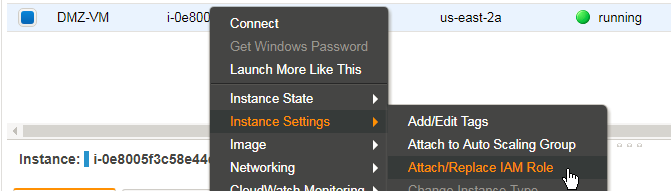
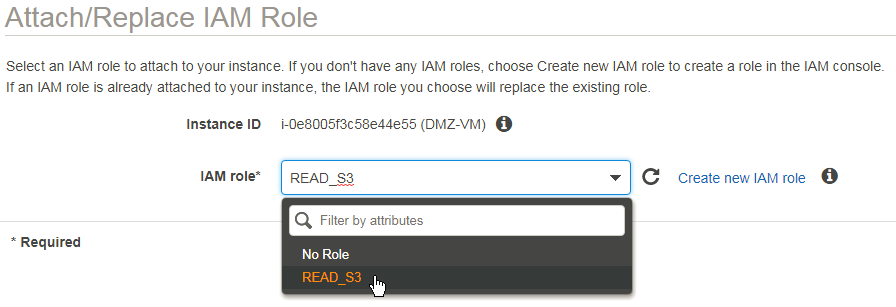
Attach Role to EC2-Instance

  1. Services
  2. EC2
  3. Instances
  4. Instance Settings
  • attach IAM-Role
    • READ_S3
EC2-instance: attach IAM Role
Instance: attach Role „READ_S3“

Prepare Linux Setup
Within the EC2-Instance to which the IAM-Role has been attached.

ubuntu@ip-10-2-0-193:~$ sudo apt-get install -y python-pip
ubuntu@ip-10-2-0-193:~$ sudo apt install -y awscli
ubuntu@ip-10-2-0-193:~$ pip install boto3
ubuntu@ip-10-2-0-193:~$ pip install requests

Check Access to „meta-data“ => „IAM“ => „Security-Credentials“
The Script has to know the name of the role to use.

ubuntu@ip-10-2-0-193:~$ curl http://169.254.169.254/latest/meta-data/iam/security-credentials/READ_S3
{
  "Code" : "Success",
  "LastUpdated" : "2018-02-27T20:16:38Z",
  "Type" : "AWS-HMAC",
  "AccessKeyId" : "ASIAI5EHDXGCAQBR7AA",
  "SecretAccessKey" : "6qWNxrTDU2FTynEkkJHl4pADQ4/xdQqgr89tF8x",
  "Token" : "FQoDYXdzEMX//////////wEaDBVs9pF5ec5XdDPiFCK3A5zquC32puTTqR9jV2BiViEBtagFXJ13++wq+lSUoCxL7sZwSCwa9njCWppjv5ShoKdqfkAWWivecZ18Px8SLoO7T83pZCeyri+WKKVdzNrt5tvrftxxlRVMvj+/Hy683KJi4GeheOEAC0XuiNwFC0IMM5xwJatdzXlann6I/A1zLSC5p/iydHPug9YvgEn3+cwTa2CCBNjzk4Sh0NsGkdhVggjZNcYe/jWSxdcCJJNc5cSTz76z2G+vFppbWnL0Rz4iKGRVXXs81upazvtbheffVWApUiL0ULhS2jrxEzFioPNX73AGlwaNM9jD0Zk5N2BSQuQE9yxyKcetkcCZQ85B4pkmxgldPTStQng+zeYv/rAZjyURFHGHTPhOLaHnnZyn89EfjThZ8rYhq1RJpu8Gqx9Z58Jclyj0YiHQe6IfF77N8PBLc0lGu7iT3yc6cp3n2kdsmuK3N3+WmRQI0G+OMJvMSx6eH31IVgwF+nEwkl0epW13D+3RQEdaCwm9b5wV9UFBkXtI4XPgF08gS2qwiyRO25ztuWD1USq9ZchrmJIOMHO4BX1XpOmf0M9drpbmIYbP4EoovnW1AU=",
  "Expiration" : "2018-02-28T02:48:10Z"

Fetch the IAM-Role-Credentials using python.requests()
Attention: recreated the Role in the meantime, so the credentials have been modified.

ubuntu@ip-10-2-0-193:~$ python
Python 2.7.12 (default, Dec  4 2017, 14:50:18)
[GCC 5.4.0 20160609] on linux2
Type "help", "copyright", "credits" or "license" for more information.

>>> import requests
>>> import boto3

>>> r = requests.get('http://169.254.169.254/latest/meta-data/iam/security-credentials/READ_S3')
>>> cred = r.json()
>>> print cred
{u'Code': u'Success', u'LastUpdated': u'2018-02-27T20:33:14Z', u'AccessKeyId': u'ASIAIRKJFTEBQLSFR6A', u'SecretAccessKey': u'USXXJb1zoCa13FBRrUR5AWwaH0ymo+af8DmW7eQ', u'Token': u'FQoDYXdzEMb//////////wEaDGxRlk0fbmRHnfL8mSK3A0tyJcQ2JgXY+fEnjFioduAnU/FRhth+DhLHzJWnwSw0/isO/tP72wFkneklld1JtAkRkRxH9SjRwqWKpybtW6cEITEksP976Ym7sjxoT+NglC4KNk9DfaRgvJgB8EqDqgG1oZHoJ91O+US+vxPlLAifh7Fvepuw+2nmwPDpOIPz7H6Q2pAr/i7AEncyMGCwZejVhnY5lk8+aDmYMqS7ymfe1n/DyjwEfiYH4kFJplOtubXMsc+rlTg2KtMSovMRX4h+SrdH6bpVpT4DeIvivyH5ABFL66YMyW76P8GGdaGtb8ohxQZ3zeR1gGYs5WEBcziZVEGJDEopKLSUgqgkC1dUFLk0XLfB8vaEGjNsaaT3gaRm2AWAEVonLFyUr+uWvdxptOmFPIMUwUlNitXJkqG44fQEuOw5oDHANJ7zZtPYrWQUhmJzHubJZbvJ313GlPfUQzs7bkDBxoBXIgKIPMpK09uxh48iEByLdqoHyAtkL4qWddQVywuEgEH7Qw/X1/20ngaXqVVSjEa3hu/98EvxKOoushMpeLiG1JyxZJR5nQGH/YgxC17t2ipzsrWPepPkZfz5aAo3IDX1AU=', u'Expiration': u'2018-02-28T02:50:12Z', u'Type': u'AWS-HMAC'}
>>>

Use the credentials to create a Session-Object

>>> session = boto3.Session(
...     aws_access_key_id=cred["AccessKeyId"],
...     aws_secret_access_key=cred["SecretAccessKey"],
...     aws_session_token=cred["Token"],
... )
>>>

Read all S3-Buckets, print out their attributes („Name“)

>>> s3 = session.resource('s3', region_name='us-east-1')
>>>
>>> for b in s3.buckets.all():
...   print b
...
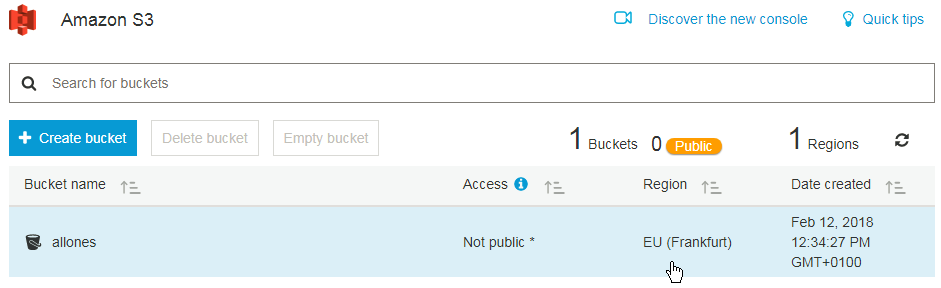
s3.Bucket(name='allones')
>>>

Is this all?

  • Only one Bucket?

Yes – and it’s located in Frankfurt.

S3: Buckets

Further reading:
Python API for Amazon S3: Examples

Cisco IOS Service-Containers: Run an x86-VM inside a Router (Part 5: Install the Service-VM)

The CSR1000V-Router has already been prepared (Create a CSR1000V-Instance with nested Virtualiation support) and in (Part 4: Package the Service-VM into an OVA) we copied the OVA-Image of our „ubuntu-server“-VM to this Router.

Add the internal Network-Interface between Router and Service-VM

SERVICECONTAINER#conf t
Enter configuration commands, one per line.  End with CNTL/Z.
SERVICECONTAINER(config)#int virtualportgroup 0
*Feb  3 19:05:17.206: %LINEPROTO-5-UPDOWN: Line protocol on Interface VirtualPortGroup0, changed state to up
SERVICECONTAINER(config-if)#ip addr 192.168.0.1 255.255.255.0
SERVICECONTAINER(config-if)#exit

SERVICECONTAINER(config)#virtual-service
SERVICECONTAINER(config-virt-serv-global)#signing level unsigned
% Support for unsigned packages has been user-enabled. Unsigned packages are not endorsed by Cisco Systems, Inc. User assumes all responsibility
SERVICECONTAINER(config-virt-serv-global)#ex

SERVICECONTAINER(config)#ip dhcp pool SERVICE
SERVICECONTAINER(dhcp-config)# network 192.168.0.0 255.255.255.0
SERVICECONTAINER(dhcp-config)# exit

SERVICECONTAINER(config)#virtual-service UBUNTU
SERVICECONTAINER(config-virt-serv)#vnic gateway virtualPortGroup 0
SERVICECONTAINER(config-virt-serv-vnic)#guest ip address 192.168.0.2
SERVICECONTAINER(config-virt-serv-vnic)#end
SERVICECONTAINER#
*Feb  3 19:06:27.474: %SYS-5-CONFIG_I: Configured from console by console

Install the Service-VM

SERVICECONTAINER#debug virtual-service all
virtual service all debugging is on
SERVICECONTAINER#term mon
% Console already monitors
SERVICECONTAINER#term width 0
SERVICECONTAINER#virtual-service install name UBUNTU package bootflash:ubuntu1604.ova
Installing package 'bootflash:/ubuntu1604.ova' for virtual-service 'UBUNTU'. Once the install has finished, the VM may be activated. Use 'show virtual-service list' for progress.

*Feb  3 19:07:43.518: VIRTUAL-SERVICE [UBUNTU]: Sending install req for [UBUNTU], path=bootflash:/ubuntu1604.ova, uri= uid=0
*Feb  3 19:07:43.529: VIRTUAL-INSTANCE: Message sent for INSTALL TDL request: Virtual-instance name: UBUNTU, UID: 0
*Feb  3 19:07:43.529: VIRTUAL-SERVICE: Started response timer for tid DD000001 - 30 minutes
*Feb  3 19:05:14.205: %IOSXE-4-PLATFORM: R0/0: kernel: dev->name [intsvc0]: dev_entry not populated

SERVICECONTAINER#show virtual-service list
System busy installing virtual-service 'UBUNTU'. The request may take several minutes...
Virtual Service List:


Name                    Status             Package Name
------------------------------------------------------------------------------
UBUNTU                  Installing         ubuntu1604.ova


*Feb  3 19:08:00.645: %VMAN-5-PACKAGE_SIGNING_LEVEL_ON_INSTALL: R0/0: vman: Package 'ubuntu1604.ova' for service container 'UBUNTU' is 'unsigned', signing level cached on original install is 'unsigned'
*Feb  3 19:08:09.216: VIRTUAL-SERVICE: Install response handler: VM[UBUNTU]: Owner IOSd trans_id 3707764737
*Feb  3 19:08:09.216: VIRTUAL-SERVICE [UBUNTU]: vm[UBUNTU] set owner [IOSd]
*Feb  3 19:08:09.225: VIRTUAL-SERVICE [UBUNTU]: application_name: 'ubuntu' application_vendor: '' application_version: '1.1'
*Feb  3 19:08:09.226: VIRTUAL-SERVICE [UBUNTU]: Default profile info: license_name: '', license_ver: ''
*Feb  3 19:08:09.226: VIRTUAL-SERVICE: Install pkg response for tid DD000001: rc=0, descr=Install Success
*Feb  3 19:08:09.226: VIRTUAL-SERVICE [UBUNTU]: License type: none, no license needed
*Feb  3 19:08:09.226: %VIRT_SERVICE-5-INSTALL_STATE: Successfully installed virtual service UBUNTU
*Feb  3 19:08:09.243: VIRTUAL-SERVICE: Received local transport activation request
*Feb  3 19:08:09.244: VIRTUAL-SERVICE: Enabling vman local transport

SERVICECONTAINER#show virtual-service list
Virtual Service List:

Name                    Status             Package Name
------------------------------------------------------------------------------
UBUNTU                  Installed          ubuntu1604.ova

*Feb  3 19:08:32.758: %ONEP_BASE-6-SS_ENABLED: ONEP: Service set Base was enabled by Default
*Feb  3 19:08:33.259: VIRTUAL-SERVICE: Local transport 'activation' request processed

Activate the installed Service-VM

SERVICECONTAINER#conf t
Enter configuration commands, one per line.  End with CNTL/Z.
SERVICECONTAINER(config)#virtual-service UBUNTU
SERVICECONTAINER(config-virt-serv)#activate
SERVICECONTAINER(config-virt-serv)#end

% Activating virtual-service 'UBUNTU', this might take a few minutes. Use 'show virtual-service list' for progress.

*Feb  3 19:09:57.772: VIRTUAL-SERVICE [UBUNTU]: Activate CLI: appl->owner [IOSd]
*Feb  3 19:09:57.775: VIRTUAL-INSTANCE: Message sent for ACTIVATE TDL request: Virtual service name: UBUNTU, UID: 0
*Feb  3 19:09:57.775: VIRTUAL-SERVICE [UBUNTU]: Started virtual service (0) activate response timer - 30 minutes
*Feb  3 19:10:06.052: %SYS-5-CONFIG_I: Configured from console by console
*Feb  3 19:10:06.383: VIRTUAL-SERVICE [UBUNTU]: Activate response handler: got owner [IOSd]
*Feb  3 19:10:06.383: VIRTUAL-SERVICE: clnt_type 0: Interface counter is '1'
*Feb  3 19:10:06.383: VIRTUAL-SERVICE: Information for virtual port grp '0' is received
*Feb  3 19:10:06.384: VIRTUAL-SERVICE [UBUNTU]: Deliver intf response, vm =UBUNTU, counter=1
*Feb  3 19:10:06.384: VIRTUAL-SERVICE [UBUNTU]: Received interface id=0, type=1, state=1
*Feb  3 19:10:06.384: VIRTUAL-SERVICE [UBUNTU]: Received virtual port group interface 0 with service MAC 001e.e5b1.cfba, state: up
*Feb  3 19:10:06.385: VIRTUAL-INSTANCE: Message sent for IF MTU TDL message: appliance 'UBUNTU'
*Feb  3 19:10:06.385: VIRTUAL-SERVICE [UBUNTU]: Activate response handler: rsp_rc 0
*Feb  3 19:10:06.385: VIRTUAL-SERVICE [UBUNTU]: Deliver response: appliance_state 3 rsp_rc 0 if_notify name UBUNTU clnt_type 0 act_state 0
*Feb  3 19:10:06.385: %VIRT_SERVICE-5-ACTIVATION_STATE: Successfully activated virtual service UBUNTUconf t
*Feb  3 19:10:06.385: VIRTUAL-SERVICE [UBUNTU]: Stopped virtual service (1) response timer
*Feb  3 19:10:06.385: VIRTUAL-SERVICE: Delivered Virt-manager response message to virtual service 'UBUNTU' - Response: 'OK'
*Feb  3 19:10:06.385: VIRTUAL-SERVICE [UBUNTU]: set owner to 'IOSd' in appliance

SERVICECONTAINER#show virtual-service list
Virtual Service List:

Name                    Status             Package Name
------------------------------------------------------------------------------
UBUNTU                  Activated          ubuntu1604.ova

SERVICECONTAINER#show ip dhcp bind
Bindings from all pools not associated with VRF:
IP address      Client-ID/              Lease expiration        Type       State      Interface
                Hardware address/
                User name
192.168.0.2     001e.e5b1.cfba          Feb 04 2018 07:20 PM    Automatic  Active     VirtualPortGroup0

Access the VM using the (virtual) Serial-Console

SERVICECONTAINER#virtual-service connect name UBUNTU console
Connected to appliance. Exit using ^c^c^c

Ubuntu 16.04.3 LTS ubuntu-server ttyS0

ubuntu-server login: user
Password:
Last login: Sat Feb  3 20:23:27 CET 2018 on ttyS0
Welcome to Ubuntu 16.04.3 LTS (GNU/Linux 4.4.0-87-generic x86_64)

 * Documentation:  https://help.ubuntu.com
 * Management:     https://landscape.canonical.com
 * Support:        https://ubuntu.com/advantage

9 packages can be updated.
7 updates are security updates.


user@ubuntu-server:~$ who
user     ttyS0        2018-02-03 23:12

Logout: 3x [CTRL]+

user@ubuntu-server:~$ ^C

Access the VM using SSH via the internal Network

SERVICECONTAINER#ssh -l user 192.168.0.2
Password:
Welcome to Ubuntu 16.04.3 LTS (GNU/Linux 4.4.0-87-generic x86_64)

 * Documentation:  https://help.ubuntu.com
 * Management:     https://landscape.canonical.com
 * Support:        https://ubuntu.com/advantage

9 packages can be updated.
7 updates are security updates.

Last login: Sat Feb  3 23:12:21 2018
user@ubuntu-server:~$ who
user     pts/0        2018-02-03 23:13 (192.168.0.1)

Check the local python/NAPALM-Setup to get facts about the containing router

user@ubuntu-server:~$ python
Python 2.7.12 (default, Dec  4 2017, 14:50:18)
[GCC 5.4.0 20160609] on linux2
Type "help", "copyright", "credits" or "license" for more information.

>>> import napalm

>>> iosdriver = napalm.get_network_driver('ios')
dpass', optional_args={'port': 22, 'dest_file_system': 'bootflash:'})sword='rmon

>>> router.open()

>>> print router.get_facts()
{u'os_version': u'Virtual XE Software (X86_64_LINUX_IOSD-UNIVERSALK9-M), Version 16.7.1, RELEASE SOFTWARE (fc6)', u'uptime': 12840, u'interface_list': [u'GigabitEthernet1', u'GigabitEthernet2', u'GigabitEthernet3', u'VirtualPortGroup0'], u'vendor': u'Cisco', u'serial_number': u'9SNHUBYAML', u'model': u'CSR1000V', u'hostname': u'SERVICECONTAINER', u'fqdn': u'SERVICECONTAINER.lab.local'}

Cisco IOS Service-Containers: Run an x86-VM inside a Router (Part 4: Package the Service-VM into an OVA)

I’ll start at the KVM-Virtualization Host („Ubuntu Desktop“) again.

Folder Structure
I’ll create a folder „isr-service-container“ for common stuff (package.yaml, create_ova.sh) and a for each VM a dedicated sub-folder, today: „ubuntu-server16.04“

user@KVM-1:~$ mkdir isr-service-container
user@KVM-1:~$ cd isr-service-container
user@KVM-1:~/isr-service-container$ mkdir ubuntu-server16.04

Download the Cisco-provided „templates.tar“ from GitHub (GitHub: Templates.tar).
It contains:

  • package.yaml
  • create_ova.sh

Prepare a compressed virtual harddisk of the „Ubuntu-Server“-VM
Locate the original virtual harddisk:

user@KVM-1:~$ sudo ls /var/lib/libvirt/images/ -l
total 3238172
-rw------- 1 root root 21478375424 Feb  2 23:14 ubuntu-server16.04.qcow2

Convert the original „.qcow2“-File into a compressed „copy“:

user@KVM-1:~/isr-service-container$ sudo qemu-img convert -p -c -o compat=0.10 -O qcow2 /var/lib/libvirt/images/ubuntu-server16.04.qcow2 ./ubuntu-server16.04/ubuntu-server16.04.qcow2
    (100.00/100%)

user@KVM-1:~/isr-service-container$ cd ubuntu-server16.04/
user@KVM-1:~/isr-service-container/ubuntu-server16.04$ ls -lh
total 1,2G
-rw-r--r-- 1 root root 1,2G Feb  2 23:26 ubuntu-server16.04.qcow2

Change the Owner of this new file:

user@KVM-1:~/isr-service-container/ubuntu-server16.04$ sudo chown user:user ubuntu-server16.04.qcow2 
user@KVM-1:~/isr-service-container/ubuntu-server16.04$ ls -lh
total 1,2G
-rw-r--r-- 1 user user 1,2G Feb  2 23:26 ubuntu-server16.04.qcow2
user@KVM-1:~/isr-service-container/ubuntu-server16.04$ copy ../package.yaml ./package.yaml

I’ll change:

  • Description: „KVM Ubuntu 16.04 LTS“
  • resources/vcpu: 1
  • disk/file: ubuntu-server16.04.qcow2

The vCPU# got decreased since the CSR1000v only supports Service-VMs with one vCPU.

user@KVM-1:~/isr-service-container/ubuntu-server16.04$ joe ./package.yaml
manifest-version: 1.0

info:
  name: ubuntu
  description: "KVM Ubuntu 16.04 LTS"
  version: 1.1

app:
  # Indicate app type (vm, paas, lxc etc.,)
  apptype: vm

  resources:
   cpu: 10
   memory: 854016
   vcpu: 1

   disk:
    - target-dev: hdc
      file: ubuntu-server16.04.qcow2

   interfaces:
    - target-dev: net1

   serial:
    - console
    - aux

  # Specify runtime and startup
  startup:
    runtime: kvm
    boot-dev: hd

Another File „version.ver“ has to be created:

  • the „version“ must match the „manifest-version“ of the yaml-file.
user@KVM-1:~/isr-service-container/ubuntu-server16.04$ echo 1.0 > version.ver

Check the content of the VM-folder

user@KVM-1:~/isr-service-container/ubuntu-server16.04$ ls -l
total 1206788
-rw-rw-r-- 1 user user        437 Feb  3 20:13 package.yaml
-rw-r--r-- 1 user user 1239148032 Feb  2 23:26 ubuntu-server16.04.qcow2
-rw-rw-r-- 1 user user          4 Feb  2 23:33 version.ver

Create the OVA-File

user@KVM-1:~/isr-service-container/ubuntu-server16.04$ cd ..

user@KVM-1:~/isr-service-container$ ./create_ova.sh -mts 200000 -mfs 100000 ubuntu-server16.04
create_ova.sh v1.0(Linux) - Create a virtual-service OVA package

User inputs:
  Compress=(files > '100000M' if total 
            file size > '200000M')
  Directory=ubuntu-server16.04

Package name :  ubuntu
 Generating SHA1 on files...
Running SHA1 over all files in '/home/user/isr-service-container/ubuntu-server16.04' and
    creating manifest file ' ubuntu.mf', please wait...

Done creating ' ubuntu.mf' file
 ...Done Generating SHA1 on files
Creating ' ubuntu.ova' please wait...
package.yaml
ubuntu.mf
ubuntu-server16.04.qcow2
version.ver

'/home/user/isr-service-container/ubuntu-server16.04/ ubuntu.ova' created

Manifest Contents:
SHA1(package.yaml)= fb47cf5b764a7bb062561a4f67d830003f8e4d5a  
SHA1(ubuntu-server16.04.qcow2)= 732c8ac9dc81ab6b2695fe6c045bec4493d77168  
SHA1(version.ver)= 61652cd1568dcf2614df833eba241755eee34e89  

Copy the OVA-File to the Router:

user@KVM-1:~/isr-service-container$ scp ./ubuntu-server16.04/ubuntu.ova <ios-user>@<csr1000v-management-router-ip>:bootflash:ubuntu1604.ova
Password: <ios-password>
ubuntu.ova                                                                                         100% 1182MB   1.2MB/s   17:05    
Connection to 192.168.2.189 closed by remote host.

Check the ISR-Router:

SERVICECONTAINER#dir *.ova

Directory of bootflash:/
   22  -rw-  1239152640   Feb 3 2018 19:00:42 +00:00  ubuntu1604.ova
7897796608 bytes total (4507389952 bytes free)

Cisco IOS Service-Containers: Run an x86-VM inside a Router (Part 3: Create the Service-VM)

Create the „Ubuntu Server“-VM using KVM on top of the „Ubuntu Desktop“-VM
Run the „Virtual Machine Manager“

Virtual Machine Manager

Create a new virtual Machine:
Virtual Machine Manager – create a new VM

(1) Create a new virtual Machine

vmm – 1 – Create a new virtual machine

(2) Select the Installation ISO
* and deselect „auto OS Detection“

vmm – 2 – Use ISO Image

(3) Choose Memory and CPU Settings

vmm – 3 – Choose Memory and CPU settings

(4) Create a virtual Hard-Disk for the VM

vmm – 4 – Enable storage for this VM

(5) Give a name to the VM

vmm – 5 – Ready to begin the installation

Boot the KVM-VM („Ubuntu Server“)

0 – install Ubuntu Server

Basic Setup:

  • Language: Englisch
  • my territory: other/Europe/Germany
  • locale: en_US.UTF_8
  • Keyboard: German
  • hostname: ubuntu-server
  • user / password
  • no home-directory encryption
  • timezone Europe/Berlin
  • use entire virtual disk (no need for „LVM…“ i think)
  • no HTTP-Proxy
  • no automatic updates
  • [x] SSH-Server
  • install GRUB

After the first login, as always:
sudo apt-get update && sudo apt-get upgrade –y
sudo reboot

Enable the Virtual-„Console“-Port of the Ubuntu-Server-VM

  • enable a virtual „CON“ serial-port at the linux vm

sudo joe /lib/systemd/system/ttyS0.service

Example-Script for the 16.04 System-CTL Service:

[Unit]
Description=Serial Console Service

[Service]
ExecStart=/sbin/getty -L 9600 ttyS0 vt102
Restart=always

[Install]
WantedBy=multi-user.target

Reload systemctl, enable the TTY-service and then start it:

sudo systemctl daemon-reload
sudo systemctl enable ttyS0
sudo systemctl start ttyS0

Verify the service state:
user@ubuntu-server:~$ sudo systemctl status ttyS0
● ttyS0.service - Serial Console Service
Loaded: loaded (/lib/systemd/system/ttyS0.service; enabled; vendor preset: en
Active: active (running) since Sat 2018-02-03 20:21:20 CET; 1h 19min ago
Main PID: 831 (login)
Tasks: 0
Memory: 672.0K
CPU: 196ms
CGroup: /system.slice/ttyS0.service
‣ 831 /bin/login --

Add your „Network Application“ to the VM:
I want to use my Service-Container for network-management (Centralized access to device-configuration and other state-information using NAPALM and Linux: SNMP with Python ):
sudo apt-get install -y joe
sudo apt-get install –y libsnmp-dev snmp-mibs-downloader
sudo apt-get install –y gcc python-dev python-pip libssl-dev libffi-dev python-cffi
pip install easysnmp
pip install napalm

That’s all
Shutdown the VM

NAPALM Validation (Static rule)

Yesterday I attended a short presentation held by David Barroso introducing the NAPALM-„Validation“-Module.

Configuring the Network fully automated is just half the way to go.
Checking the Network-State the other half.

Python-Script
Had to try it out the easy-way using just python (without ansible) first:

import napalm

#just to get the DICT returned by the "compliance_report"-Method in a readable manner on the screen
import pprint
pp = pprint.PrettyPrinter()

iosdriver = napalm.get_network_driver('ios')

DEVICE="192.168.2.139"
USER="rmond"
PASS="rmondpassword"
router = iosdriver(hostname=DEVICE, username=USER,  password=PASS, optional_args={'port': 22, 'dest_file_system': 'bootflash:'})

router.open()
report = router.compliance_report("validate.yaml")
router.close()

pp.pprint(report)

Static YAML-File
Validating against the following static „validate.yaml“-File:

- get_facts:
    hostname: CSR-1-DC
    os_version: CSR1000V Software (X86_64_LINUX_IOSD-UNIVERSALK9-M), Version 15.4(2)S3, RELEASE SOFTWARE (fc2)
    interface_list:
        list:
            - GigabitEthernet1
            - GigabitEthernet2
            - GigabitEthernet3
            - GigabitEthernet4
            - VirtualPortGroup0
- get_interfaces_ip:
    GigabitEthernet1:
      ipv4:
       192.168.2.139:
         prefix_length: 25

leads to the following result

{u'complies': False,
 'get_facts': {u'complies': True,
               u'extra': [],
               u'missing': [],
               u'present': {'hostname': {u'complies': True,
                                         u'nested': False},
                            'interface_list': {u'complies': True,
                                               u'nested': True},
                            'os_version': {u'complies': True,
                                           u'nested': False}}},
 'get_interfaces_ip': {u'complies': False,
                       u'extra': [],
                       u'missing': [],
                       u'present': {'GigabitEthernet1': {u'complies': False,
                                                         u'diff': {u'complies': False,
                                                                   u'extra': [],
                                                                   u'missing': [],
                                                                   u'present': {'ipv4': {u'complies': False,
                                                                                         u'diff': {u'complies': False,
                                                                                                   u'extra': [],
                                                                                                   u'missing': [],
                                                                                                   u'present': {'192.168.2.139': {u'complies': False,
                                                                                                                                 u'diff': {u'complies': False,
                                                                                                                                           u'extra': [],
                                                                                                                                           u'missing': [],
                                                                                                                                           u'present': {'prefix_length': {u'actual_value': 24,
                                                                                                                                                                          u'complies': False,
                                                                                                                                                                          u'expected_value': 25,
                                                                                                                                                                          u'nested': False}}},
                                                                                                                                 u'nested': True}}},
                                                                                         u'nested': True}}},
                                                         u'nested': True}}},
 u'skipped': []}

Whats wrong with the Router?
„nested = True“ means – the issue is downward in the datastructure.

In the example, the first Object with „nested = False“ is „prefix_length“
The Prefix-Length („Subnet-Mask“) is wrong:

  • wanted: /25-Bit
  • configured: /24-Bit.

Validate the output of commands which use additional parameters
Example: Ping to the Default-Gateway

First: Get familiar with the datastructure returned by the command:

>>> pp.pprint(router.ping("192.168.2.1"))
{u'success': {u'packet_loss': 0,
              u'probes_sent': 5,
              u'results': [{u'ip_address': u'192.168.2.1', u'rtt': 0.0},
                           {u'ip_address': u'192.168.2.1', u'rtt': 0.0},
                           {u'ip_address': u'192.168.2.1', u'rtt': 0.0},
                           {u'ip_address': u'192.168.2.1', u'rtt': 0.0},
                           {u'ip_address': u'192.168.2.1', u'rtt': 0.0}],
              u'rtt_avg': 1.0,
              u'rtt_max': 2.0,
              u'rtt_min': 1.0,
              u'rtt_stddev': 0.0}}

add the following portion to the YAML-File:

- ping:
    _name: Default-Gateway
    _kwargs:
      destination: "192.168.2.1"
    success:
      packet_loss: 0

Result (Success)

>>> pp.pprint(router.compliance_report("validate.yaml"))
{'Default-Gateway': {u'complies': True,
                     u'extra': [],
                     u'missing': [],
                     u'present': {'success': {u'complies': True,
                                              u'nested': True}}},

Result (failure)

>>> pp.pprint(router.compliance_report("validate.yaml"))
{'Default-Gateway': {u'complies': False,
                     u'extra': [],
                     u'missing': [],
                     u'present': {'success': {u'complies': False,
                                              u'diff': {u'complies': False,
                                                        u'extra': [],
                                                        u'missing': [],
                                                        u'present': {'packet_loss': {u'actual_value': -1,
                                                                                     u'complies': False,
                                                                                     u'expected_value': 0,
                                                                                     u'nested': False}}},
                                              u'nested': True}}},

Cisco IOS Service-Containers: Run an x86-VM inside a Router (Part 2: Create a CSR1000v-Instance with nested Virtualization support)

In real life an hardware-ISR/ASR-Router might be the correct choice.

Create a CSR1000v-Instance with nested Virtualization support
But since the CSR1000v-Router supports Service-Containers, too – this is the chance to prove the setup in a lab environment:

  • IOS-XE 3.17 is the first supported release, i’ll go with IOS-XE 16.7.1
  • Option to enable unsigned containers
  • any 3rd party KVM
  • Libvirt based format / YAML manifest file
  • Requires 4GB+ dedicated RAM
  • ASR1000, ISR4000, CSR1000

5 Minutes to deploy the virtual CSR1000v-Router using COT
I’ll use COT (Common OVF Tool (COT) – Automated Lab-Router Deployment) to deploy my CSR1000v-Router:

user@ubuntu-server:~$ cot inject-config csr1000v-universalk9.16.07.01.ova -c ios-napalm.startup.cfg -o csr1000v-universalk9.16.07.01.napalm.ova
Add disk file to existing (but empty) cdrom drive? [y]
NOTICE  : Overwriting existing disk Item in OVF

cot --verbose deploy csr1000v-universalk9.16.07.01.napalm.ova esxi &amp;amp;amp;lt;VCENTER-HOST/IP&amp;amp;amp;gt;/&amp;amp;amp;lt;DATACENTER&amp;amp;amp;gt;/host/&amp;amp;amp;lt;ESXi-HOST/IP&amp;amp;amp;gt; -u &amp;amp;amp;lt;USER&amp;amp;amp;gt; -p &amp;amp;amp;lt;PASS&amp;amp;amp;gt; -n RTR-SERVICE-CONTAINER -d &amp;amp;amp;lt;DATASTORE&amp;amp;amp;gt; -S "telnet://:41001,server" -N GigabitEthernet1="Management" GigabitEthernet2=T24 GigabitEthernet3=T34 -c 2CPU-8GB

Boot the Router
Check the Virtualization-Environment: fail 🙁

  • Machine types disabled : KVM
SERVICECONTAINER# show virtual-service
Virtual Service Global State and Virtualization Limits:

Infrastructure version : 1.7
Total virtual services installed : 0
Total virtual services activated : 0

Machine types supported   : LXC
Machine types disabled    : KVM

Maximum VCPUs per virtual service : 1
Resource virtualization limits:
Name                         Quota     Committed     Available
--------------------------------------------------------------
system CPU (%)                  75             0            75
memory (MB)                   3072             0          3072
bootflash (MB)               20000             0          5554

i forgot to enable nested-virtualization for the CSR1000v-Router-VM.

Action Plan

    • Power-down the VM („Shut Down Guest“) again
    • edit Hardware (Web-Client)
csr1000v-router-enable-nested-virtualization
  • boot the router again

Check again: works 🙂

  • Machine types supported : KVM, LXC
SERVICECONTAINER#show virtual-service
Virtual Service Global State and Virtualization Limits:

Infrastructure version : 1.7
Total virtual services installed : 0
Total virtual services activated : 0

Machine types supported   : KVM, LXC
Machine types disabled    : none

Maximum VCPUs per virtual service : 1
Resource virtualization limits:
Name                         Quota     Committed     Available
--------------------------------------------------------------
system CPU (%)                  75             0            75
memory (MB)                   3072             0          3072
bootflash (MB)               20000             0          5553

That’s it, the CSR1000V is ready.

Notice: vCPU-Limitation in CSR1000v

  • Maximum VCPUs per virtual service : 1

Remember this, when creating the YAML-File for the OVA. (Part 4: Package the Service-VM into an OVA)

Cisco IOS Service-Containers: Run an x86-VM inside a Router (Part 1: KVM Development Environment)

Network Hosted Kernel Virtual Machine (KVM)

Many Cisco Routers allow you to host your own virtual machine directly inside a router.
DevNet: Cisco IOS KVM Service-Containers

  • CSR 1000v
  • ISR 4000
  • ASR 1000

I went through the documentation, especially Service-Containers-Tutorial.pdf and Ubuntu – Building a Service Container.pdf where very helpful.

But i didn’t want to go the „Ubuntu-Desktop-14.04-LTS“-way which was described.

„My“ Service-Container-VM should be:

  • Ubuntu 16.04 LTS
  • Ubuntu Server
    • save some compute/cpu/dram/harddisk-ressources by not installing an Ubuntu-Desktop-Environment inside the Router. Just network services, please!

The whole deployment process can be accomplished in five steps:

  1. build a KVM virtualization-Environment
  2. prepare an ISR-Router (lab: Create a CSR1000v-Instance for nested Virtualization)
  3. create the Service-VM (Ubuntu-Server)
  4. package it inside an OVA
  5. install this OVA at the router

Build the KVM Virtualization Environment

Here I’ll use Ubuntu LTS, but the „Desktop“-Release to get the „Virtual Machine Manager“-GUI.
ubuntu-16.04.3-desktop-amd64.iso

Common vSphere Process „New VM“

  • Linux Ubuntu 64 Bit, 4GB DRAM, 120GB Disk
  • mount Ubuntu-Desktop-ISO as DVD

Enable nested virtualization (Hardware-Virtualization for Guest-OS)
Don’t forget: this „KVM Virtualization Environment“ will run on top of an VSphere-ESXi-Host.

  • nested virtualization: [Linux-Server-VM] on top of [KVM Virtualization] on top of [ESXi Hypervisor]
Hardware virtualization: [x] Expose hardware assisted virtualization to guest-OS

Ubuntu-Desktop VM with KVM-Virtualization
Installation: Defaults are fine

  • never use the „root“-acccout
  • use a common user-account instead, i’ll use the username „user“ in the text

Additional Setup
user@KVM-1:~$ sudo apt-get update && sudo apt-get upgrade -y
user@KVM-1:~$ sudo apt-get install -y open-vm-tools open-vm-tools-desktop

Add KVM („libvirt“)
user@KVM-1:~$ sudo apt-get install -y qemu-kvm libvirt-bin bridge-utils virt-manager qemu-system
Finalize it
user@KVM-1:~$ sudo reboot

Check the KVM Environment
Should look like this:

user@KVM-1:~/isr-service-container$ virsh -c qemu:///system list

 Id    Name                           State
----------------------------------------------------

Fine-tuning: „Disable Screensaver“

  • avoid ever and ever re-login to the remote-Desktop
  • acceptable in an isolated lab environment

all settings => brightness & lock

  • „never“ turn screen off when inactive
  • lock „off“
  • [ ] require password when waking from suspend

Preparation: Mount NFS-Share with „ubuntu-server“-ISO
I store my ISO-Images on an central NFS-Datastore.

  • the ISO-image has to be available inside the VM
sudo apt-get install -y nfs-common
mkdir /home/user/<NAS-SHARE>
sudo mount.nfs <NAS-IP>:<NAS-SHARE> /home/user/<NAS-SHARE>