COT – Common OVF-Tool – Import of VCenter HTTPS Certificate

Background: Python-Requests wants to verify https-certificates, which makes sense to me.
– but my VCenter uses a self-signed Certificate

$ python
Python 2.7.15rc1 (default, Apr 15 2018, 21:51:34)
[GCC 7.3.0] on linux2
Type "help", "copyright", "credits" or "license" for more information.
>>> import requests
>>> requests.get("https://<vcenter-ip>")
Traceback (most recent call last):
  File "<stdin>", line 1, in <module>
  File "/usr/lib/python2.7/dist-packages/requests/api.py", line 72, in get
    return request('get', url, params=params, **kwargs)
  File "/usr/lib/python2.7/dist-packages/requests/api.py", line 58, in request
    return session.request(method=method, url=url, **kwargs)
  File "/usr/lib/python2.7/dist-packages/requests/sessions.py", line 520, in request
    resp = self.send(prep, **send_kwargs)
  File "/usr/lib/python2.7/dist-packages/requests/sessions.py", line 630, in send
    r = adapter.send(request, **kwargs)
  File "/usr/lib/python2.7/dist-packages/requests/adapters.py", line 506, in send
    raise SSLError(e, request=request)
requests.exceptions.SSLError: HTTPSConnectionPool(host='192.168.2.13', port=443): Max retries exceeded with url: / (Caused by SSLError(SSLError(1, u'[SSL: CERTIFICATE_VERIFY_FAILED] certificate verify failed (_ssl.c:726)'),))

Don’t think about ignoring certificate errors 😉

Prerequisites

sudo apt-get install unzip

Download the certificate from the VCenter:

wget --no-check-certificate https://<vcenter-ip>/certs/download
mv download download.zip
unzip download.zip

Install the certificate:

cd certs
$ ls -l
total 8
-rw-r--r-- 1 administrator administrator 1294 Apr 29  2016 d2f59c0d.0
-rw-r--r-- 1 administrator administrator  702 Oct 15 14:36 d2f59c0d.r0

$ export REQUESTS_CA_BUNDLE=d2f59c0d.0

Now Python.requests validates the vCenter:

$ python
Python 2.7.15rc1 (default, Apr 15 2018, 21:51:34)
[GCC 7.3.0] on linux2
Type "help", "copyright", "credits" or "license" for more information.
>>> import requests
>>> requests.get("https://<vcenter-ip>")
<Response [200]>

Add the Export to ~/.bashrc

sudo vi ~/.bashrc

at the end of the file

export REQUESTS_CA_BUNDLE=~/certs/d2f59c0d.0

COT – Common OVF Tool

…this article should have been published at 2017-11-23, i forgot to press the right botton.

So, an update might be needed, anyone still interested in cot today?

Release 2.1 (2018-01-29) is the current release, containing some fixes (https://github.com/glennmatthews/cot/blob/master/CHANGELOG.rst)

  • COT installation using PIP

So, let’s go, following

administrator@lx-ubuntu:~$ sudo pip install cot
sudo: pip: command not found


thats embarassing.

Install PIP first

$ sudo apt-get update
$ sudo apt-get install python-pip

$ pip --version
pip 9.0.1 from /usr/lib/python2.7/dist-packages (python 2.7)

Try it again

$ sudo pip install cot
...
Successfully installed backports.shutil-get-terminal-size-1.0.0 colorlog-3.1.4 cot-2.1.0 ndg-httpsclient-0.5.1 pyvmomi-6.7.0.2018.9 verboselogs-1.7
$ cot --version
Common OVF Tool (COT), version 2.1.0
Copyright (C) 2013-2017 the COT project developers.
  • Optional: Argument-Completion

Not essential, but handy.

$sudo pip install argcomplete
...
Successfully installed argcomplete-1.9.4
  • COT helpers

A full installation requires so called „cot-helpers“ to use all features.

$ cot install-helpers --verify-only
Results:
-------------
COT manpages: DIRECTORY NOT FOUND: /usr/local/man/man1
fatdisk:      NOT FOUND
mkisofs:      NOT FOUND
ovftool:      NOT FOUND
qemu-img:     NOT FOUND
vmdktool:     NOT FOUND
$ sudo apt-get install xutils-dev
...
Setting up xutils-dev (1:7.7+5ubuntu1) ...
$ sudo cot install-helpers
...
Results:
-------------
COT manpages: already installed, no updates needed
fatdisk:      INSTALLATION FAILED: [Errno 1] Helper program './RUNME' exited with error 1
mkisofs:      version 2.1, present at /usr/bin/mkisofs
ovftool:      INSTALLATION FAILED: No support for automated installation of ovftool, as VMware requires a site login to
              download it. See https://www.vmware.com/support/developer/ovf/
qemu-img:     version 2.11.1, present at /usr/bin/qemu-img
vmdktool:     version 1.4, present at /usr/local/bin/vmdktool

[Errno 1] Unable to install some helpers

first fix „fatdisk“ which is used to inject configs into OVA-Files


$ sudo cp /usr/include/x86_64-linux-gnu/bits/stdint-intn.h /usr/include/x86_64-linux-gnu/bits/stdint-intn.h.bak
$ sudo vi /usr/include/x86_64-linux-gnu/bits/stdint-intn.h


uncomment

 typedef __int64_t int64_t;


to

//typedef __int64_t int64_t;


and run the helper-installation again:

$ sudo cot install-helpers
...
NOTICE  : Successfully installed 'fatdisk'
Results:
-------------
COT manpages: already installed, no updates needed
fatdisk:      successfully installed to /usr/local/bin/fatdisk, version 1.0
mkisofs:      version 2.1, present at /usr/bin/mkisofs
ovftool:      INSTALLATION FAILED: No support for automated installation of ovftool, as VMware requires a site login to
              download it. See https://www.vmware.com/support/developer/ovf/
qemu-img:     version 2.11.1, present at /usr/bin/qemu-img
vmdktool:     version 1.4, present at /usr/local/bin/vmdktool
[Errno 1] Unable to install some helpers


But it threw a lot of warnings..
warning: format ‘%lu’ expects argument of type ‘long unsigned int’, but argument 3 has type ‘int64_t {aka long long int}’ [-Wformat=]
… but it compiles… Memo: Try manual compilation…

$ mkdir fatdisk
$ cd fatdisk
$ wget -O fatdisk.tgz https://github.com/goblinhack/fatdisk/archive/master.tar.gz
$ tar zxf fatdisk.tgz
$ cd fatdisk-master/
$ ./RUNME

OFVTool of course has to be installed manually
Download from VMware: OVFTOOL-Download

Upload to the Linux-Server using Putty-SCP(PSCP) and public-key-authentication:

C:\Downloads&gt;pscp -scp -i C:\rh.priv.ppk VMware-ovftool-4.3.0-7948156-lin.x86_64.bundle administrator@192.168.56.101:
VMware-ovftool-4.3.0-7948 | 35623 kB | 35623.9 kB/s | ETA: 00:00:00 | 100%

At the Linux-Server

$ ls -l
total 35644
-rw-r--r-- 1 administrator administrator 36478864 Oct 15 18:36 VMware-ovftool-4.3.0-7948156-lin.x86_64.bundle
$ chmod a+x VMware-ovftool-4.3.0-7948156-lin.x86_64.bundle
$ sudo ./VMware-ovftool-4.3.0-7948156-lin.x86_64.bundle
...
Installing VMware OVF Tool component for Linux 4.3.0
    Configuring...
[######################################################################] 100%
Installation was successful.
administrator@lx-ubuntu:~$ cot install-helpers --verify-only
Results:
-------------
COT manpages: already installed, no updates needed
fatdisk:      version 1.0, present at /usr/local/bin/fatdisk
mkisofs:      version 2.1, present at /usr/bin/mkisofs
ovftool:      version 4.3, present at /usr/bin/ovftool
qemu-img:     version 2.11.1, present at /usr/bin/qemu-img
vmdktool:     version 1.4, present at /usr/local/bin/vmdktool

Cisco IOS Service-Containers: Run an x86-VM inside a Router (Part 2: Create a CSR1000v-Instance with nested Virtualization support)

In real life an hardware-ISR/ASR-Router might be the correct choice.

Create a CSR1000v-Instance with nested Virtualization support
But since the CSR1000v-Router supports Service-Containers, too – this is the chance to prove the setup in a lab environment:

  • IOS-XE 3.17 is the first supported release, i’ll go with IOS-XE 16.7.1
  • Option to enable unsigned containers
  • any 3rd party KVM
  • Libvirt based format / YAML manifest file
  • Requires 4GB+ dedicated RAM
  • ASR1000, ISR4000, CSR1000

5 Minutes to deploy the virtual CSR1000v-Router using COT
I’ll use COT (Common OVF Tool (COT) – Automated Lab-Router Deployment) to deploy my CSR1000v-Router:

user@ubuntu-server:~$ cot inject-config csr1000v-universalk9.16.07.01.ova -c ios-napalm.startup.cfg -o csr1000v-universalk9.16.07.01.napalm.ova
Add disk file to existing (but empty) cdrom drive? [y]
NOTICE  : Overwriting existing disk Item in OVF

cot --verbose deploy csr1000v-universalk9.16.07.01.napalm.ova esxi &amp;amp;amp;lt;VCENTER-HOST/IP&amp;amp;amp;gt;/&amp;amp;amp;lt;DATACENTER&amp;amp;amp;gt;/host/&amp;amp;amp;lt;ESXi-HOST/IP&amp;amp;amp;gt; -u &amp;amp;amp;lt;USER&amp;amp;amp;gt; -p &amp;amp;amp;lt;PASS&amp;amp;amp;gt; -n RTR-SERVICE-CONTAINER -d &amp;amp;amp;lt;DATASTORE&amp;amp;amp;gt; -S "telnet://:41001,server" -N GigabitEthernet1="Management" GigabitEthernet2=T24 GigabitEthernet3=T34 -c 2CPU-8GB

Boot the Router
Check the Virtualization-Environment: fail 🙁

  • Machine types disabled : KVM
SERVICECONTAINER# show virtual-service
Virtual Service Global State and Virtualization Limits:

Infrastructure version : 1.7
Total virtual services installed : 0
Total virtual services activated : 0

Machine types supported   : LXC
Machine types disabled    : KVM

Maximum VCPUs per virtual service : 1
Resource virtualization limits:
Name                         Quota     Committed     Available
--------------------------------------------------------------
system CPU (%)                  75             0            75
memory (MB)                   3072             0          3072
bootflash (MB)               20000             0          5554

i forgot to enable nested-virtualization for the CSR1000v-Router-VM.

Action Plan

    • Power-down the VM („Shut Down Guest“) again
    • edit Hardware (Web-Client)

csr1000v-router-enable-nested-virtualization

  • boot the router again

Check again: works 🙂

  • Machine types supported : KVM, LXC
SERVICECONTAINER#show virtual-service
Virtual Service Global State and Virtualization Limits:

Infrastructure version : 1.7
Total virtual services installed : 0
Total virtual services activated : 0

Machine types supported   : KVM, LXC
Machine types disabled    : none

Maximum VCPUs per virtual service : 1
Resource virtualization limits:
Name                         Quota     Committed     Available
--------------------------------------------------------------
system CPU (%)                  75             0            75
memory (MB)                   3072             0          3072
bootflash (MB)               20000             0          5553

That’s it, the CSR1000V is ready.

Notice: vCPU-Limitation in CSR1000v

  • Maximum VCPUs per virtual service : 1

Remember this, when creating the YAML-File for the OVA. (Part 4: Package the Service-VM into an OVA)

Cisco CSR1000v – additional Interfaces? Common OVF Tool (COT)!

Routers with more than three interfaces? Not that uncommon!
It might be handy, if several devices are needed with more than three interfaces, to:

  • not:
    • deploy the devices with three interfaces first
    • add the needed number of interfaces to the routers
    • attache tne new interfaces to the correct vSphere-Portgroup
  • but instead:
    • create an OVA-Template with the correct number of interfaces (one time)
    • deploy the routers and attach them during deployment to their portgroup

So using vNIC Hot-Add might be not the favourite way to work.

Common OVF Tool
COT lets you to deploy Cisco CSR1000v routers by easy to use (linux-)commands.
(Common OVF Tool (COT) – Automated Lab-Router Deployment
This is my original OVA-file already containing some basic configurations needed for NAPALM.

  • it will build a virtual router with three GigabitEthernet-Interfaces
user@ubuntu-server:~$ cot info csr1000v-universalk9.16.03.05.napalm.ova | egrep "(Networks|Gigabit)"
Networks:
  GigabitEthernet1  "Data network 1"
  GigabitEthernet2  "Data network 2"
  GigabitEthernet3  "Data network 3"
NICs and Associated Networks:
  GigabitEthernet1 : GigabitEthernet1
  GigabitEthernet2 : GigabitEthernet2
  GigabitEthernet3 : GigabitEthernet3
  Management Interface                                    "GigabitEthernet1"

Add another Interface (long version)
Let’s use the prepared OVA and create another OVA with 4 interfaces:

user@ubuntu-server:~$ cot edit-hardware csr1000v-universalk9.16.03.05.napalm.ova -o csr1000v-universalk9.16.03.05.napalm.4IF.ova -n 4 --nic-type vmxnet3 --nic-networks "GigabitEthernet1" "GigabitEthernet2" "GigabitEthernet3" "GigabitEthernet4" --network-descriptions "Data network 1" "Data network 2" "Data network 3" "Data network 4"
Network GigabitEthernet4 is not currently defined. Create it? [y] y

Result:

user@ubuntu-server:~$ cot info csr1000v-universalk9.16.03.05.napalm.4IF.ova | egrep "(Networks|Gigabit)"
Networks:
  GigabitEthernet1  "Data network 1"
  GigabitEthernet2  "Data network 2"
  GigabitEthernet3  "Data network 3"
  GigabitEthernet4  "Data network 4"
NICs and Associated Networks:
  GigabitEthernet1 : GigabitEthernet1
  GigabitEthernet2 : GigabitEthernet2
  GigabitEthernet3 : GigabitEthernet3
  GigabitEthernet4 : GigabitEthernet4
  Management Interface                                    "GigabitEthernet1"

Add another Interface (short version)
It’s possible to replace the long enumerations („GigabitEthernet1“ „GigabitEthernet2“ „GigabitEthernet3“ „GigabitEthernet4“) by a macro „GigabitEthernet{1}“ => the Variable {1} will get expanded to 1…2…3…4…up to the number needed. This is much more flexible when sometimes 4, sometimes 5 NICs need to be added.

user@ubuntu-server:~$ cot edit-hardware csr1000v-universalk9.16.03.05.napalm.ova -o csr1000v-universalk9.16.03.05.napalm.4IFb.ova -n 4 --nic-type vmxnet3 --nic-networks "GigabitEthernet{1}" --network-descriptions "Data network {1}"
Network GigabitEthernet4 is not currently defined. Create it? [y]

Same result as before:

user@ubuntu-server:~$ cot info csr1000v-universalk9.16.03.05.napalm.4IFb.ova | egrep "(Networks|Gigabit)"
Networks:
  GigabitEthernet1  "Data network 1"
  GigabitEthernet2  "Data network 2"
  GigabitEthernet3  "Data network 3"
  GigabitEthernet4  "Data network 4"
NICs and Associated Networks:
  GigabitEthernet1 : GigabitEthernet1
  GigabitEthernet2 : GigabitEthernet2
  GigabitEthernet3 : GigabitEthernet3
  GigabitEthernet4 : GigabitEthernet4
  Management Interface                                    "GigabitEthernet1"

Deploy a new Router-VM using this OVA

user@ubuntu-server:~$ cot --verbose deploy csr1000v-universalk9.16.03.05.napalm.4IFb.ova esxi VCENTERIP/Datacenter/host/ESXiIP -u VCENTER-USER -p PASS -n CSR-4IF -d "DS-LAB" -S "telnet://:44444,server" -N GigabitEthernet1="Management" GigabitEthernet2=T24 GigabitEthernet3=T34 GigabitEthernet4=TBB -c 1CPU-4GB
INFO    : vm_description  : Loading 'csr1000v-universalk9.16.03.05.napalm.4IFb.ova' as OVF
INFO    : ovf             : OVF version is 1.x
INFO    : ovf             : OVF product class com.cisco.csr1000v --> platform Cisco CSR1000V
INFO    : vm_description  : Successfully loaded OVF from csr1000v-universalk9.16.03.05.napalm.4IFb.ova
WARNING : deploy          : No serial connectivity information is available for 1 serial port(s) - they will not be created or configured.
INFO    : deploy_esxi     : Deploying VM...
NOTICE  : helper          : Calling 'ovftool --deploymentOption=1CPU-4GB --net:GigabitEthernet1=Management --net:GigabitEthernet2=T24 --net:GigabitEthernet3=T34 --net:GigabitEthernet4=TBB --name=CSR-4IF --datastore=DS-LAB csr1000v-universalk9.16.03.05.napalm.4IFb.ova vi://administrator@lab.local:VMware1!@192.168.2.13/Datacenter/host/192.168.2.12'...
Opening OVA source: csr1000v-universalk9.16.03.05.napalm.4IFb.ova
The manifest validates
Opening VI target: vi://administrator%40lab.local@192.168.2.13:443/Datacenter/host/192.168.2.12
Deploying to VI: vi://administrator%40lab.local@192.168.2.13:443/Datacenter/host/192.168.2.12
Transfer Completed
Completed successfully
NOTICE  : helper          : ...done
INFO    : deploy_esxi     : FIXING up serial ports on deployed VM...
INFO    : deploy_esxi     : Serial port will be a telnet server at :44444
INFO    : deploy_esxi     : Done with serial port fixup

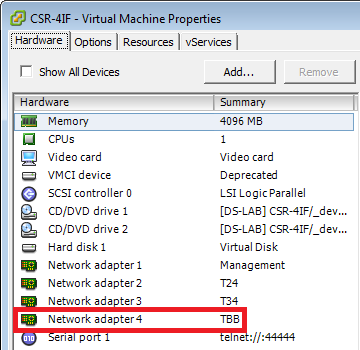
Isn’t it beautiful?

edit Hardware“: 4x GigabitEthernet-Interfaces

Test the created CSR1000v-Router
The forth GigabitEthernet-Interface was detected during hardware-setup:

NAPALM-1#show ip int brief
Interface              IP-Address      OK? Method Status                Protocol
GigabitEthernet1       192.168.2.244   YES DHCP   up                    up
GigabitEthernet2       unassigned      YES unset  administratively down down
GigabitEthernet3       unassigned      YES unset  administratively down down
GigabitEthernet4       unassigned      YES unset  administratively down down

The Interface works fine:

NAPALM-1#conf t
Enter configuration commands, one per line.  End with CNTL/Z.
NAPALM-1(config)#int gig 4
NAPALM-1(config-if)#ip addr 192.168.64.99 255.255.255.0
NAPALM-1(config-if)#end

NAPALM-1#ping 192.168.64.1
Type escape sequence to abort.
Sending 5, 100-byte ICMP Echos to 192.168.64.1, timeout is 2 seconds:
.!!!!
Success rate is 80 percent (4/5), round-trip min/avg/max = 2/3/4 ms

Common OVF Tool (COT) – Automated Lab-Router Deployment

Is this SDN (Software defined Networking)? I think so!
I really love to provision new Cisco CSR1000v lab-routers without the need to do everything manually in the graphical user interface.

It’s possible to provision production-routers, too, of course: Just add your license-information to leave the 100Kbps-limit behind (which is no handicap for normal lab-usage).

The Common OVF Tool (COT) (Documentation) enables me to do this by injecting an initial startup-configuration into the cisco-provided OVA-file before deploying it to an ESXi-host.
Interactive Cisco CLI-Commands possible
And, even better, the Cisco CSR1000V allows interactive CLI-commands within the injected configuration:

  • building new bootflash-directories,
  • creating a SSH-key.

Injecting the bootstrap-config

$ cot --version
Common OVF Tool (COT), version 2.0.3
Copyright (C) 2013-2017 the COT project developers.

$ cot inject-config csr1000v-universalk9.03.16.06b.S.155-3.S6b-ext.ova -c ios-napalm.startup.cfg -o csr1000v-universalk9.03.16.06b.S.155-3.S6b-ext.napalm.ova

This is an example-config setting parameters needed for napalm:
Centralized access to device-configuration and other state-information using NAPALM
Automated RMON Alarm/Event-configuration for class-based QoS-Monitoring using NAPALM

!
hostname NAPALM-1
ip domain-name lab.local
!
no ip domain-lookup
!
crypto key generate rsa modulus 2048
!
username rmond privilege 15 secret rmondpass
!
platform console serial
!
vrf definition MGMT
  address-family ipv4
!
int gig 1
  descr mgmt0
  vrf forwarding MGMT
  ip address dhcp
  no shut
!
ip scp server enable
!
ip access-list standard ACL_SNMP
    permit host 192.168.2.89
!
snmp-server community READ ro ACL_SNMP
snmp-server location allones.de
!
file prompt quiet
!
do mkdir bootflash:/ARCHIVE
archive
  path bootflash:/ARCHIVE/bak
!
line vty 0 4
  login local
  transport input ssh
!
end

Deploy the CSR1000V-Router
One command to deploy the router

  • at an ESXi-Host/vSphere-Datacenter
  • using a defined Datastore
  • creating an serial-port (not really needed since SSH is running immedeately)
  • place the three NICs of this router at the desired vSwitch-Portgroups

Those vSwitch-Portgroups have been created using vSphere-CLI.

$ cot --verbose deploy csr1000v-universalk9.03.16.06b.S.155-3.S6b-ext.napalm.ova esxi //host/ -u -p -n RTR-NAPALM-1 -d -S "telnet://:31001,server" -N GigabitEthernet1="Management" GigabitEthernet2=T24 GigabitEthernet3=T34 -c 1CPU-4GB

SSH-Access to the router

NAPALM-1# show ssh
Connection Version Mode Encryption  Hmac         State                 Username
0          2.0     IN   aes256-ctr  hmac-sha1    Session started       rmond
0          2.0     OUT  aes256-ctr  hmac-sha1    Session started       rmond
%No SSHv1 server connections running.

NAPALM-1#who
    Line       User       Host(s)              Idle       Location
*  1 vty 0     rmond      idle                 00:00:00 192.168.2.312

NAPALM-1#cd bootflash:ARCHIVE
NAPALM-1#pwd
bootflash:/ARCHIVE/

NAPALM-1#show crypto key mypubkey all
Key name: NAPALM-1.lab.local
Key type: RSA KEYS
 Storage Device: private-config
 Usage: General Purpose Key
 Key is not exportable. Redundancy enabled.
 Key Data:
  30820222 300D0609 2A864886 F70D0101 01050003 82020F00 3082020A 02820201
  ...
  70F5FE1C 01BE930D B3C84841 AC46EE0D 451DC530 55F28B9C 82796E8F 1B5F5163
  57020301 0001

NAPALM-1#show ip int brief
Interface              IP-Address      OK? Method Status                Protocol
GigabitEthernet1       192.168.2.135   YES DHCP   up                    up
GigabitEthernet2       unassigned      YES unset  administratively down down
GigabitEthernet3       unassigned      YES unset  administratively down down

NAPALM-1#show ip route vrf MGMT
Routing Table: MGMT
Gateway of last resort is 192.168.2.1 to network 0.0.0.0

S*    0.0.0.0/0 [254/0] via 192.168.2.1
      192.168.2.0/24 is variably subnetted, 3 subnets, 2 masks
C        192.168.2.0/24 is directly connected, GigabitEthernet1
S        192.168.2.1/32 [254/0] via 192.168.2.1, GigabitEthernet1
L        192.168.2.315/32 is directly connected, GigabitEthernet1