Provision a Cisco CSR1000V-Router as Virtual-Box-VM with sliptreamed Configuration, wait until it’s up and open an Putty-SSH-Connection

The existing Windows-Comman-Script has been enhanced so it now

  • waits until the Router-VM is up
  • got an IP-Address assigned using DHCP.

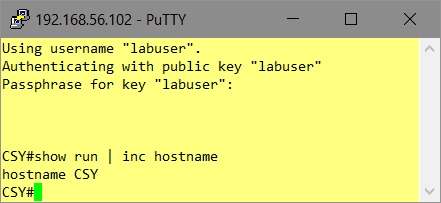
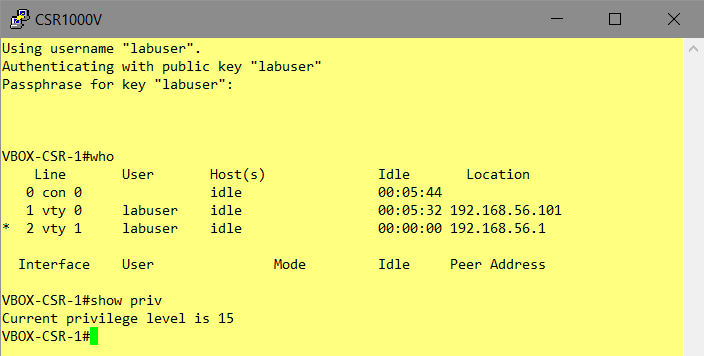
For Demonstration-Purposes an SSH-Connection will be established.

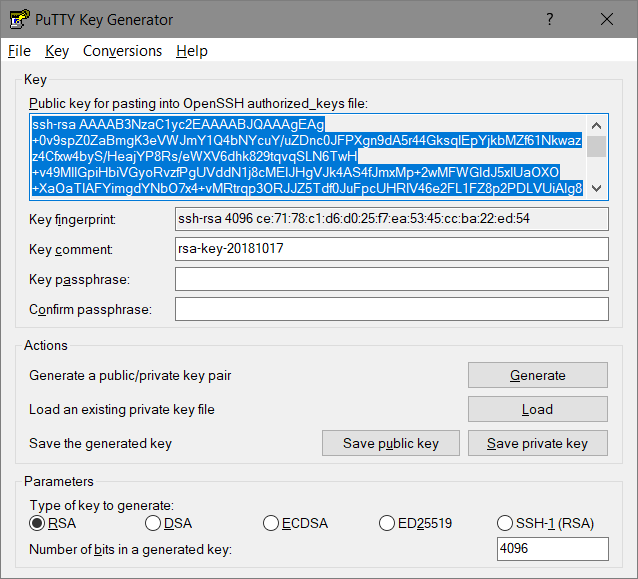
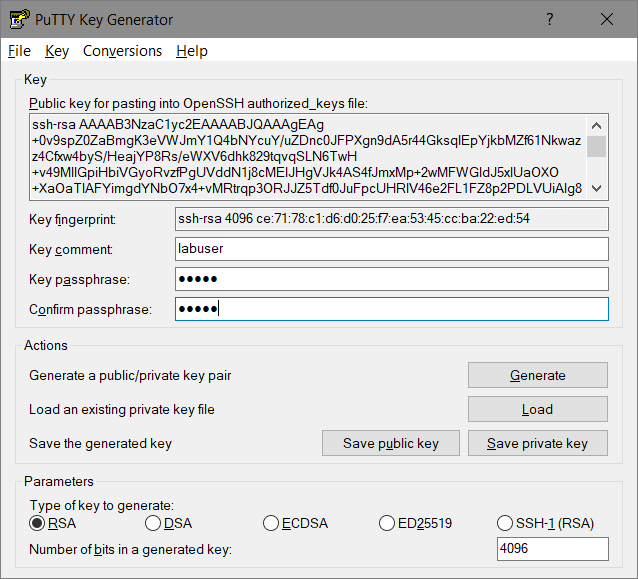
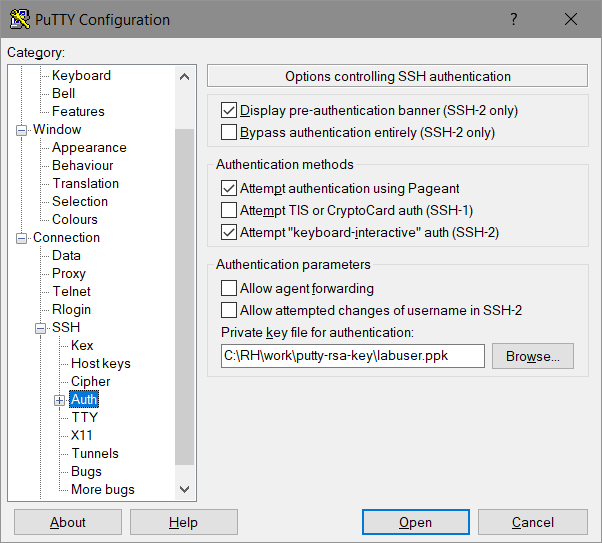
  • The public-key of my laptop-ssh-client is part of the slipstreamed Router-Configuration.

Deploy a Router-VM with hostname „CSY“.

C:\RH\work\entwicklung\csr1000v-provision-in-virtualbox>CSR1000v-Virtual-Box.cmd CSY
Virtual machine 'CSY' is created and registered.
UUID: 915a7495-0728-4fc5-9c4c-21b3106a07e5
Settings file: 'c:\RH\LAB\VM\CSY\CSY.vbox'
Creating ISO image at c:\RH\LAB\VM\CSY\CSY_config.iso, 1 Files, Size: 8,00 KB
100%
0%...10%...20%...30%...40%...50%...60%...70%...80%...90%...100%
Medium created. UUID: b79d708a-0a0a-4866-853b-3ac45c6a6127
Waiting for VM "CSY" to power on...
VM "CSY" has been successfully started.
Waiting for VM "CSY" to be initialized...
Router "CSY" up and running, using IP=192.168.56.102
Establishing SSH-Connection as "labuser"
Done

Establish an SSH-Connection to the discovered Router-IP:

Have a look to the startup-config used:

This is the „CMD“-Script used:

@echo off

: Ronald Heitmann

:set VM=CSR1000vX
:set /p VM="Enter CSR1000v Hostname:"
: Parameter given? Use it as VM-Name
set VM=%1
if not defined VM set /p VM="Enter CSR1000v Hostname:"

:echo %VM%

set PUTTYUSER=labuser
set PUTTYPK=C:\RH\work\putty\labuser.ppk


set BASE=c:\RH\LAB\VM

set ISO=C:\Downloads\csr1000v-universalk9.16.09.0x.iso

: Create VM
:VBoxManage createvm --name %VM% --ostype "Linux_64" --basefolder %BASE% --register
VBoxManage createvm --name %VM% --ostype "Linux26_64" --basefolder %BASE% --register

:now the Path in the Filesystem to ...LOC... exists
set LOC=%BASE%\%VM%

: Create ISO containing slipstreamed config-file
: use UNXTOOLS "sed" to customize the "hostname"-Command
:
set CFGISO=%LOC%\%VM%_config.iso
set CFGSRC=C:\RH\LAB\VM\iosxe_config.txt
set CFGTXT=%LOC%\iosxe_config.txt
cat %CFGSRC% | sed "s/HOSTNAME/%VM%/g" > %CFGTXT%
"%ProgramFiles(x86)%"\CDBurnerXP\cdbxpcmd.exe --burn-data -file:%CFGTXT% -iso:%CFGISO% -format:iso

: Customize VM
VBoxManage modifyvm %VM% --memory 4096
VBoxManage modifyvm %VM% --vram 16
VBoxManage modifyvm %VM% --pae on --paravirtprovider default --hwvirtex on --nestedpaging on

: Storage
VBoxManage createhd --filename %LOC%\%VM%.vdi --size 8192
VBoxManage storagectl %VM% --name "IDE-CTL" --add ide --portcount 2 --bootable on
VBoxManage storageattach %VM% --storagectl IDE-CTL --port 0 --device 0 --type hdd --medium %LOC%\%VM%.vdi
VBoxManage storageattach %VM% --storagectl IDE-CTL --port 1 --device 0 --type dvddrive --medium %ISO%
VBoxManage storageattach %VM% --storagectl IDE-CTL --port 1 --device 1 --type dvddrive --medium %CFGISO%
VBoxManage modifyvm %VM% --boot1=dvd --boot2=disk --boot3=none --boot4=none

: Serial-Interfaces via "Pipe"
VBoxManage modifyvm %VM% --uartmode1 server \\.\pipe\%VM%
VBoxManage modifyvm %VM% --uart1 0x3f8 4
VBoxManage modifyvm %VM% --uartmode2 server \\.\pipe\%VM%_diag
VBoxManage modifyvm %VM% --uart2 0x2f8 4

: Audio
VBoxManage modifyvm %VM% --audio none

: NICs
VBoxManage modifyvm %VM% --nic1 nat --nic2 hostonly --nic3 hostonly --nic4 hostonly
VBoxManage modifyvm %VM% --nictype1 virtio --nictype2 virtio --nictype3 virtio --nictype4 virtio
VBoxManage modifyvm %VM% --nicpromisc1 allow-all --nicpromisc2 allow-all --nicpromisc3 allow-all --nicpromisc4 allow-all
VBoxManage modifyvm %VM% --hostonlyadapter2 "VirtualBox Host-Only Ethernet Adapter"
VBoxManage modifyvm %VM% --hostonlyadapter3 "VirtualBox Host-Only Ethernet Adapter"
VBoxManage modifyvm %VM% --hostonlyadapter4 "VirtualBox Host-Only Ethernet Adapter"

: Set the VM-Logo for the VirtualBox-Inventory
VBoxManage modifyvm %VM% --iconfile C:\RH\LAB\72px-Cisco_logo.svg.png

: Boot the VM, it'l reboot once to apply the running-config
VBoxManage startvm %VM% --type headless

: Wait for the VM to be fully initialized
: - with DHCP-IP-Address at "Gig 2"
: - and store this IP-Address in Variable VMIP
echo Waiting for VM "%VM%" to be initialized...
for /f %%I in ('python WaitForCDPNeighbor.py -n %VM% -c -i "VirtualBox Host-Only Ethernet Adapter" 2^> nul') do @(set VMIP=%%I)

echo Router "%VM%" up and running, using IP=%VMIP%

: Connect to Router using Putty/SSH
echo Establishing SSH-Connection as "%PUTTYUSER%"
start putty -ssh -i %PUTTYPK% %PUTTYUSER%@%VMIP%

echo Done

WaitForCDPNeighbor.py enhanced: Wait for CDP Hostname with usable connected IP-Address.

The following version adds a „-c“ option: „Connected IP-Address“-Check.

  • the script exits, when the Router-VM is up and running and has an usable IP-Address

The Script still checks all CDP-Packets received at the specified Interface:

  • If the Sender has the correct „Hostname“ it reads the CDP-Management-IP-Address announced.
  • This IP-Address has to be within the IP-Range of any connected IP-Network at the specified Interface.

So it’ll be possible to establish a SSH-Session to the router-VM.

C:\> echo %VM%
CSX

C:\> python WaitForCDPNeighbor.py -n %VM% -c -i "VirtualBox Host-Only Ethernet Adapter"
192.168.56.101
#! /usr/bin/env python

# Ronald Heitmann
#
import argparse

from scapy.all import *
load_contrib("cdp")

from netaddr import IPNetwork, IPAddress

from netifaces import AF_INET, AF_INET6, AF_LINK
import netifaces

# returns a list of all IP-Adresses bound to the specified Interface "if_name"
def get_connected(if_name):
  if_id = ""
  networks = []

  for i in ifaces.data.keys():
    iface = ifaces.data[i]
    wname = iface.data['name']
    if wname == if_name:
      if_id = i
      addresses = netifaces.ifaddresses(i)
      if AF_INET in addresses:
        for addr in netifaces.ifaddresses(i)[AF_INET]:
          #print(addr)
          ipnetwork = IPNetwork(addr["addr"]+"/"+addr["netmask"]).cidr
          networks.append(ipnetwork)
  #print(networks)
  return networks

# checks, if the IP-Address "ip" is within the subnet-range of any network contained in the list "networks"

def is_IP_connected(ip, networks):
  found = False
  ipnetwork = IPNetwork(ip).cidr

  for n in networks:
    if (ipnetwork in n):
      found = True

  return found

  
def main():

    # Parse CLI-Arguments
    parser = argparse.ArgumentParser(description='Wait for a CDP-Neighbor.')
    parser.add_argument("-i", "--interface", help="monitored interface", default="VirtualBox Host-Only Ethernet Adapter")
    parser.add_argument("-n", "--hostname", help="Neighbor to wait for", required=True)
    parser.add_argument("-c", "--connected", help="wait, until CDP-Neighbor announces an directly-connected IP-Address", action='store_true')
    args = parser.parse_args()

    #looking for a specific hostname
    #
    hostname = ""
    wait_for_hostname = args.hostname

    #watching for CDP-Packets from this host on a specific interface
    #the router-IP should use a directly-connected IP-Address
    ip = "0.0.0.0"
    wait_for_connected = args.connected
    
    interface=args.interface
    networks = get_connected(interface)
    #print(networks) 

    #CDP
    capturefilter="ether dst 01:00:0c:cc:cc:cc"

    while not((hostname == wait_for_hostname) and (not(wait_for_connected) or is_IP_connected(ip,networks))):
      p=sniff(iface=interface, count=1, filter=capturefilter)
      pkt=p[0]
      #print("Packet received",pkt.show())

      #is this a CDP-Packet containing a hostname?
      if (CDPMsgDeviceID in pkt):
        #is this the CDP-Neighbor we're looking for?
        device=pkt["CDPMsgDeviceID"].val.decode()
        hostname=device.split(".")[0]
        #print("Hostname:",hostname)

        if (hostname == wait_for_hostname):
          #is this a CDP-Packet containing a management-IP-Address?
          if (CDPAddrRecordIPv4 in pkt):
            ip=pkt["CDPAddrRecordIPv4"].addr
            #print("IP-Address found:",ip)

    #return the IP-Address to the calling application or the CLI
    return ip

if __name__ == "__main__":
    print(main())

Python Scapy: Wait for CDP-Neighbor

After provisioning a new Cisco CSR1000V-Router this script

  • waits until the router is fully deployed
  • got it’s Management-IP-Address assigned via DHCP.

and returns this Management IP-Address.

  1. Prepare
  2. First, install „netaddr“-package.

    • needed to check, if the management-IP of the CDP-Neighbor is in the correct IP-Subnet
    C:\RH>pip install netaddr
    Collecting netaddr
      Downloading https://files.pythonhosted.org/packages/ba/97/ce14451a9fd7bdb5a397abf99b24a1a6bb7a1a440b019bebd2e9a0dbec74/netaddr-0.7.19-py2.py3-none-any.whl (1.6MB)
        100% |████████████████████████████████| 1.6MB 4.0MB/s
    Installing collected packages: netaddr
    Successfully installed netaddr-0.7.19
    
  3. the „wait-for-CDP“-Script
  4. Obviously far to much hard-coded stuff, just as an example 😉 waiting for a CDP-Neighbor to appear with the following properties:

    • hostname „CSR-A“
    • an IP-Address within the network „192.168.56.0 /24“
    • at the interface

    • VirtualBox Host-Only-Network
    #! /usr/bin/env python
    
    from scapy.all import *
    load_contrib("cdp")
    
    from netaddr import IPNetwork, IPAddress
    
    # run it for max. 99 Packets
    ip = "0.0.0.0"
    wait_for_hostname = "CSR-A"
    wait_for_host_in_network = "192.168.56.0/24"
    
    interface="VirtualBox Host-Only Ethernet Adapter"
    capturefilter="ether dst 01:00:0c:cc:cc:cc"
    
    while not(IPAddress(ip) in IPNetwork(wait_for_host_in_network)):
      p=sniff(iface=interface, count=1, filter=capturefilter)
      pkt=p[0]
      #print("Packet received",pkt.show())
    
      #is this a CDP-Packet containing a hostname?
      if (CDPMsgDeviceID in pkt):
        #is this the CDP-Neighbor we're looking for?
        device=pkt["CDPMsgDeviceID"].val.decode()
        hostname=device.split(".")[0]
        #print("Hostname:",hostname)
    
        if (hostname == wait_for_hostname):
          #is this a CDP-Packet containing a management-IP-Address?
          if (CDPAddrRecordIPv4 in pkt):
            ip=pkt["CDPAddrRecordIPv4"].addr
            #print("IP-Address found:",ip)
    
    #return the IP-Address to the calling application or the CLI
    print(ip)
    
  5. Provision a new CSR1000V Router named „CSR-A“
  6. C:\RH>CSR1000v-Virtual-Box.cmd
    Enter CSR1000v Hostname:CSR-A
    Virtual machine 'CSR-A' is created and registered.
    UUID: 8a9c969e-3895-4a7c-9cbc-5f5551bf1b7b
    Settings file: 'c:\RH\LAB\VM\CSR-A\CSR-A.vbox'
    Creating ISO image at c:\RH\LAB\VM\CSR-A\config.iso, 1 Files, Size: 8,00 KB
    100%
    0%...10%...20%...30%...40%...50%...60%...70%...80%...90%...100%
    Medium created. UUID: 55ea8df5-7e3c-4485-8e08-9302cb61a09d
    Waiting for VM "CSR-A" to power on...
    VM "CSR-A" has been successfully started.
    
  7. Run the „wait-for-CDP-Neighbor“-Script
  8. In a second CMD-Box, and… Be patient, of course.

    C:\RH>python wait-for-cdpneighbor.py
    192.168.56.101
    
  9. Or store the returned IP-Address in an Shell-Variable „ROUTER-IP“/li>
    C:\RH>for /f %I in ('python wait-for-cdpneighbor.py 2^> nul') do @(set ROUTER-IP=%I)
    
  10. and pass it to putty – using public-key authentication
  11. The Public-Key for user „labuser“ is part of my baseline-config used to provision the virtual-router.

    C:\RH>putty -ssh -i C:\RH\work\putty-rsa-key\labuser.ppk labuser@%ROUTER-IP%
    

    Works, this is a nice preparation for an automated virtual ansible-lab, too!

Python Scapy: CDP-Monitor

Watch and decode Cisco Discovery Protocol Packetes.

  1. CDP Monitor-Script
  2. Inspired by the Scapy ARP-Monitor i created an CDP-Monitor displaying hostname and an optional Management-IP-Address.

    #! /usr/bin/env python
    from scapy.all import *
    load_contrib("cdp")
    
    def cdp_monitor_callback(pkt):
      ip = "0.0.0.0"
      if (CDPMsgDeviceID in pkt):
        device=pkt["CDPMsgDeviceID"].val.decode()
        hostname=device.split(".")[0]
        if (CDPAddrRecordIPv4 in pkt):
          ip=pkt["CDPAddrRecordIPv4"].addr
        return "Device: {0} IP: {1}".format(hostname,ip)
    
    interface="VirtualBox Host-Only Ethernet Adapter"
    capturefilter="ether dst 01:00:0c:cc:cc:cc"
    
    # run it for max. 99 Packets
    p=sniff(prn=cdp_monitor_callback, iface=interface, count=99, filter=capturefilter, store=0)
    
  3. Real-Life Example
    • Run this script:
    • C:\RH>python
      Python 3.7.0 (v3.7.0:1bf9cc5093, Jun 27 2018, 04:59:51) [MSC v.1914 64 bit (AMD64)] on win32
      Type "help", "copyright", "credits" or "license" for more information.
      >>> #! /usr/bin/env python
      ... from scapy.all import *
      >>> load_contrib("cdp")
      >>>
      >>> def cdp_monitor_callback(pkt):
      ...   ip = "0.0.0.0"
      ...   if (CDPMsgDeviceID in pkt):
      ...     device=pkt["CDPMsgDeviceID"].val.decode()
      ...     hostname=device.split(".")[0]
      ...     if (CDPAddrRecordIPv4 in pkt):
      ...       ip=pkt["CDPAddrRecordIPv4"].addr
      ...     return "Device: {0} IP: {1}".format(hostname,ip)
      ...
      >>> interface="VirtualBox Host-Only Ethernet Adapter"
      >>> capturefilter="ether dst 01:00:0c:cc:cc:cc"
      >>>
      >>> # run it for max. 99 Packets
      ... p=sniff(prn=cdp_monitor_callback, iface=interface, count=99, filter=capturefilter, store=0)
      
    • Open another CMD-Window to spin up a new CSR1000V-Router:
    • C:\RH\work\entwicklung\csr1000v-provision-in-virtualbox>CSR1000v-Virtual-Box.cmd
      Enter CSR1000v Hostname:CSR-CDPTEST-A
      Virtual machine 'CSR-CDPTEST-A' is created and registered.
      UUID: eaa931bd-9db4-4a78-b263-754d4bb300a0
      Settings file: 'c:\RH\LAB\VM\CSR-CDPTEST-A\CSR-CDPTEST-A.vbox'
      Creating ISO image at c:\RH\LAB\VM\CSR-CDPTEST-A\config.iso, 1 Files, Size: 8,00 KB
      100%
      0%...10%...20%...30%...40%...50%...60%...70%...80%...90%...100%
      Medium created. UUID: 3019216e-2e61-435a-95f2-3d26312c3ed9
      Waiting for VM "CSR-CDPTEST-A" to power on...
      VM "CSR-CDPTEST-A" has been successfully started.
      
    • Go back to the „python“-Screen and wait:
    • >>> # run it for max. 99 Packets
      ... p=sniff(prn=cdp_monitor_callback, iface=interface, count=99, filter=capturefilter, store=0)
      Device: CSR-CDPTEST-A IP: 0.0.0.0
      Device: CSR-CDPTEST-A IP: 0.0.0.0
      Device: CSR-CDPTEST-A IP: 0.0.0.0
      Device: CSR-CDPTEST-A IP: 0.0.0.0
      Device: CSR-CDPTEST-A IP: 0.0.0.0
      Device: CSR-CDPTEST-A IP: 10.0.2.15
      Device: CSR-CDPTEST-A IP: 10.0.2.15
      Device: CSR-CDPTEST-A IP: 10.0.2.15
      

      It works, the IOS-XE CSR1000V-Router is installed and it got it’s baseline-config applied:

      • Hostname
      • Interface set to „ip address dhcp“
      • CDP enabled

      takes some time, but these first CDP-Packets captured were not sent in 60s interval, so don’t be scared 😉

Python Scapy: Capturing „Cisco Discovery Protocol (CDP)“

It’s hard to believe, how easy it is to capture (and to craft) LAN-Data using Python Scapy.

I need to capture CDP-Packets and to extract information like the hostname of the sender and it’s IP-Address.

As an modification of the „ARP-Monitor“-example taken from the manual Using scapy in your tools.

  1. Scapy Installation
  2. nothing special: pip install

    C:\RH>pip install scapy
    Collecting scapy
      Downloading https://files.pythonhosted.org/packages/68/01/b9943984447e7ea6f8948e90c1729b78161c2bb3eef908430638ec3f7296/scapy-2.4.0.tar.gz (3.1MB)
        100% |████████████████████████████████| 3.1MB 420kB/s
      In the tar file C:\Users\RONALD~1.HEI\AppData\Local\Temp\pip-unpack-4jm9kde1\scapy-2.4.0.tar.gz the member scapy-2.4.0/README is invalid: unable to resolve link inside archive
    Installing collected packages: scapy
      Running setup.py install for scapy ... done
    Successfully installed scapy-2.4.0
    
  3. Python: Install Scapy
  4. C:\RH>python
    Python 3.7.0 (v3.7.0:1bf9cc5093, Jun 27 2018, 04:59:51) [MSC v.1914 64 bit (AMD64)] on win32
    Type "help", "copyright", "credits" or "license" for more information.
    
    >>> from scapy.all import *
    
  5. Example: List all Interfaces of my Laptop
  6. >>> ifaces
    INDEX  IFACE                                     IP            MAC
    20     VirtualBox Host-Only Ethernet Adapter     192.168.56.1  0A:00:27:00:00:14
    22     Intel(R) Dual Band Wireless-AC 8265       172.20.10.2   IntelCor:BD:10:37
    4      Intel(R) Ethernet Connection (4) I219-LM  47.11.17.10   BayNetwo:00:DE:11
    
    >>> for i in ifaces.data.keys():
    ...     iface = ifaces.data[i]
    ...     name = str(iface.name)
    ...     wname = iface.data['netid']
    ...     mac = str(iface.mac)
    ...     ip  = str(iface.ip)
    ...     print("DESCR:{0}, NAME:{1}, MAC:{2}, IP:{3}".format(wname,name,mac,ip))
    ...
    DESCR:Wi-Fi, NAME:Intel(R) Dual Band Wireless-AC 8265, MAC:74:70:FD:BD:10:37, IP:172.20.10.2
    DESCR:VirtualBox Host-Only Network, NAME:VirtualBox Host-Only Ethernet Adapter, MAC:0A:00:27:00:00:14, IP:192.168.56.1
    DESCR:ETH_DELL, NAME:Intel(R) Ethernet Connection (4) I219-LM, MAC:00:00:81:00:DE:11, IP:47.11.17.10
    
  7. Capture 10 Packets on a specific interface
  8. The "NAME" is needed as interface-handle
    >>> interface="VirtualBox Host-Only Ethernet Adapter"
    
    >>> p=sniff(iface=interface, count=10)
    >>> p.display()
    0000 Ether / IP / UDP 192.168.56.1:17500 > 255.255.255.255:17500 / Raw
    0001 Ether / IP / UDP 192.168.56.1:17500 > 255.255.255.255:17500 / Raw
    0002 Ether / IP / UDP 192.168.56.1:17500 > 192.168.56.255:17500 / Raw
    0003 Ether / IP / UDP 192.168.56.1:17500 > 255.255.255.255:17500 / Raw
    0004 Ether / IP / UDP 192.168.56.1:17500 > 255.255.255.255:17500 / Raw
    0005 Ether / IP / UDP 192.168.56.100:bootps > 255.255.255.255:bootpc / BOOTP / DHCP
    0006 Ether / IP / UDP 192.168.56.102:50472 > 255.255.255.255:10067 / Raw
    0007 Ether / IP / UDP 192.168.56.103:49580 > 255.255.255.255:10067 / Raw
    0008 Ether / IP / UDP 192.168.56.1:17500 > 255.255.255.255:17500 / Raw
    0009 Ether / IP / UDP 192.168.56.1:17500 > 255.255.255.255:17500 / Raw
    
  9. Capture CDP-Packets
  10. Capture CDP
    
    >>> p=sniff(iface=interface, count=2, filter="ether dst 01:00:0c:cc:cc:cc")
    >>> p
    <Sniffed: TCP:0 UDP:0 ICMP:0 Other:2>
    >>> p.display()
    0000 802.3 08:00:27:c9:d5:7e > 01:00:0c:cc:cc:cc / LLC / SNAP / Raw
    0001 802.3 08:00:27:c9:d5:7e > 01:00:0c:cc:cc:cc / LLC / SNAP / Raw
    
  11. Decode CDP (with inactive dissector)
  12. >>> p[0].display()
    ###[ 802.3 ]###
      dst       = 01:00:0c:cc:cc:cc
      src       = 08:00:27:c9:d5:7e
      len       = 386
    ###[ LLC ]###
         dsap      = 0xaa
         ssap      = 0xaa
         ctrl      = 3
    ###[ SNAP ]###
            OUI       = 0xc
            code      = 0x2000
    ###[ Raw ]###
               load      = '\x02\xb4\x91\x18\x00\x01\x00\x13CSR-A.lab.local\x00\x05\x01\x05Cisco IOS Software [Fuji], Virtual XE Software (X86_64_LINUX_IOSD-UNIVERSALK9-M), Version 16.9.1, RELEASE SOFTWARE (fc2)\nTechnical Support: http://www.cisco.com/techsupport\nCopyright (c) 1986-2018 by Cisco Systems, Inc.\nCompiled Tue 17-Jul-18 16:57 by mcpre\x00\x06\x00\x12cisco CSR1000V\x00\x02\x00\x11\x00\x00\x00\x01\x01\x01\xcc\x00\x04\xc0\xa88e\x00\x03\x00\x14GigabitEthernet2\x00\x04\x00\x08\x00\x00\x00!\x00\x07\x00\t\n\x00\x02\x00\x18\x00\x0b\x00\x05\x01\x00\x16\x00\x11\x00\x00\x00\x01\x01\x01\xcc\x00\x04\xc0\xa88e'
    
  13. Activate the CDP-Parser
  14. >>> list_contrib()
    avs                 : AVS WLAN Monitor Header                  status=loads
    bgp                 : BGP v0.1                                 status=loads
    carp                : CARP                                     status=loads
    cdp                 : Cisco Discovery Protocol                 status=loads
    chdlc               : Cisco HDLC and SLARP                     status=loads
    coap                : Constrained Application Protocol (CoAP)  status=loads
    diameter            : Diameter                                 status=loads
    dtp                 : DTP                                      status=loads
    eigrp               : EIGRP                                    status=loads
    etherip             : EtherIP                                  status=loads
    gsm_um              : PPI                                      status=loads
    gtp                 : GTP                                      status=loads
    gtp_v2              : GTPv2                                    status=loads
    homeplugav          : HomePlugAV Layer                         status=loads
    http2               : HTTP/2 (RFC 7540, RFC 7541)              status=loads
    icmp_extensions     : ICMP Extensions                          status=loads
    igmp                : IGMP/IGMPv2                              status=loads
    igmpv3              : IGMPv3                                   status=loads
    ikev2               : IKEv2                                    status=loads
    isis                : ISIS                                     status=loads
    ldp                 : Label Distribution Protocol (LDP)        status=loads
    lldp                : LLDP                                     status=loads
    macsec              : -                                        status=?
    modbus              : ModBus Protocol                          status=loads
    mpls                : MPLS                                     status=loads
    mqtt                : -                                        status=?
    nsh                 : NSH Protocol                             status=loads
    openflow            : Openflow v1.0                            status=loads
    openflow3           : Openflow v1.3                            status=loads
    ospf                : OSPF                                     status=loads
    pnio                : ProfinetIO base layer                    status=loads
    pnio_rtc            : ProfinetIO Real-Time Cyclic (RTC)        status=loads
    ppi                 : PPI                                      status=loads
    ppi_cace            : PPI CACE                                 status=loads
    ppi_geotag          : PPI GEOLOCATION                          status=loads
    ripng               : RIPng                                    status=loads
    rsvp                : RSVP                                     status=loads
    sebek               : Sebek                                    status=loads
    send                : Secure Neighbor Discovery (SEND) (ICMPv6) status=loads
    skinny              : Skinny Call Control Protocol (SCCP)      status=loads
    spbm                : SBPM                                     status=loads
    tacacs              : TACACS+ Protocol                         status=loads
    tzsp                : TZSP                                     status=loads
    ubberlogger         : Ubberlogger dissectors                   status=loads
    vqp                 : VLAN Query Protocol                      status=loads
    vtp                 : VLAN Trunking Protocol (VTP)             status=loads
    wpa_eapol           : WPA EAPOL dissector                      status=loads
    
    >>> load_contrib("cdp")
    
  15. Capture again and display CDP-Information as cleartext
  16. >>> load_contrib("cdp")
    
    >>> p=sniff(iface=interface, count=1, filter=capturefilter)
    >>>
    >>>
    >>> p[0].show()
    ###[ 802.3 ]###
      dst       = 01:00:0c:cc:cc:cc
      src       = 08:00:27:c9:d5:7e
      len       = 386
    ###[ LLC ]###
         dsap      = 0xaa
         ssap      = 0xaa
         ctrl      = 3
    ###[ SNAP ]###
            OUI       = 0xc
            code      = 0x2000
    ###[ Cisco Discovery Protocol version 2 ]###
               vers      = 2
               ttl       = 180
               cksum     = 0x9118
               \msg       \
                |###[ Device ID ]###
                |  type      = Device ID
                |  len       = 19
                |  val       = 'CSR-A.lab.local'
                |###[ Software Version ]###
                |  type      = Software Version
                |  len       = 261
                |  val       = 'Cisco IOS Software [Fuji], Virtual XE Software (X86_64_LINUX_IOSD-UNIVERSALK9-M), Version 16.9.1, RELEASE SOFTWARE (fc2)\nTechnical Support: http://www.cisco.com/techsupport\nCopyright (c) 1986-2018 by Cisco Systems, Inc.\nCompiled Tue 17-Jul-18 16:57 by mcpre'
                |###[ Platform ]###
                |  type      = Platform
                |  len       = 18
                |  val       = 'cisco CSR1000V'
                |###[ Addresses ]###
                |  type      = Addresses
                |  len       = 17
                |  naddr     = 1
                |  \addr      \
                |   |###[ CDP Address IPv4 ]###
                |   |  ptype     = NLPID
                |   |  plen      = 1
                |   |  proto     = '\xcc'
                |   |  addrlen   = 4
                |   |  addr      = 192.168.56.101
                |###[ Port ID ]###
                |  type      = Port ID
                |  len       = 20
                |  iface     = 'GigabitEthernet2'
                |###[ Capabilities ]###
                |  type      = Capabilities
                |  len       = 8
                |  cap       = Router+IGMPCapable
                |###[ IP Prefix ]###
                |  type      = IP Prefix
                |  len       = 9
                |  defaultgw = 10.0.2.0
                |###[ CDP Generic Message ]###
                |  type      = 0x1800
                |  len       = 2816
                |  val       = '\x05\x01\x00\x16\x00\x11\x00\x00\x00\x01\x01\x01\xcc\x00\x04\xc0\xa88e'
    
  17. Decode CDP-Hostname
  18. >>> device=p[0]["CDPMsgDeviceID"].val.decode()
    >>> device
    'CSR-A.lab.local'
    >>> hostname=device.split(".")[0]
    >>> hostname
    'CSR-A'
    
  19. Decode CDP-Management-IP-Address
  20. >>> ip=p[0]["CDPAddrRecordIPv4"]
    >>> ip.addr
    '192.168.56.101'
    

Scripted provisioning of a Cisco CSR1000V as VirtualBox-Guest

In a lab environment it might be handy to quickly rollout new (virtual) routers without much manual intervention. The following script creates a VirtualBox-VM and boots it up.

  1. Prepare
  2. Install VirtualBox and have a CSR1000V-ISO-File ready.

    set VM=CSR1000V
    set BASE=c:\RH\LAB\VM
    
    set ISO=C:\Downloads\csr1000v-universalk9.16.09.01.iso
    
    : Create VM
    VBoxManage createvm --name %VM% --ostype "Linux26_64" --basefolder %BASE% --register
    
    !:now the Path in the Filesystem to ...LOC... exists
    set LOC=%BASE%\%VM%
    
    : Customize VM
    VBoxManage modifyvm %VM% --memory 4096
    VBoxManage modifyvm %VM% --vram 16
    VBoxManage modifyvm %VM% --pae on --paravirtprovider default --hwvirtex on --nestedpaging on
    
    : Storage
    VBoxManage createhd --filename %LOC%\%VM%.vdi --size 8192
    VBoxManage storagectl %VM% --name "IDE-CTL" --add ide --portcount 2 --bootable on
    VBoxManage storageattach %VM% --storagectl IDE-CTL --port 0 --device 0 --type hdd --medium %LOC%\%VM%.vdi
    VBoxManage storageattach %VM% --storagectl IDE-CTL --port 1 --device 0 --type dvddrive --medium %ISO%
    
    VBoxManage modifyvm %VM% --boot1=dvd --boot2=disk --boot3=none --boot4=none
    
    : Serial-Interfaces via "Pipe"
    VBoxManage modifyvm %VM% --uartmode1 server \\.\pipe\%VM%
    VBoxManage modifyvm %VM% --uart1 0x3f8 4
    VBoxManage modifyvm %VM% --uartmode2 server \\.\pipe\%VM%_diag
    VBoxManage modifyvm %VM% --uart2 0x2f8 4
    
    : Audio
    VBoxManage modifyvm %VM% --audio none
    
    : NICs
    VBoxManage modifyvm %VM% --nic1 nat --nic2 hostonly --nic3 hostonly --nic4 hostonly
    VBoxManage modifyvm %VM% --nictype1 virtio --nictype2 virtio --nictype3 virtio --nictype4 virtio
    VBoxManage modifyvm %VM% --nicpromisc1 allow-all --nicpromisc2 allow-all --nicpromisc3 allow-all --nicpromisc4 allow-all
    VBoxManage modifyvm %VM% --hostonlyadapter2 "VirtualBox Host-Only Ethernet Adapter"
    VBoxManage modifyvm %VM% --hostonlyadapter3 "VirtualBox Host-Only Ethernet Adapter"
    VBoxManage modifyvm %VM% --hostonlyadapter4 "VirtualBox Host-Only Ethernet Adapter"
    
    : Set the VM-Logo for the VirtualBox-Inventory
    VBoxManage modifyvm %VM% --iconfile C:\RH\LAB\72px-Cisco_logo.svg.png
    
    : Boot the VM, it'l reboot once to apply the running-config
    VBoxManage startvm %VM%
    
  3. Execute
  4. The Inventory populates:

  5. Use it
  6. conf t
      platform console serial
    end
    

    After another reboot the serial console can be accessed by a windows pipe:

    The pipe provides access to the serial-console:

Cisco IOS – Public-Key User-Authentication

It’s a two step process to get rid of insecure username/password-authentication.

  1. Generate a RSA keypair at your SSH-client
  2. btw. Cisco-IOS doesn’t support DSA-keys

  3. Configure your network device(s) to assign the (public-)key of this keypair to an user-account

This user-account could get privileges from a Radius/TACACS+-Server which could provide access-logs, too.

  1. Generate RSA-Key: Windows as SSH-Client
  2. I prefer Putty, usually in form of „mRemoteNG“, so i use PuttyGen to generate the RSA keypair.

    • Windows.Start => PuttyGen
    • (x) RSA, 4096-bits are supported, use it
    • [Generate]
    • move the mouse to improve the randomgenerator
    • change the „comment“ – for example replace it by an username
    • add a passphrase – using this key-pair is possible only for people knowing this passphrase
    • Save both parts of the RSA keypair:
      • [Save public key] => Filename for example „labuser.pub“
      • [Save private key] => Filename for example „labuser.ppk“
    • Verify
    • C:>dir labuser*.* -l
      -rw-rw-rw-   1 user     group        2710 Oct 17 18:26 labuser.ppk
      -rw-rw-rw-   1 user     group         820 Oct 17 18:26 labuser.pub
      
    • Since the contained keys are BASE64-Encoded (The Secure Shell (SSH) Public Key File Format) you could extract them using grep.
    • C:>cat labuser.pub
      ---- BEGIN SSH2 PUBLIC KEY ----
      Comment: "labuser"
      AAAAB3NzaC1yc2EAAAABJQAAAgEAg+0v9spZ0ZaBmgK3eVWJmY1Q4bNYcuY/uZDn
      c0JFPXgn9dA5r44GksqIEpYjkbMZf61Nkwazz4Cfxw4byS/HeajYP8Rs/eWXV6dh
      k829tqvqSLN6TwH+v49MllGpiHbiVGyoRvzfPgUVddN1j8cMEIJHgVJk4AS4fJmx
      Mp+2wMFWGldJ5xlUaOXO+XaOaTlAFYimgdYNbO7x4+vMRtrqp3ORJJZ5Tdf0JuFp
      cUHRlV46e2FL1FZ8p2PDLVUiAlg8o8yxI8D52r0A5VQToKz3wKUchTWIWqRmIfOR
      fS5jJz8+yTb/swkFs4FzAEpxD8CgvArz7ewTkna0zm8/wbysZCH1lKyce7AmZCp9
      lm1Nsythl+6ztB9M01AbzBo2ElVo3GZHEr3AclsON8aCKgf8hVaZww5BqN1YHvUj
      dKH0Mb8i0zLs+XFSgV7rYXg1EcHyBqsRFAi5OdkuGwd5D2NfWkcwk2XBsi6qG8bP
      951MlHi0SuiMTSTmskdf1OyzzIFaPYjaW9VQe36tg07MsBP48KOPEB4803k35gWx
      Sw2nxAO4O9KisYNCfw0SHna9RiAWRsyykLUTe6Z39vzppTEiC+j2f6IQs9Celk4S
      s9r8IIoI0yswtvc/DsJBLd8y0CmNwyZof9L5MSY1RlcBiCykUPh1Z+UFLEYrFBa1
      qQCAwU8=
      ---- END SSH2 PUBLIC KEY ----
      
    • THIS output could be directly used within Cisco-IOS command syntax:
    • C:>egrep "^[a-zA-Z0-9+\/=]+$" labuser.pub
      AAAAB3NzaC1yc2EAAAABJQAAAgEAg+0v9spZ0ZaBmgK3eVWJmY1Q4bNYcuY/uZDn
      c0JFPXgn9dA5r44GksqIEpYjkbMZf61Nkwazz4Cfxw4byS/HeajYP8Rs/eWXV6dh
      k829tqvqSLN6TwH+v49MllGpiHbiVGyoRvzfPgUVddN1j8cMEIJHgVJk4AS4fJmx
      Mp+2wMFWGldJ5xlUaOXO+XaOaTlAFYimgdYNbO7x4+vMRtrqp3ORJJZ5Tdf0JuFp
      cUHRlV46e2FL1FZ8p2PDLVUiAlg8o8yxI8D52r0A5VQToKz3wKUchTWIWqRmIfOR
      fS5jJz8+yTb/swkFs4FzAEpxD8CgvArz7ewTkna0zm8/wbysZCH1lKyce7AmZCp9
      lm1Nsythl+6ztB9M01AbzBo2ElVo3GZHEr3AclsON8aCKgf8hVaZww5BqN1YHvUj
      dKH0Mb8i0zLs+XFSgV7rYXg1EcHyBqsRFAi5OdkuGwd5D2NfWkcwk2XBsi6qG8bP
      951MlHi0SuiMTSTmskdf1OyzzIFaPYjaW9VQe36tg07MsBP48KOPEB4803k35gWx
      Sw2nxAO4O9KisYNCfw0SHna9RiAWRsyykLUTe6Z39vzppTEiC+j2f6IQs9Celk4S
      s9r8IIoI0yswtvc/DsJBLd8y0CmNwyZof9L5MSY1RlcBiCykUPh1Z+UFLEYrFBa1
      qQCAwU8=
      
  3. Generate RSA-Key: Linux as SSH-Client
    • there might already exist a rsa-key in the „.ssh“-path of your home-directory
    • $ cd ~/.ssh/
      $ ls -l
      total 20
      -rw------- 1 administrator administrator 1675 Aug 28 09:43 id_rsa
      -rw-r--r-- 1 administrator administrator  405 Aug 28 09:43 id_rsa.pub
      -rw-r--r-- 1 administrator administrator  222 Aug 28 11:07 known_hosts
      
      $ cat id_rsa.pub
      ssh-rsa AAAAB3NzaC1yc2EAAAADAQABAAABAQCohMsS3gJ/OcF4Hg43mKeVHKWl2lECCn0iZQu9QSrUjAb4PVHWXIbj11yy5Jh/ygMys0n9IED6357fkRmq8Cc8ujpU0sCen7kBFUt3UqbLg1PLT9wMmJAEv4dcxbX9WRvwYXjLd8+EgDYDmrj7vTB3xIvw1I2WWuUK2jPWbVI57vbyGtw224Qb9Qk0KQfyGiTvErZnddDg65/rn9Pyt7FQlzCwUPH0nyJVoFhiYYJYJszTKc8BTFB6VdIbALHc4atFmjYt7YDUvEvaZqOL+zwQtr7FmXsZ5oaRGV6ZChuBPTpNEL41w/Il1mSJicRykpD90O2AxlUFebQfABTWadnr administrator@lx-ubuntu
      

      The RFC states that the key should get split into multiple lines containing max. 72 characters.

    • use
      • „cut“ to extract the encoded-key
      • „fold“ to split the key into multiple lines
    • $ cut -d " " -f 2 id_rsa.pub
      AAAAB3NzaC1yc2EAAAADAQABAAABAQCohMsS3gJ/OcF4Hg43mKeVHKWl2lECCn0iZQu9QSrUjAb4PVHWXIbj11yy5Jh/ygMys0n9IED6357fkRmq8Cc8ujpU0sCen7kBFUt3UqbLg1PLT9wMmJAEv4dcxbX9WRvwYXjLd8+EgDYDmrj7vTB3xIvw1I2WWuUK2jPWbVI57vbyGtw224Qb9Qk0KQfyGiTvErZnddDg65/rn9Pyt7FQlzCwUPH0nyJVoFhiYYJYJszTKc8BTFB6VdIbALHc4atFmjYt7YDUvEvaZqOL+zwQtr7FmXsZ5oaRGV6ZChuBPTpNEL41w/Il1mSJicRykpD90O2AxlUFebQfABTWadnr
      
      $ cut -d " " -f 2 id_rsa.pub | fold -b -w 72
      AAAAB3NzaC1yc2EAAAADAQABAAABAQCohMsS3gJ/OcF4Hg43mKeVHKWl2lECCn0iZQu9QSrU
      jAb4PVHWXIbj11yy5Jh/ygMys0n9IED6357fkRmq8Cc8ujpU0sCen7kBFUt3UqbLg1PLT9wM
      mJAEv4dcxbX9WRvwYXjLd8+EgDYDmrj7vTB3xIvw1I2WWuUK2jPWbVI57vbyGtw224Qb9Qk0
      KQfyGiTvErZnddDg65/rn9Pyt7FQlzCwUPH0nyJVoFhiYYJYJszTKc8BTFB6VdIbALHc4atF
      mjYt7YDUvEvaZqOL+zwQtr7FmXsZ5oaRGV6ZChuBPTpNEL41w/Il1mSJicRykpD90O2AxlUF
      ebQfABTWadnr
      
    • otherwise generate a new rsa key-pair („newid_rsa“)
    • $ ssh-keygen -t rsa -b 4096
      Generating public/private rsa key pair.
      Enter file in which to save the key (/home/administrator/.ssh/id_rsa): newid_rsa
      Enter passphrase (empty for no passphrase): *****
      Enter same passphrase again: *****
      Your identification has been saved in newid_rsa.
      Your public key has been saved in newid_rsa.pub.
      The key fingerprint is:
      SHA256:4g/JkvpFQmlTaOE2VQAZ9IHfz/+6NJiI8W/WVt9TJGA administrator@lx-ubuntu
      The key's randomart image is:
      +---[RSA 4096]----+
      |   .=B=o.        |
      |   .== .    E    |
      |   .O...   . .   |
      |   + o. .     . .|
      |    . + So     o |
      |     * * .oo  . .|
      |    o B o ooo. .o|
      |   . o o .o.+. .o|
      |  ...   .o..o+. .|
      +----[SHA256]-----+
      
      $ ls -l
      total 36
      ...
      -rw------- 1 administrator administrator 3326 Oct 18 07:19 newid_rsa
      -rw-r--r-- 1 administrator administrator  749 Oct 18 07:19 newid_rsa.pub
      
  4. IOS-Router: Add those public-keys to your IOS-Config
    • i’ll use both clients (linux & windows) with the same cisco-user-account „labuser“
    • conf t
      ip ssh pubkey-chain
      username labuser
        key-string
      AAAAB3NzaC1yc2EAAAABJQAAAgEAg+0v9spZ0ZaBmgK3eVWJmY1Q4bNYcuY/uZDn
      c0JFPXgn9dA5r44GksqIEpYjkbMZf61Nkwazz4Cfxw4byS/HeajYP8Rs/eWXV6dh
      k829tqvqSLN6TwH+v49MllGpiHbiVGyoRvzfPgUVddN1j8cMEIJHgVJk4AS4fJmx
      Mp+2wMFWGldJ5xlUaOXO+XaOaTlAFYimgdYNbO7x4+vMRtrqp3ORJJZ5Tdf0JuFp
      cUHRlV46e2FL1FZ8p2PDLVUiAlg8o8yxI8D52r0A5VQToKz3wKUchTWIWqRmIfOR
      fS5jJz8+yTb/swkFs4FzAEpxD8CgvArz7ewTkna0zm8/wbysZCH1lKyce7AmZCp9
      lm1Nsythl+6ztB9M01AbzBo2ElVo3GZHEr3AclsON8aCKgf8hVaZww5BqN1YHvUj
      dKH0Mb8i0zLs+XFSgV7rYXg1EcHyBqsRFAi5OdkuGwd5D2NfWkcwk2XBsi6qG8bP
      951MlHi0SuiMTSTmskdf1OyzzIFaPYjaW9VQe36tg07MsBP48KOPEB4803k35gWx
      Sw2nxAO4O9KisYNCfw0SHna9RiAWRsyykLUTe6Z39vzppTEiC+j2f6IQs9Celk4S
      s9r8IIoI0yswtvc/DsJBLd8y0CmNwyZof9L5MSY1RlcBiCykUPh1Z+UFLEYrFBa1
      qQCAwU8=
      exit
      username labuser
        key-string    
      AAAAB3NzaC1yc2EAAAADAQABAAABAQCohMsS3gJ/OcF4Hg43mKeVHKWl2lECCn0iZQu9QSrU
      jAb4PVHWXIbj11yy5Jh/ygMys0n9IED6357fkRmq8Cc8ujpU0sCen7kBFUt3UqbLg1PLT9wM
      mJAEv4dcxbX9WRvwYXjLd8+EgDYDmrj7vTB3xIvw1I2WWuUK2jPWbVI57vbyGtw224Qb9Qk0
      KQfyGiTvErZnddDg65/rn9Pyt7FQlzCwUPH0nyJVoFhiYYJYJszTKc8BTFB6VdIbALHc4atF
      mjYt7YDUvEvaZqOL+zwQtr7FmXsZ5oaRGV6ZChuBPTpNEL41w/Il1mSJicRykpD90O2AxlUF
      ebQfABTWadnr
      exit
      
      exit
      exit
      end
      
    • Now two RSA-keys are valid to authenticate the user „labuser“
      • The Router stores only the key-hashes:
      VBOX-CSR-1#show run | section key-chain
      ip ssh pubkey-chain
        username labuser
         key-hash ssh-rsa CE7178C1D6D025F7EA5345CCBA22ED54
         key-hash ssh-rsa ABBF42AB330CA79B235FB369FCC4D53E
      
    • btw. look (above) – puttygen displayed the hash
    • ssh-rsa 4096 ce:71:78:c1:d6:d0:25:f7:ea:53:45:cc:ba:22:ed:54
      

      so you could save time to just configure the hash.

  5. Prove SSH-Client-access: Linux
    • Who am i?
    • $ who
      administrator pts/0        Oct 18 17:37 (192.168.56.1)
      

      Linux re-uses the name of the current linux-user to login into the ssh-device unless a user is specified

      $ ssh 192.168.56.102
      Password:
      

      The IOS-Router prompts for a password for users who have no known-public-key in the running-config – and there is no public-key for a user named „administrator“.

      • This is the default-behaviour:
      (config)# ip ssh server algorithm authentication publickey keyboard password
      
      • Change this undesired behaviour (disable „keyboard“ and „password“):
      conf t
        ip ssh server algorithm authentication publickey
      end
      
        Now the router blocks the access since the publickey of „administrator“ is not known.
      $ ssh 192.168.56.102
      administrator@192.168.56.102: Permission denied (publickey).
      
    • Let the linux-user „administrator“ log into the router as „labuser“:
      • Manually specify a username to use and gain CLI access
    • $ ssh -l labuser 192.168.56.102
      
      VBOX-CSR-1>who
          Line       User       Host(s)              Idle       Location
         0 con 0                idle                 00:02:43
      *  1 vty 0     labuser    idle                 00:00:00 192.168.56.101
      
    • You don’t want to configure an „enable secret“-password in 2018..
    • VBOX-CSR-1>enable
      % No password set
      
      • configure a local user-privilege or use for example the Cisco ISE for centralized Authorization and additional Accounting if needed.
      • conf t
          username labuser privilege 15
        end
        
      • Check – you’ll access privileged-mode immediately
      • $ ssh -l labuser 192.168.56.102
        
        VBOX-CSR-1#who
            Line       User       Host(s)              Idle       Location
           0 con 0                idle                 00:00:10
        *  1 vty 0     labuser    idle                 00:00:00 192.168.56.101
        
          Interface    User               Mode         Idle     Peer Address
        
        VBOX-CSR-1#show priv
        Current privilege level is 15
        
  6. Prove SSH-Client-access: Windows/Putty
    • Specify the „Auto-Login-Username“: „labuser“
    • Specify the private-key-file (*.ppk)
    • [Open]
      • since the ppk-file was password-protected (in PuttyGen) this password has to be entered:
      • privilege-15 access for the windows-user

      [btw. the linux-ssh-client „labuser“ is still logged in]

That’s all.

Cisco IOS Service-Containers: Run an x86-VM inside a Router (Part 5: Install the Service-VM)

The CSR1000V-Router has already been prepared (Create a CSR1000V-Instance with nested Virtualiation support) and in (Part 4: Package the Service-VM into an OVA) we copied the OVA-Image of our „ubuntu-server“-VM to this Router.

Add the internal Network-Interface between Router and Service-VM

SERVICECONTAINER#conf t
Enter configuration commands, one per line.  End with CNTL/Z.
SERVICECONTAINER(config)#int virtualportgroup 0
*Feb  3 19:05:17.206: %LINEPROTO-5-UPDOWN: Line protocol on Interface VirtualPortGroup0, changed state to up
SERVICECONTAINER(config-if)#ip addr 192.168.0.1 255.255.255.0
SERVICECONTAINER(config-if)#exit

SERVICECONTAINER(config)#virtual-service
SERVICECONTAINER(config-virt-serv-global)#signing level unsigned
% Support for unsigned packages has been user-enabled. Unsigned packages are not endorsed by Cisco Systems, Inc. User assumes all responsibility
SERVICECONTAINER(config-virt-serv-global)#ex

SERVICECONTAINER(config)#ip dhcp pool SERVICE
SERVICECONTAINER(dhcp-config)# network 192.168.0.0 255.255.255.0
SERVICECONTAINER(dhcp-config)# exit

SERVICECONTAINER(config)#virtual-service UBUNTU
SERVICECONTAINER(config-virt-serv)#vnic gateway virtualPortGroup 0
SERVICECONTAINER(config-virt-serv-vnic)#guest ip address 192.168.0.2
SERVICECONTAINER(config-virt-serv-vnic)#end
SERVICECONTAINER#
*Feb  3 19:06:27.474: %SYS-5-CONFIG_I: Configured from console by console

Install the Service-VM

SERVICECONTAINER#debug virtual-service all
virtual service all debugging is on
SERVICECONTAINER#term mon
% Console already monitors
SERVICECONTAINER#term width 0
SERVICECONTAINER#virtual-service install name UBUNTU package bootflash:ubuntu1604.ova
Installing package 'bootflash:/ubuntu1604.ova' for virtual-service 'UBUNTU'. Once the install has finished, the VM may be activated. Use 'show virtual-service list' for progress.

*Feb  3 19:07:43.518: VIRTUAL-SERVICE [UBUNTU]: Sending install req for [UBUNTU], path=bootflash:/ubuntu1604.ova, uri= uid=0
*Feb  3 19:07:43.529: VIRTUAL-INSTANCE: Message sent for INSTALL TDL request: Virtual-instance name: UBUNTU, UID: 0
*Feb  3 19:07:43.529: VIRTUAL-SERVICE: Started response timer for tid DD000001 - 30 minutes
*Feb  3 19:05:14.205: %IOSXE-4-PLATFORM: R0/0: kernel: dev->name [intsvc0]: dev_entry not populated

SERVICECONTAINER#show virtual-service list
System busy installing virtual-service 'UBUNTU'. The request may take several minutes...
Virtual Service List:


Name                    Status             Package Name
------------------------------------------------------------------------------
UBUNTU                  Installing         ubuntu1604.ova


*Feb  3 19:08:00.645: %VMAN-5-PACKAGE_SIGNING_LEVEL_ON_INSTALL: R0/0: vman: Package 'ubuntu1604.ova' for service container 'UBUNTU' is 'unsigned', signing level cached on original install is 'unsigned'
*Feb  3 19:08:09.216: VIRTUAL-SERVICE: Install response handler: VM[UBUNTU]: Owner IOSd trans_id 3707764737
*Feb  3 19:08:09.216: VIRTUAL-SERVICE [UBUNTU]: vm[UBUNTU] set owner [IOSd]
*Feb  3 19:08:09.225: VIRTUAL-SERVICE [UBUNTU]: application_name: 'ubuntu' application_vendor: '' application_version: '1.1'
*Feb  3 19:08:09.226: VIRTUAL-SERVICE [UBUNTU]: Default profile info: license_name: '', license_ver: ''
*Feb  3 19:08:09.226: VIRTUAL-SERVICE: Install pkg response for tid DD000001: rc=0, descr=Install Success
*Feb  3 19:08:09.226: VIRTUAL-SERVICE [UBUNTU]: License type: none, no license needed
*Feb  3 19:08:09.226: %VIRT_SERVICE-5-INSTALL_STATE: Successfully installed virtual service UBUNTU
*Feb  3 19:08:09.243: VIRTUAL-SERVICE: Received local transport activation request
*Feb  3 19:08:09.244: VIRTUAL-SERVICE: Enabling vman local transport

SERVICECONTAINER#show virtual-service list
Virtual Service List:

Name                    Status             Package Name
------------------------------------------------------------------------------
UBUNTU                  Installed          ubuntu1604.ova

*Feb  3 19:08:32.758: %ONEP_BASE-6-SS_ENABLED: ONEP: Service set Base was enabled by Default
*Feb  3 19:08:33.259: VIRTUAL-SERVICE: Local transport 'activation' request processed

Activate the installed Service-VM

SERVICECONTAINER#conf t
Enter configuration commands, one per line.  End with CNTL/Z.
SERVICECONTAINER(config)#virtual-service UBUNTU
SERVICECONTAINER(config-virt-serv)#activate
SERVICECONTAINER(config-virt-serv)#end

% Activating virtual-service 'UBUNTU', this might take a few minutes. Use 'show virtual-service list' for progress.

*Feb  3 19:09:57.772: VIRTUAL-SERVICE [UBUNTU]: Activate CLI: appl->owner [IOSd]
*Feb  3 19:09:57.775: VIRTUAL-INSTANCE: Message sent for ACTIVATE TDL request: Virtual service name: UBUNTU, UID: 0
*Feb  3 19:09:57.775: VIRTUAL-SERVICE [UBUNTU]: Started virtual service (0) activate response timer - 30 minutes
*Feb  3 19:10:06.052: %SYS-5-CONFIG_I: Configured from console by console
*Feb  3 19:10:06.383: VIRTUAL-SERVICE [UBUNTU]: Activate response handler: got owner [IOSd]
*Feb  3 19:10:06.383: VIRTUAL-SERVICE: clnt_type 0: Interface counter is '1'
*Feb  3 19:10:06.383: VIRTUAL-SERVICE: Information for virtual port grp '0' is received
*Feb  3 19:10:06.384: VIRTUAL-SERVICE [UBUNTU]: Deliver intf response, vm =UBUNTU, counter=1
*Feb  3 19:10:06.384: VIRTUAL-SERVICE [UBUNTU]: Received interface id=0, type=1, state=1
*Feb  3 19:10:06.384: VIRTUAL-SERVICE [UBUNTU]: Received virtual port group interface 0 with service MAC 001e.e5b1.cfba, state: up
*Feb  3 19:10:06.385: VIRTUAL-INSTANCE: Message sent for IF MTU TDL message: appliance 'UBUNTU'
*Feb  3 19:10:06.385: VIRTUAL-SERVICE [UBUNTU]: Activate response handler: rsp_rc 0
*Feb  3 19:10:06.385: VIRTUAL-SERVICE [UBUNTU]: Deliver response: appliance_state 3 rsp_rc 0 if_notify name UBUNTU clnt_type 0 act_state 0
*Feb  3 19:10:06.385: %VIRT_SERVICE-5-ACTIVATION_STATE: Successfully activated virtual service UBUNTUconf t
*Feb  3 19:10:06.385: VIRTUAL-SERVICE [UBUNTU]: Stopped virtual service (1) response timer
*Feb  3 19:10:06.385: VIRTUAL-SERVICE: Delivered Virt-manager response message to virtual service 'UBUNTU' - Response: 'OK'
*Feb  3 19:10:06.385: VIRTUAL-SERVICE [UBUNTU]: set owner to 'IOSd' in appliance

SERVICECONTAINER#show virtual-service list
Virtual Service List:

Name                    Status             Package Name
------------------------------------------------------------------------------
UBUNTU                  Activated          ubuntu1604.ova

SERVICECONTAINER#show ip dhcp bind
Bindings from all pools not associated with VRF:
IP address      Client-ID/              Lease expiration        Type       State      Interface
                Hardware address/
                User name
192.168.0.2     001e.e5b1.cfba          Feb 04 2018 07:20 PM    Automatic  Active     VirtualPortGroup0

Access the VM using the (virtual) Serial-Console

SERVICECONTAINER#virtual-service connect name UBUNTU console
Connected to appliance. Exit using ^c^c^c

Ubuntu 16.04.3 LTS ubuntu-server ttyS0

ubuntu-server login: user
Password:
Last login: Sat Feb  3 20:23:27 CET 2018 on ttyS0
Welcome to Ubuntu 16.04.3 LTS (GNU/Linux 4.4.0-87-generic x86_64)

 * Documentation:  https://help.ubuntu.com
 * Management:     https://landscape.canonical.com
 * Support:        https://ubuntu.com/advantage

9 packages can be updated.
7 updates are security updates.


user@ubuntu-server:~$ who
user     ttyS0        2018-02-03 23:12

Logout: 3x [CTRL]+

user@ubuntu-server:~$ ^C

Access the VM using SSH via the internal Network

SERVICECONTAINER#ssh -l user 192.168.0.2
Password:
Welcome to Ubuntu 16.04.3 LTS (GNU/Linux 4.4.0-87-generic x86_64)

 * Documentation:  https://help.ubuntu.com
 * Management:     https://landscape.canonical.com
 * Support:        https://ubuntu.com/advantage

9 packages can be updated.
7 updates are security updates.

Last login: Sat Feb  3 23:12:21 2018
user@ubuntu-server:~$ who
user     pts/0        2018-02-03 23:13 (192.168.0.1)

Check the local python/NAPALM-Setup to get facts about the containing router

user@ubuntu-server:~$ python
Python 2.7.12 (default, Dec  4 2017, 14:50:18)
[GCC 5.4.0 20160609] on linux2
Type "help", "copyright", "credits" or "license" for more information.

>>> import napalm

>>> iosdriver = napalm.get_network_driver('ios')
dpass', optional_args={'port': 22, 'dest_file_system': 'bootflash:'})sword='rmon

>>> router.open()

>>> print router.get_facts()
{u'os_version': u'Virtual XE Software (X86_64_LINUX_IOSD-UNIVERSALK9-M), Version 16.7.1, RELEASE SOFTWARE (fc6)', u'uptime': 12840, u'interface_list': [u'GigabitEthernet1', u'GigabitEthernet2', u'GigabitEthernet3', u'VirtualPortGroup0'], u'vendor': u'Cisco', u'serial_number': u'9SNHUBYAML', u'model': u'CSR1000V', u'hostname': u'SERVICECONTAINER', u'fqdn': u'SERVICECONTAINER.lab.local'}

Cisco IOS Service-Containers: Run an x86-VM inside a Router (Part 2: Create a CSR1000v-Instance with nested Virtualization support)

In real life an hardware-ISR/ASR-Router might be the correct choice.

Create a CSR1000v-Instance with nested Virtualization support
But since the CSR1000v-Router supports Service-Containers, too – this is the chance to prove the setup in a lab environment:

  • IOS-XE 3.17 is the first supported release, i’ll go with IOS-XE 16.7.1
  • Option to enable unsigned containers
  • any 3rd party KVM
  • Libvirt based format / YAML manifest file
  • Requires 4GB+ dedicated RAM
  • ASR1000, ISR4000, CSR1000

5 Minutes to deploy the virtual CSR1000v-Router using COT
I’ll use COT (Common OVF Tool (COT) – Automated Lab-Router Deployment) to deploy my CSR1000v-Router:

user@ubuntu-server:~$ cot inject-config csr1000v-universalk9.16.07.01.ova -c ios-napalm.startup.cfg -o csr1000v-universalk9.16.07.01.napalm.ova
Add disk file to existing (but empty) cdrom drive? [y]
NOTICE  : Overwriting existing disk Item in OVF

cot --verbose deploy csr1000v-universalk9.16.07.01.napalm.ova esxi &amp;amp;amp;lt;VCENTER-HOST/IP&amp;amp;amp;gt;/&amp;amp;amp;lt;DATACENTER&amp;amp;amp;gt;/host/&amp;amp;amp;lt;ESXi-HOST/IP&amp;amp;amp;gt; -u &amp;amp;amp;lt;USER&amp;amp;amp;gt; -p &amp;amp;amp;lt;PASS&amp;amp;amp;gt; -n RTR-SERVICE-CONTAINER -d &amp;amp;amp;lt;DATASTORE&amp;amp;amp;gt; -S "telnet://:41001,server" -N GigabitEthernet1="Management" GigabitEthernet2=T24 GigabitEthernet3=T34 -c 2CPU-8GB

Boot the Router
Check the Virtualization-Environment: fail 🙁

  • Machine types disabled : KVM
SERVICECONTAINER# show virtual-service
Virtual Service Global State and Virtualization Limits:

Infrastructure version : 1.7
Total virtual services installed : 0
Total virtual services activated : 0

Machine types supported   : LXC
Machine types disabled    : KVM

Maximum VCPUs per virtual service : 1
Resource virtualization limits:
Name                         Quota     Committed     Available
--------------------------------------------------------------
system CPU (%)                  75             0            75
memory (MB)                   3072             0          3072
bootflash (MB)               20000             0          5554

i forgot to enable nested-virtualization for the CSR1000v-Router-VM.

Action Plan

    • Power-down the VM („Shut Down Guest“) again
    • edit Hardware (Web-Client)
csr1000v-router-enable-nested-virtualization
  • boot the router again

Check again: works 🙂

  • Machine types supported : KVM, LXC
SERVICECONTAINER#show virtual-service
Virtual Service Global State and Virtualization Limits:

Infrastructure version : 1.7
Total virtual services installed : 0
Total virtual services activated : 0

Machine types supported   : KVM, LXC
Machine types disabled    : none

Maximum VCPUs per virtual service : 1
Resource virtualization limits:
Name                         Quota     Committed     Available
--------------------------------------------------------------
system CPU (%)                  75             0            75
memory (MB)                   3072             0          3072
bootflash (MB)               20000             0          5553

That’s it, the CSR1000V is ready.

Notice: vCPU-Limitation in CSR1000v

  • Maximum VCPUs per virtual service : 1

Remember this, when creating the YAML-File for the OVA. (Part 4: Package the Service-VM into an OVA)

Cisco IOS Service-Containers: Run an x86-VM inside a Router (Part 1: KVM Development Environment)

Network Hosted Kernel Virtual Machine (KVM)

Many Cisco Routers allow you to host your own virtual machine directly inside a router.
DevNet: Cisco IOS KVM Service-Containers

  • CSR 1000v
  • ISR 4000
  • ASR 1000

I went through the documentation, especially Service-Containers-Tutorial.pdf and Ubuntu – Building a Service Container.pdf where very helpful.

But i didn’t want to go the „Ubuntu-Desktop-14.04-LTS“-way which was described.

„My“ Service-Container-VM should be:

  • Ubuntu 16.04 LTS
  • Ubuntu Server
    • save some compute/cpu/dram/harddisk-ressources by not installing an Ubuntu-Desktop-Environment inside the Router. Just network services, please!

The whole deployment process can be accomplished in five steps:

  1. build a KVM virtualization-Environment
  2. prepare an ISR-Router (lab: Create a CSR1000v-Instance for nested Virtualization)
  3. create the Service-VM (Ubuntu-Server)
  4. package it inside an OVA
  5. install this OVA at the router

Build the KVM Virtualization Environment

Here I’ll use Ubuntu LTS, but the „Desktop“-Release to get the „Virtual Machine Manager“-GUI.
ubuntu-16.04.3-desktop-amd64.iso

Common vSphere Process „New VM“

  • Linux Ubuntu 64 Bit, 4GB DRAM, 120GB Disk
  • mount Ubuntu-Desktop-ISO as DVD

Enable nested virtualization (Hardware-Virtualization for Guest-OS)
Don’t forget: this „KVM Virtualization Environment“ will run on top of an VSphere-ESXi-Host.

  • nested virtualization: [Linux-Server-VM] on top of [KVM Virtualization] on top of [ESXi Hypervisor]
Hardware virtualization: [x] Expose hardware assisted virtualization to guest-OS

Ubuntu-Desktop VM with KVM-Virtualization
Installation: Defaults are fine

  • never use the „root“-acccout
  • use a common user-account instead, i’ll use the username „user“ in the text

Additional Setup
user@KVM-1:~$ sudo apt-get update && sudo apt-get upgrade -y
user@KVM-1:~$ sudo apt-get install -y open-vm-tools open-vm-tools-desktop

Add KVM („libvirt“)
user@KVM-1:~$ sudo apt-get install -y qemu-kvm libvirt-bin bridge-utils virt-manager qemu-system
Finalize it
user@KVM-1:~$ sudo reboot

Check the KVM Environment
Should look like this:

user@KVM-1:~/isr-service-container$ virsh -c qemu:///system list

 Id    Name                           State
----------------------------------------------------

Fine-tuning: „Disable Screensaver“

  • avoid ever and ever re-login to the remote-Desktop
  • acceptable in an isolated lab environment

all settings => brightness & lock

  • „never“ turn screen off when inactive
  • lock „off“
  • [ ] require password when waking from suspend

Preparation: Mount NFS-Share with „ubuntu-server“-ISO
I store my ISO-Images on an central NFS-Datastore.

  • the ISO-image has to be available inside the VM
sudo apt-get install -y nfs-common
mkdir /home/user/<NAS-SHARE>
sudo mount.nfs <NAS-IP>:<NAS-SHARE> /home/user/<NAS-SHARE>