Microsoft Azure – Hyperthreading and Nested Virtualization

Go to https://docs.microsoft.com/en-us/azure/virtual-machines/acu and look for:

***Hyper-threaded and capable of running nested virtualization

The following „script“ pulls the SKUs out of the table:

wget -O - --no-check-certificate https://docs.microsoft.com/en-us/azure/virtual-machines/acu | egrep -B2 "\*\*\*" | egrep "data-linktype" | sed -E "s/^.+relative-path..([^\<]+).+$/SKU: \1/g"
C:\RH>echo "Hyper-threaded and capable of running nested virtualization" && wget -q -O - --no-check-certificate https://docs.microsoft.com/en-us/azure/virtual-machines/acu | egrep -B2 "\*\*\*" | egrep "data-linktype" | sed -E "s/^.+relative-path..([^\<]+).+$/SKU: \1/g"
"Hyper-threaded and capable of running nested virtualization"
SKU: D_v3
SKU: Ds_v3
SKU: Dv4
SKU: Dsv4
SKU: Ddv4
SKU: Ddsv4
SKU: E_v3
SKU: Es_v3
SKU: Ev4
SKU: Esv4
SKU: Edv4
SKU: Edsv4
SKU: F2s_v2 - F72s_v2
SKU: M

Next Step? Finding one with enough memory for an acceptable price.

Cisco TECDEV-2765

Preparation

C:\> pip install pyang
Collecting pyang
Downloading https://files.pythonhosted.org/packages/5e/b4/4f1937f18914b847168ea596b77e04d75d28ff937ecc4ac7da210b17ad78/pyang-2.1.1-py2.py3-none-any.whl (572kB)
100% |████████████████████████████████| 573kB 3.6MB/s
Collecting lxml (from pyang)
Downloading https://files.pythonhosted.org/packages/aa/17/b9ccbdd50f66258d362561dbfe3cf4aaa60c82c4bba0302b3f52ab730b99/lxml-4.4.2-cp37-cp37m-win_amd64.whl (3.7MB)
100% |████████████████████████████████| 3.7MB 5.2MB/s
Installing collected packages: lxml, pyang
Successfully installed lxml-4.4.2 pyang-2.1.1
You are using pip version 10.0.1, however version 20.0.1 is available.
You should consider upgrading via the 'python -m pip install --upgrade pip' command.

C:\> python -m pip install --upgrade pip
Collecting pip
Downloading https://files.pythonhosted.org/packages/57/36/67f809c135c17ec9b8276466cc57f35b98c240f55c780689ea29fa32f512/pip-20.0.1-py2.py3-none-any.whl (1.5MB)
100% |████████████████████████████████| 1.5MB 7.0MB/s
Installing collected packages: pip
Found existing installation: pip 10.0.1
Uninstalling pip-10.0.1:
Successfully uninstalled pip-10.0.1
Successfully installed pip-20.0.1


C:\cd lab
C:\LAB>cd GIT


C:\LAB\GIT> git clone https://github.com/YangModels/yang.git
Cloning into 'yang'...
remote: Enumerating objects: 19, done.
remote: Counting objects: 100% (19/19), done.
remote: Compressing objects: 100% (16/16), done.
remote: Total 30728 (delta 6), reused 12 (delta 3), pack-reused 30709
Receiving objects: 100% (30728/30728), 61.09 MiB | 11.29 MiB/s, done.
Resolving deltas: 100% (23142/23142), done.
Checking out files: 100% (32215/32215), done.


C:\LAB\GIT> git clone https://github.com/mikemikhail/ML-anomaly_detection-demo.git
Cloning into 'ML-anomaly_detection-demo'...
remote: Enumerating objects: 61, done.
remote: Counting objects: 100% (61/61), done.
remote: Compressing objects: 100% (60/60), done.
remote: Total 178 (delta 30), reused 4 (delta 1), pack-reused 117
Receiving objects: 100% (178/178), 51.86 MiB | 11.27 MiB/s, done.
Resolving deltas: 100% (30/30), done.


Windows LAN-MTU Test

The default-MTU allows max. 1472-byte sized ping-packets to be sent (28 Bytes will always get added: 20 Byte IPv4-Header, 8 Byte ICMP-Header).

If you want to test the max. MTU of the LAN, you have to modify the IP-MTU of the Windows-NIC.

List all Interfaces

C:\>netsh interface ipv4 show interfaces

Idx Met MTU State Name
--- ---------- ---------- ------------ ---------------------------
1 75 4294967295 connected Loopback Pseudo-Interface 1
27 55 1500 disconnected WLAN
12 25 1500 disconnected Local Area Connection* 9
8 25 1500 disconnected Local Area Connection* 10
4 5 1500 disconnected ETH_DELL
23 25 1500 connected VirtualBox_Host3
13 25 1500 connected ETH_DOCK
24 25 1500 connected VirtualBox_Host1
11 25 1500 connected VirtualBox_Host2
9 25 1500 connected Npcap Loopback Adapter
5 25 65536 connected Ethernet
15 25 1500 connected VirtualBox Host-Only Network #4
14 1 1500 disconnected Ethernet 4

Interesting is for example ETH_DOCK – my active NIC when the Laptop is mounted to the „docking-station“.
C:\>netsh interface ipv4 show subinterface 13

MTU MediaSenseState Bytes In Bytes Out Interface
------ --------------- --------- --------- -------------
1500 1 255082163 60077137 ETH_DOCK

This doesn’t prove anything – the IP-Packet wont be sent through the NIC, Windows prints the „Packet neneds to be fragmented but DF set“-Message instead.
C:\>ping 192.168.2.1 -l 9000 -f

Pinging 192.168.2.1 with 9000 bytes of data:
Packet needs to be fragmented but DF set.

Ping statistics for 192.168.2.1:
Packets: Sent = 4, Received = 0, Lost = 4 (100% loss),

Modify the IP-MTU

C:\>netsh interface ipv4 set subinterface 13 mtu=9000 store=persistent
The requested operation requires elevation (Run as administrator).

@Retry as admin
C:\WINDOWS\system32>netsh interface ipv4 set subinterface 13 mtu=9000 store=persistent
Ok.

Verify the IP-MTU again
C:\> netsh interface ipv4 show subinterface 13

MTU MediaSenseState Bytes In Bytes Out Interface
------ --------------- --------- --------- -------------
9000 1 255253609 60683324 ETH_DOCK

Now the IP-Ping is sent into the LAN-Switch.

C:\> ping 192.168.2.1 -l 8972 -f

Pinging 192.168.2.1 with 8972 bytes of data:
Request timed out.
Request timed out.
Request timed out.
Request timed out.

Ping statistics for 192.168.2.1:
Packets: Sent = 4, Received = 0, Lost = 4 (100% loss),

Timeout?

Action Plan:

  • check device 192.168.2.1 – is it powert up?
  • fix the LAN-Switch-MTU?
  • fix the IP-MTU of end-device „192.168.2.1“
IEEE 802.1ax – LACP: How to virtually tear down a DC using a Linux-Server

more than ten years later (IEEE 802.1ax-2008), but everybody calls it 802.3ad and serverguys still prefer static bonding with round-robin distribution [without telling network admins about that decision] to confuse (or tear down) ethernet-networks.

What a stupid default: default bond0 interface with balance round robin mode Awsome 🙂

FWM-2-STM_LOOP_DETECT How a single server affects vMotion, SLB-VIP-Mobility, First-Hop Redundancy-Protocols (VRRP, HSRP you name it) in 2019.

I won’t expect technology like software-defined-networks to solve human ignorance.

Cisco HyperFlex Edge

  • 2/3/4-Node Cluster
  • no Fabric-Interconnects (FIs)
    • Edge-Servers connected to LAN-Switches
    • „back-to-Back“-Option for 2-Node Cluster
  • only „RF2“-redundancy


Cisco HyperFlex External Storage

Use-Case

Investment-Protection

VM-Migration

Fibre-Channel


Ethernet

iSCSI

FCoE

FC-Setup

VSAN

WWNN/WWPN-Pool

vHBA templates

FC-SAN Zoning / LUN-Masking

  • FC-Switch
  • Directly connected FC-Storage supported
    • zoning within UCS-FI

HyperFlex SAN Connectivity Policy

iSCSI Setup

VLAN

MAC-Pool/vNIC-Template(s)

HyperFlex LAN-Connectivity Policy


Provision a Cisco CSR1000V-Router as Virtual-Box-VM with sliptreamed Configuration, wait until it’s up and open an Putty-SSH-Connection

The existing Windows-Comman-Script has been enhanced so it now

  • waits until the Router-VM is up
  • got an IP-Address assigned using DHCP.

For Demonstration-Purposes an SSH-Connection will be established.

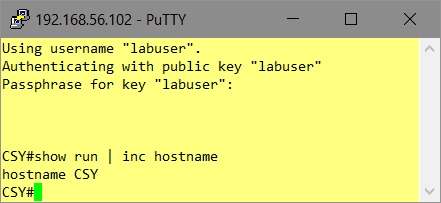
  • The public-key of my laptop-ssh-client is part of the slipstreamed Router-Configuration.

Deploy a Router-VM with hostname „CSY“.

C:\RH\work\entwicklung\csr1000v-provision-in-virtualbox>CSR1000v-Virtual-Box.cmd CSY
Virtual machine 'CSY' is created and registered.
UUID: 915a7495-0728-4fc5-9c4c-21b3106a07e5
Settings file: 'c:\RH\LAB\VM\CSY\CSY.vbox'
Creating ISO image at c:\RH\LAB\VM\CSY\CSY_config.iso, 1 Files, Size: 8,00 KB
100%
0%...10%...20%...30%...40%...50%...60%...70%...80%...90%...100%
Medium created. UUID: b79d708a-0a0a-4866-853b-3ac45c6a6127
Waiting for VM "CSY" to power on...
VM "CSY" has been successfully started.
Waiting for VM "CSY" to be initialized...
Router "CSY" up and running, using IP=192.168.56.102
Establishing SSH-Connection as "labuser"
Done

Establish an SSH-Connection to the discovered Router-IP:

Have a look to the startup-config used:

This is the „CMD“-Script used:

@echo off

: Ronald Heitmann

:set VM=CSR1000vX
:set /p VM="Enter CSR1000v Hostname:"
: Parameter given? Use it as VM-Name
set VM=%1
if not defined VM set /p VM="Enter CSR1000v Hostname:"

:echo %VM%

set PUTTYUSER=labuser
set PUTTYPK=C:\RH\work\putty\labuser.ppk


set BASE=c:\RH\LAB\VM

set ISO=C:\Downloads\csr1000v-universalk9.16.09.0x.iso

: Create VM
:VBoxManage createvm --name %VM% --ostype "Linux_64" --basefolder %BASE% --register
VBoxManage createvm --name %VM% --ostype "Linux26_64" --basefolder %BASE% --register

:now the Path in the Filesystem to ...LOC... exists
set LOC=%BASE%\%VM%

: Create ISO containing slipstreamed config-file
: use UNXTOOLS "sed" to customize the "hostname"-Command
:
set CFGISO=%LOC%\%VM%_config.iso
set CFGSRC=C:\RH\LAB\VM\iosxe_config.txt
set CFGTXT=%LOC%\iosxe_config.txt
cat %CFGSRC% | sed "s/HOSTNAME/%VM%/g" > %CFGTXT%
"%ProgramFiles(x86)%"\CDBurnerXP\cdbxpcmd.exe --burn-data -file:%CFGTXT% -iso:%CFGISO% -format:iso

: Customize VM
VBoxManage modifyvm %VM% --memory 4096
VBoxManage modifyvm %VM% --vram 16
VBoxManage modifyvm %VM% --pae on --paravirtprovider default --hwvirtex on --nestedpaging on

: Storage
VBoxManage createhd --filename %LOC%\%VM%.vdi --size 8192
VBoxManage storagectl %VM% --name "IDE-CTL" --add ide --portcount 2 --bootable on
VBoxManage storageattach %VM% --storagectl IDE-CTL --port 0 --device 0 --type hdd --medium %LOC%\%VM%.vdi
VBoxManage storageattach %VM% --storagectl IDE-CTL --port 1 --device 0 --type dvddrive --medium %ISO%
VBoxManage storageattach %VM% --storagectl IDE-CTL --port 1 --device 1 --type dvddrive --medium %CFGISO%
VBoxManage modifyvm %VM% --boot1=dvd --boot2=disk --boot3=none --boot4=none

: Serial-Interfaces via "Pipe"
VBoxManage modifyvm %VM% --uartmode1 server \\.\pipe\%VM%
VBoxManage modifyvm %VM% --uart1 0x3f8 4
VBoxManage modifyvm %VM% --uartmode2 server \\.\pipe\%VM%_diag
VBoxManage modifyvm %VM% --uart2 0x2f8 4

: Audio
VBoxManage modifyvm %VM% --audio none

: NICs
VBoxManage modifyvm %VM% --nic1 nat --nic2 hostonly --nic3 hostonly --nic4 hostonly
VBoxManage modifyvm %VM% --nictype1 virtio --nictype2 virtio --nictype3 virtio --nictype4 virtio
VBoxManage modifyvm %VM% --nicpromisc1 allow-all --nicpromisc2 allow-all --nicpromisc3 allow-all --nicpromisc4 allow-all
VBoxManage modifyvm %VM% --hostonlyadapter2 "VirtualBox Host-Only Ethernet Adapter"
VBoxManage modifyvm %VM% --hostonlyadapter3 "VirtualBox Host-Only Ethernet Adapter"
VBoxManage modifyvm %VM% --hostonlyadapter4 "VirtualBox Host-Only Ethernet Adapter"

: Set the VM-Logo for the VirtualBox-Inventory
VBoxManage modifyvm %VM% --iconfile C:\RH\LAB\72px-Cisco_logo.svg.png

: Boot the VM, it'l reboot once to apply the running-config
VBoxManage startvm %VM% --type headless

: Wait for the VM to be fully initialized
: - with DHCP-IP-Address at "Gig 2"
: - and store this IP-Address in Variable VMIP
echo Waiting for VM "%VM%" to be initialized...
for /f %%I in ('python WaitForCDPNeighbor.py -n %VM% -c -i "VirtualBox Host-Only Ethernet Adapter" 2^> nul') do @(set VMIP=%%I)

echo Router "%VM%" up and running, using IP=%VMIP%

: Connect to Router using Putty/SSH
echo Establishing SSH-Connection as "%PUTTYUSER%"
start putty -ssh -i %PUTTYPK% %PUTTYUSER%@%VMIP%

echo Done

WaitForCDPNeighbor.py enhanced: Wait for CDP Hostname with usable connected IP-Address.

The following version adds a „-c“ option: „Connected IP-Address“-Check.

  • the script exits, when the Router-VM is up and running and has an usable IP-Address

The Script still checks all CDP-Packets received at the specified Interface:

  • If the Sender has the correct „Hostname“ it reads the CDP-Management-IP-Address announced.
  • This IP-Address has to be within the IP-Range of any connected IP-Network at the specified Interface.

So it’ll be possible to establish a SSH-Session to the router-VM.

C:\> echo %VM%
CSX

C:\> python WaitForCDPNeighbor.py -n %VM% -c -i "VirtualBox Host-Only Ethernet Adapter"
192.168.56.101
#! /usr/bin/env python

# Ronald Heitmann
#
import argparse

from scapy.all import *
load_contrib("cdp")

from netaddr import IPNetwork, IPAddress

from netifaces import AF_INET, AF_INET6, AF_LINK
import netifaces

# returns a list of all IP-Adresses bound to the specified Interface "if_name"
def get_connected(if_name):
  if_id = ""
  networks = []

  for i in ifaces.data.keys():
    iface = ifaces.data[i]
    wname = iface.data['name']
    if wname == if_name:
      if_id = i
      addresses = netifaces.ifaddresses(i)
      if AF_INET in addresses:
        for addr in netifaces.ifaddresses(i)[AF_INET]:
          #print(addr)
          ipnetwork = IPNetwork(addr["addr"]+"/"+addr["netmask"]).cidr
          networks.append(ipnetwork)
  #print(networks)
  return networks

# checks, if the IP-Address "ip" is within the subnet-range of any network contained in the list "networks"

def is_IP_connected(ip, networks):
  found = False
  ipnetwork = IPNetwork(ip).cidr

  for n in networks:
    if (ipnetwork in n):
      found = True

  return found

  
def main():

    # Parse CLI-Arguments
    parser = argparse.ArgumentParser(description='Wait for a CDP-Neighbor.')
    parser.add_argument("-i", "--interface", help="monitored interface", default="VirtualBox Host-Only Ethernet Adapter")
    parser.add_argument("-n", "--hostname", help="Neighbor to wait for", required=True)
    parser.add_argument("-c", "--connected", help="wait, until CDP-Neighbor announces an directly-connected IP-Address", action='store_true')
    args = parser.parse_args()

    #looking for a specific hostname
    #
    hostname = ""
    wait_for_hostname = args.hostname

    #watching for CDP-Packets from this host on a specific interface
    #the router-IP should use a directly-connected IP-Address
    ip = "0.0.0.0"
    wait_for_connected = args.connected
    
    interface=args.interface
    networks = get_connected(interface)
    #print(networks) 

    #CDP
    capturefilter="ether dst 01:00:0c:cc:cc:cc"

    while not((hostname == wait_for_hostname) and (not(wait_for_connected) or is_IP_connected(ip,networks))):
      p=sniff(iface=interface, count=1, filter=capturefilter)
      pkt=p[0]
      #print("Packet received",pkt.show())

      #is this a CDP-Packet containing a hostname?
      if (CDPMsgDeviceID in pkt):
        #is this the CDP-Neighbor we're looking for?
        device=pkt["CDPMsgDeviceID"].val.decode()
        hostname=device.split(".")[0]
        #print("Hostname:",hostname)

        if (hostname == wait_for_hostname):
          #is this a CDP-Packet containing a management-IP-Address?
          if (CDPAddrRecordIPv4 in pkt):
            ip=pkt["CDPAddrRecordIPv4"].addr
            #print("IP-Address found:",ip)

    #return the IP-Address to the calling application or the CLI
    return ip

if __name__ == "__main__":
    print(main())